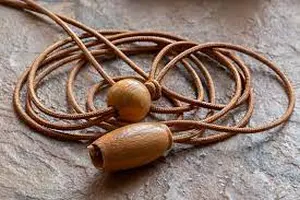
Untangling a necklace can be a frustrating task, but with a little patience and the right techniques, you can get it done quickly and easily.
Here are some tips to help you untangle your necklace and keep it looking great.
First, gather all the tools you will need. You will need a pair of scissors, a pair of tweezers, and a small bowl or cup. Fill the bowl or cup with warm water and add a small amount of mild detergent.
Crédit : pxhere.com
Next, lay your necklace out on a flat surface. If it is very tangled, you may need to gently pull it apart with your fingers. Be careful not to pull too hard, as this can cause the necklace to break.
Once the necklace is laid out, use the tweezers to gently pull out any knots or tangles. Be sure to work slowly and carefully, as you don’t want to damage it.
Work slowly and carefully
If the necklace is still tangled, you can try soaking it in the warm water and detergent mixture for a few minutes. This can help to loosen any knots or tangles. Be sure to rinse it thoroughly and dry it with a soft cloth before storing it.
Another technique you can use to untangle your necklace is to place it in a plastic bag and put it in the freezer for a few hours. The cold temperature can help to shrink the knots and make them easier to untangle. Once removed from the freezer, let it sit for a few minutes to thaw before working on it.
You can also use a plastic yarn needle to gently work through the knots. Use the needle to gently push through the knots and loosen them. Be sure to work slowly and carefully, as you don’t want to damage the necklace.
If all else fails, you can always take it to a jeweler for professional cleaning and untangling. They have the tools and expertise to safely untangle your necklace without causing any damage.
In conclusion, untangling a necklace can be challenging but it is often easier that it looks. Remember to work slowly and carefully, and to use the right tools for the job. With a little care and attention, your necklace will be looking great in no time.
A swing shift is a work schedule that falls outside of the traditional 9-5 work day.
Swing shift typically refers to a schedule that starts in the afternoon and goes into the late night or early morning.
The hours of a swing shift can vary, but it is common for it to be from 2pm to 10pm or 3pm to 11pm. Some swing shifts may also start as early as 1pm or go as late as midnight. It is also possible to include overnight hours, such as from 10pm to 6am.
Credit : Hideya HAMANO
One of the main characteristics of a swing shift is that it changes from day to day. For example, an employee may work one day and then have a day off the next. This type of schedule is known as a “rotating shift.” Another common type of swing shift is one where the employee works a set number of days in a row. For example such as three 12-hour shifts, and then has a set number of days off.
Swing shifts are often used in industries that need to have coverage 24 hours a day, such as hospitals, manufacturing plants, and police departments. They can also be found in customer service and other industries where there is a need for extended hours of operation.
Pros and cons
There are both pros and cons to working a swing shift. One advantage is that it can allow for a better work-life balance, as the employee may have more time off during the week to pursue personal interests or spend time with family. Another benefit is that workers may receive a higher pay rate due to the unconventional hours.
However, there can also be negative impacts on the health and well-being of swing shift workers. The changing schedule can disrupt the body’s natural sleep patterns and lead to difficulty sleeping, fatigue, and decreased productivity. It can also be more difficult for workers to maintain social connections. It can be also hard to participate in activities that take place during traditional working hours.
Despite these challenges, many people enjoy working a swing shift because it allows them to have a more flexible schedule. They may prefer to work during the evening or overnight hours because it allows them to have the daytime hours free for other activities.
Overall, a swing shift is a work schedule that takes place during the evening and overnight hours and can be challenging for workers due to the impact on sleep patterns and potential health risks. However, it can also offer a more flexible schedule for those who prefer to work during non-traditional hours
A dream catcher is a traditional Native American spiritual tool.
It is believed to protect the owner from bad dreams and nightmares.
What does a dream catcher do ?
Credit : Hans Splinter
The dream catcher is typically made of a circle of willow branches, with a web of sinew or cord woven inside. There are often feathers and beads attached to the dream catcher as well. Some people believe that it filters out all bad dreams, allowing only good thoughts to enter the mind.
Others believe that the dream catcher captures bad dreams and holds onto them until they disappear in the morning light. Whatever the specific belief, dream catchers are widely seen as a symbol of protection and good fortune.
Many people hang dream catchers in their homes or near their beds to help them sleep peacefully and have positive dreams.
How to make a dream catcher ?
Here is a step-by-step guide on how to make your own dream catcher:
Gather your materials. You will need a hoop, which can be made of metal, wood, or even plastic. You will also need some string or cord, feathers, and beads.
Tie the string around the hoop to create a web. Start by tying the string to the top of the hoop, and then continue wrapping it around the hoop in a spiral pattern until you reach the bottom.
Add the feathers. Tie the feathers to the bottom of the hoop, or to the strings of the web. You can use any type of feather, but traditionally, dream catchers are made with feathers from a hawk, eagle, or other bird of prey.
Add the beads. Tie the beads onto the strings of the web, or onto the feathers. You can use any type of bead, but glass beads are traditional.
Hang your dream catcher. You can hang it in your bedroom, near a window, or in any other place where you want to catch bad dreams. As the wind blows through it, it is believed to filter out the bad dreams and allow only good dreams to pass through.
Dream catchers are fun and easy to make, and they make great gifts. You can customize your dream catcher by using different types of hoops, strings, feathers, and beads. Just let your creativity flow, and you’ll have a beautiful and unique object in no time.
Where to hang a dream catcher ?
There are many places where you can hang a dream catcher. The most common place is above the bed. This is believed to protect you while you sleep and catch any negative dreams that may come your way.
Another great place to hang this item is in the living room. This can serve as a decorative piece and also provide some positive energy for the entire home.
You can also hang it in your office or workspace. This can help to create a positive and peaceful atmosphere while you work.
If you have a meditation space or yoga studio, hanging a dream catcher can add to the peaceful and calming atmosphere.
Another popular place to hang this object is in a baby’s nursery. It is believed to protect the child while they sleep and bring good dreams their way.
Some people like to hang dream catchers in their car or on their rearview mirror. This can bring some positive energy while you are driving and also serve as a reminder to stay focused on your dreams and goals.
Dream catchers can also be hung in outdoor spaces such as a patio or garden. This can create a peaceful and serene atmosphere for relaxation and contemplation.
No matter where you choose to hang it, it is important to find a place that feels special and meaningful to you. Whether it is in your bedroom, living room, or even your car, a dream catcher can bring positive energy and good dreams your way.
How to clean a dream catcher ?
Cleaning a dream catcher is a simple process that only requires a few materials and steps. Here’s how to do it:
First, gather your supplies. You will need a feather duster, a soft cloth, and some mild soap or cleaning solution.
Begin by dusting off the dream catcher with the feather duster. This will remove any loose dirt or debris from the surface.
Next, dampen the soft cloth with some mild soap or cleaning solution. Gently wipe down the dream catcher, being careful not to get the feathers or beads too wet.
Once the object is clean, use a dry cloth to wipe away any excess moisture.
Allow it to air dry completely before hanging it back up.
If the dream catcher is particularly dirty or has a lot of built-up grime, you may need to repeat the process a few times or use a more heavy-duty cleaning solution.
It’s important to handle this item with care while cleaning it, as the feathers and beads can be easily damaged. Avoid using harsh chemicals or scrubbing too aggressively.
To keep your dream catcher looking its best, try to dust it off regularly and give it a thorough cleaning at least once a month.
With proper care, it should stay clean and beautiful for many years to come.
Conclusion
A dream catcher is an object that is filled with meaning and symbolism. Whether it is used as a decorative item or as a way to protect oneself from bad dreams, it remains an important and enduring cultural icon. It has become a popular decorative item in many homes around the world. It is often used as a way to add a touch of whimsy or mystery to a room, and is a popular choice for children’s rooms and nurseries.
As Valentine’s Day approaches, many people may be considering asking someone special to be their valentine.
Asking someone to be your valentine can be stressful, but it doesn’t have to be. Here are some tips for making this important request:
Plan ahead. Don’t wait until the last minute to ask someone to be your valentine. Think about what you want to say and how you want to say it. Consider the person’s interests and preferences, and plan accordingly.
Choose the right time and place. Asking someone to be your valentine is an intimate and personal request, so it’s important to choose a time and place that is private and comfortable for both of you.
Be sincere. When you ask someone to be your valentine, be genuine and honest about your feelings. Avoid using clichés or rehearsed lines, and speak from the heart.
Keep it simple. There’s no need to go over the top or make a grand gesture. A simple, heartfelt request can be just as meaningful.
Be prepared for a variety of responses. It’s important to remember that not everyone may feel the same way you do. Be prepared for the possibility of rejection, and try to handle it gracefully. If the person says no, respect their decision and move on.
Don’t pressure the person. Asking someone to be your valentine should be a joyful and positive experience, not a source of stress or pressure. Make it clear that you respect their decision and that you will still be friends, regardless of their answer.
Have fun! Valentine’s Day is a time to celebrate love and affection, so make the most of it. Whether you’re asking someone to be your valentine or simply spending time with loved ones, make sure to enjoy yourself and have a good time.
In conclusion, asking someone to be your valentine can be a nerve-wracking experience, but with a little planning and a lot of sincerity, it can also be a joyful and memorable moment.
By considering the person’s interests and preferences, choosing the right time and place, and being prepared for a variety of responses, you can make this special request with confidence and grace.
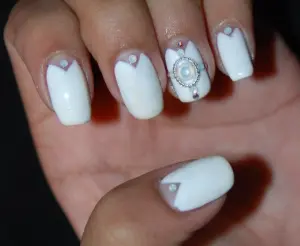
White nail polish has been a staple in the fashion world for decades. But many people are unsure of its significance.
whitenail polish has long been associated with purity and innocence. It is a color that is often associated with brides on their wedding day. So it is often seen as a symbol of fresh beginnings and new beginnings.
But beyond its association with weddings and innocence, white nail polish can also be seen as a symbol of power and strength. In recent years, white has become a popular color for women. It is a color that is bold and confident. It can be a great choice for women who want to show off their strong and powerful personalities.
oneof the reasons why it has become so popular among women is because it is a very versatile color. It can be worn with almost any outfit, and it can be dressed up or down depending on the occasion. This versatility makes it a great choice for women who want to make a statement with their nail polish, without having to worry about matching their outfit.
Purity, power, and sophistication
White nail polish can also be seen as a symbol of sophistication and elegance. It is a color that is often associated with high-end fashion and luxury. It can be a great choice for women who want to add a touch of glamour to their look.
In addition to its association with purity, power, and sophistication, white nail polish can also be seen as a symbol of confidence and self-assurance. It is a color that is often associated with women who are strong and independent. For example, women who are not afraid to make their own decisions and take charge of their own lives.
Overall, white nail polish is a versatile and powerful color that can be worn by women of all ages and styles. Whether you want to show off your innocence, your power, or your sophistication, white nail polish is a great choice. It that can help you make a statement with your nails.
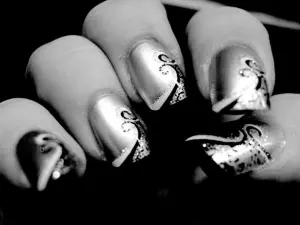
Nail glue is a convenient and quick way to apply fake nails, but sometimes it can get on the skin surrounding the nail. Here are some tips on how to get nail glue off skin
Nail glue is a great tool for keeping artificial nails in place. But it can be a nightmare to remove from skin. If you’ve found yourself with dried glue stuck to your fingers, don’t worry. There are a few simple steps you can follow to get rid of it quickly and easily.
First, it’s important to avoid picking at the glue. This can cause irritation and can even lead to infection if the skin is damaged. Instead, try soaking the affected area in warm water for several minutes. This will help to loosen the glue and make it easier to remove.
If the glue is still stubbornly stuck, you can try using a mild soap or oil to help break it down. oliveoil, coconut oil, and baby oil all work well for this purpose. Simply apply a small amount to the affected area and gently massage it in. This will help to loosen the glue and make it easier to remove.
If you’re still struggling to get the glue off, you can try using a nail polish remover. Be sure to use a non-acetone remover, as acetone can be harsh on the skin and can cause irritation. Apply a small amount of remover to a cotton pad or cotton ball and gently dab it onto the glue. This will help to dissolve the glue and make it easier to remove.
Once you’ve removed as much of the glue as possible, it’s important to moisturize the skin to help prevent dryness and irritation. You can use a gentle moisturizer or lotion. You can also try using a natural oil like almond or jojoba oil. This will help to soothe the skin and keep it looking and feeling healthy.
In conclusion, removing nail glue from skin can be a frustrating experience, but it doesn’t have to be. By following these simple steps, you can easily get rid of the glue and keep your skin looking and feeling healthy. Remember to avoid picking at the glue, use warm water and mild soap or oil to loosen it, and use a non-acetone nail polish remover if necessary. And don’t forget to moisturize the skin afterwards to help prevent dryness and irritation.
Getting gum out of clothes can be a frustrating and tedious task. Here is a simple way to do it.
Gum is one of those sticky substances that can be incredibly frustrating to remove from clothes. Not only is it sticky and messy, but it can also leave a stain if not treated properly. However, there are a few simple methods that can help remove it from clothing quickly and easily.
One method to remove gum from clothing is to place the affected area in a plastic bag and put it in the freezer for a few hours. This will cause it to harden and become brittle, making it easier to remove. Once the gum is hard, use a butter knife or other hard, flat object to gently scrape it off. Be careful not to apply too much pressure, as this can cause the fabric to tear.
Multiple methods
Another method to remove gum from clothing is to use an ice cube. Place the ice cube directly on it, and wait for a few minutes for the gum to harden. Once it is hard, use a butter knife or other hard, flat object to gently scrape it off. This method is best for removing small amounts from clothing.
If the gum is particularly stubborn, you can try using a solvent. There are several solvents that can be used to remove it from clothing, including rubbing alcohol, nail polish remover, or even peanut butter. Apply the solvent to a cloth and blot the gum until it begins to dissolve. Be careful not to apply too much solvent, as this can cause the fabric to fade or shrink.
Once the gum has been removed, wash the clothing in cold water using a laundry detergent. This will help remove any remaining residue and restore the fabric to its original condition. If it has left a stain, you can try using a stain remover to remove it.
In conclusion, removing gum from clothing can be a challenging task. However, by using the methods described above, you can easily remove it from your clothes without damaging the fabric. whetheryou use a plastic bag and freezer, ice cubes, or a solvent, these methods can help you get gum out of clothes quickly and easily.
Taking sexy photos can be a fun and exciting way to express your sensuality and celebrate your body. Here are some tips for taking stunning and sexy photos of yourself
Get in the mood. Take some time to pamper yourself and get in the right headspace. Put on your favorite music, light some candles, and do whatever else makes you feel sexy and confident.
Find the right lighting. Good lighting is key for taking any photo, but it’s especially important for sexy photos. Natural light is often the most flattering, so try taking your photos near a window or outdoors. But avoid harsh overhead lighting, as it can create unflattering shadows on your face and body.
Experiment with different angles. Try shooting from different angles to see what works best for your body. Play around with standing, sitting, lying down, and other poses to find the ones that flatter you the most.
Show off your best assets. Whether it’s your curves, your cleavage, or your legs, don’t be afraid to highlight the features you love the most. A little bit of skin can be very alluring, so consider showing a hint of your stomach, chest, or thighs.
Use props and accessories. Adding props and accessories to your photos can add interest and sexiness. So consider using a piece of lingerie, a scarf, or a piece of jewelry to add a little something extra to your photos.
Edit your photos. Most people aren’t perfectly symmetrical, so don’t be afraid to use photo editing tools to touch up your photos. A little bit of smoothing, whitening, or contouring can make a big difference in the final result.
Be confident. Above all, remember to be confident and have fun. The sexiest thing about any photo is the person in it, so own your body and your sexuality. You’ll look and feel amazing, and that will shine through in your photos.
In conclusion, taking sexy photos of yourself can be a fun and empowering experience. By finding the right lighting, experimenting with different angles, and showing off your best assets, you can create stunning and sensual photos that celebrate your body and your sexuality.
Don’t forget to have fun and be confident, and you’ll be sure to take amazing photos that you’ll love.