How to choose the right paint color for your front door?

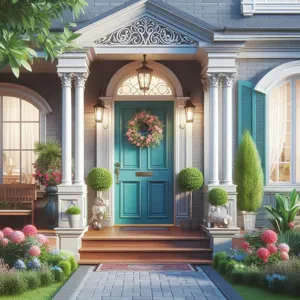
Your front door is more than just an entrance; it’s the focal point of your home and the first impression visitors receive.

Choosing the right paint color for your front door can significantly enhance your home’s curb appeal, setting the tone for the entire exterior and reflecting your personal style. With a myriad of colors and finishes available, selecting the perfect hue can be both exciting and overwhelming. From vibrant reds that exude warmth and welcome to serene blues that evoke tranquility, each color carries its unique charm and message. In this guide, we will explore the art of selecting the ideal paint color for your front door, considering factors such as architectural style, neighborhood aesthetics, and your own personality. Get ready to transform your entryway into a stunning statement that captivates and invites, because unlocking curb appeal starts right at your front door!

1. Understanding Curb Appeal: Why Your Front Door Matters

How to choose the right paint color for your front door?
Credit : whatcanu.com

When it comes to enhancing the overall aesthetic of your home, the front door is often an overlooked hero. Curb appeal is the first impression your home makes on visitors and passersby, and your front door plays a pivotal role in shaping that impression. It’s not just an entry point; it’s a statement piece that can reflect your personal style, set the tone for your home’s design, and invite warmth and welcome.

Think about it: Your front door is the focal point of your exterior. It’s the gateway to your sanctuary, and its color can evoke emotions, convey character, and even boost your home’s value. A well-chosen paint color can transform a mundane entryway into a lively, inviting space that draws in the eye and sparks curiosity. Whether you’re aiming for a classic, sophisticated look with deep navy or a cheerful pop with vibrant yellow, the color you choose can tell a story about your home.

Additionally, a thoughtfully painted front door can help unify your home’s exterior. If your home has a traditional brick facade, a rich forest green or burgundy can complement the earthy tones beautifully. Conversely, a sleek modern home may benefit from a bold and unexpected hue, such as a striking coral or a sleek black, to create a contrast that speaks to contemporary design.

Understanding curb appeal means recognizing that every detail counts. A freshly painted front door not only enhances the visual appeal of your home but also communicates care and attention to detail. In neighborhoods where homes are closely situated, a vibrant front door can make yours stand out, inviting compliments from neighbors and increasing the likelihood of potential buyers taking notice should you ever decide to sell.

In essence, your front door is more than just an entrance; it’s a canvas for expression and a critical component of your home’s first impression. By investing time and thought into choosing the perfect paint color, you can unlock the full potential of your curb appeal, transforming ordinary entrances into extraordinary welcomes.

2. Factors to Consider When Choosing a Paint Color

Choosing the perfect paint color for your front door is more than just a matter of personal preference; it’s about understanding the various factors that can significantly influence your selection. Here are some critical elements to consider as you embark on this colorful journey:

**1. Architectural Style:** The design of your home plays a significant role in determining which colors work best. A modern home with clean lines may benefit from bold, contemporary colors like deep navy or vibrant red, while a quaint cottage might look more charming with softer hues such as pastel blue or sage green. Take a moment to examine your property’s architectural details; they can guide you toward a color palette that enhances the overall aesthetic.

**2. Neighborhood Trends:** Consider the colors of neighboring houses. While you want your home to stand out, you also want it to harmonize with its surroundings. Take a leisurely stroll through your neighborhood or drive around to capture the color schemes of nearby homes. This can provide inspiration and help you avoid a decision that may clash with the overall vibe of your community.

**3. Existing Elements:** Take stock of existing features such as siding, roofing, and landscaping. The front door color should complement these elements rather than compete with them. For instance, if your home has warm beige siding, a cool-toned door might look out of place. Aim for a cohesive look by selecting a color that enhances or contrasts beautifully with your home’s exterior.

**4. Psychological Impact:** Colors evoke emotions and can influence perceptions. A cheerful yellow can project warmth and friendliness, while a deep green may evoke a sense of tranquility and nature. Think about the message you want to convey to visitors and passersby. For a bold statement that exudes confidence, opt for a striking red or a sophisticated black.

**5. Climate Considerations:** Local climate can also affect your choice. In sunny areas, lighter colors may fade quickly, while darker colors can absorb heat and become overly hot. Conversely, in cooler climates, a warm color can create a welcoming feel. Consider how the weather will influence the longevity of your paint job and how often you might need to refresh it.

**6. Personal Style:** Finally, never underestimate the power of personal preference. Your front door is a canvas – a reflection of your personality and style. Whether you lean towards vibrant and adventurous or prefer a classic and understated look, your choice should ultimately resonate with who you are.

By weighing these factors carefully, you’ll find that the perfect paint color for your front door is not just a choice; it’s an opportunity to enhance your home’s curb appeal and express your unique style. Take your time, test samples, and envision how each color will complement your home’s overall look before making a final decision.

3. Analyzing Your Home’s Style and Architecture

How to choose the right paint color for your front door?
Credit : whatcanu.com

When it comes to choosing the perfect paint color for your front door, understanding your home’s style and architecture is crucial. Your front door serves as a focal point and sets the tone for your entire property; therefore, it should harmonize with the overall aesthetic of your home.

Begin by taking a step back and analyzing the architectural features of your house. Is it a charming cottage with rustic details, a sleek modern design with clean lines, or perhaps a classic Victorian with intricate embellishments? Each style has its own character, and the right color can accentuate these features beautifully. For instance, a bold red or navy blue can add a touch of drama to a contemporary home, while softer, muted tones like sage green or buttery yellow might be more appropriate for a quaint farmhouse.

Consider also the materials used in your home’s facade. If you have natural stone or brick, selecting a door color that complements these elements can create a cohesive look. Earthy tones can enhance the organic appeal, while a contrasting color can offer a striking visual impact. Additionally, take note of any existing trim or window frames; your door color should work in tandem with these accents to create a unified appearance.

Don’t forget about the surrounding landscape as well. The colors of your plants, flowers, and any outdoor furniture can influence how your door color is perceived. A vibrant turquoise door might pop against a backdrop of lush greenery, while a deep burgundy could provide a stunning contrast to white or pastel blooms.

Ultimately, the key is to choose a paint color that not only aligns with your home’s architectural style but also reflects your personal taste. Remember, your front door is an invitation to your home—make sure it welcomes guests with warmth and charm while enhancing the overall curb appeal of your property.

4. The Psychology of Color: What Different Colors Convey

Choosing the right color for your front door is not just about aesthetics; it’s also about the profound psychological effects that colors can have on our emotions and perceptions. Understanding the psychology of color can guide you in selecting a hue that not only enhances your home’s curb appeal but also communicates the right message to visitors and passersby.

**Red** is a bold choice that exudes energy and passion. It’s often associated with warmth and excitement, making it an ideal color for those who want to draw attention and create a welcoming atmosphere. A red front door can signify a sense of adventure and boldness, inviting guests to step inside and experience the vibrancy of your home.

**Blue**, on the other hand, conveys tranquility and trust. A light blue or soft seafoam can evoke feelings of calmness and serenity, while a deeper navy can suggest stability and reliability. Painting your front door blue can create a sense of peace, making your home feel like a sanctuary amidst the chaos of the outside world.

**Yellow** is the color of sunshine and happiness. A cheerful yellow door can brighten up your home’s exterior and evoke feelings of warmth and friendliness. It’s an inviting color that can make your home feel approachable, perfect for those who want to create a welcoming vibe.

**Green** symbolizes nature, renewal, and growth. A green door can bring a sense of harmony and balance to your home’s facade. Depending on the shade, it can convey a connection to the environment, making it a great choice for eco-conscious homeowners or those living in leafy neighborhoods.

**Black** embodies sophistication and elegance. A sleek black door can make a powerful statement, suggesting strength and formality. It’s a versatile choice that pairs beautifully with a range of exterior styles, from traditional to modern, and can add a touch of luxury to your home’s entrance.

**White** is the epitome of simplicity and purity. A white front door can symbolize cleanliness and openness, projecting a sense of peace and tranquility. It works well in various architectural styles and can create a fresh, airy feel, making it an excellent choice for coastal or minimalist homes.

As you consider these colors, think about the message you want to convey and how you want to make people feel as they approach your home. The right front door color can not only elevate your home’s curb appeal but also set the tone for what lies beyond. Embrace the psychology of color and choose a hue that reflects your personality while enhancing your home’s overall aesthetic.

5. Popular Front Door Colors and Their Meanings

How to choose the right paint color for your front door?
Credit : whatcanu.com

Choosing the right color for your front door is more than just a matter of aesthetics; it’s a reflection of your personality and an expression of your home’s character. different colors evoke various feelings and associations, and understanding these can help you unlock the full potential of your curb appeal. Here’s a look at some of the most popular front door colors and their meanings:

**1. Classic Red:** A timeless choice, red is often associated with warmth, comfort, and love. It exudes confidence and draws the eye, making it an ideal color for those who want to make a bold statement. Historically, a red door symbolizes a welcoming home, so it’s perfect for creating an inviting atmosphere.

**2. Tranquil Blue:** Shades of blue, particularly softer tones like sky blue or powder blue, evoke feelings of tranquility and serenity. This color is associated with trust and stability, making it an excellent choice for coastal or suburban homes. A blue door can serve as a soothing contrast against natural greenery.

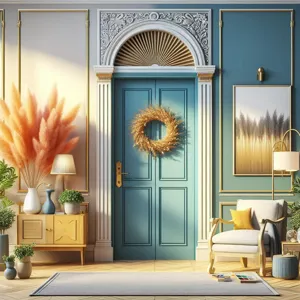
**3. Elegant Black:** A black front door signifies sophistication and elegance. It’s a choice that conveys strength and authority, often found in modern or traditional homes alike. Black doors work well with a variety of architectural styles and can add a touch of drama and refinement to your entryway.

**4. Cheerful Yellow:** Bright and inviting, yellow is a color that embodies positivity and happiness. A cheerful yellow door can instantly uplift the mood of your home, making it a perfect choice for those who want to convey a sense of friendliness and approachability. It’s a popular option for beach houses or homes in sunny climates.

**5. Earthy Green:** Green is synonymous with nature and renewal. A muted sage or deep forest green can create a calming effect, while also blending seamlessly with outdoor landscaping. This color choice can suggest a love for the environment and a desire for harmony, making it an excellent option for eco-conscious homeowners.

**6. Crisp White:** A classic white door offers a clean, fresh look that never goes out of style. It symbolizes purity and simplicity, and works beautifully with any exterior color. A white door can enhance the architectural features of your home while providing a timeless appeal.

By understanding the meanings behind these popular front door colors, you can make a more informed decision that not only enhances your home’s curb appeal but also communicates the essence of who you are. Whether you opt for a bold statement or a subtle elegance, your front door color is a key element in creating a welcoming first impression.

6. Coordinating with Your Home’s Exterior Color Palette

When it comes to selecting the perfect paint color for your front door, one of the most crucial steps is to ensure it harmonizes beautifully with your home’s exterior color palette. Your front door is not just a functional element; it’s the focal point that invites guests into your home and sets the tone for your entire property. Therefore, choosing a color that complements the surrounding hues can make a significant difference in achieving that coveted curb appeal.

Begin by taking a close look at your home’s existing color scheme. Consider the primary color of your exterior walls, the roofing materials, and any trim or accents that define the structure’s character. For instance, a soft, muted beige or gray home might benefit from a bold front door color, such as deep navy or vibrant red, to create an eye-catching contrast. Conversely, if your home features a bright, cheerful facade, a more subdued or monochromatic door color, like a gentle sage or classic white, can provide a sophisticated balance.

Additionally, think about the architectural style of your home. A traditional colonial house might call for a classic black or glossy red door, while a modern minimalist home could shine with a sleek, muted color like charcoal or even a striking matte finish. Don’t forget to consider the seasonal changes in your environment as well—colors that look stunning in bright summer sunlight might appear completely different under the muted tones of winter.

To help visualize your options, create a mood board or use digital tools that allow you to experiment with different color combinations. Take photos of your home and overlay potential door colors to see how they interact with your existing palette. This strategic approach not only ensures that your front door looks inviting but also elevates your home’s overall aesthetic, making it stand out beautifully in the neighborhood. Remember, the goal is to choose a color that feels cohesive and enhances the charm of your home, ultimately creating a welcoming entry that draws people in.

7. Seasonal Considerations for Front Door Colors

How to choose the right paint color for your front door?
Credit : whatcanu.com

When it comes to choosing the perfect paint color for your front door, seasonal considerations play a crucial role in enhancing your home’s curb appeal throughout the year. Each season brings with it a unique palette of colors inspired by nature, and aligning your door’s hue with these seasonal changes can create a harmonious and inviting appearance.

In spring, when the world bursts into bloom, consider opting for pastel shades like soft pink, mint green, or buttery yellow. These colors evoke a sense of renewal and warmth, welcoming guests with the promise of new beginnings. Imagine stepping into a home with a pale lavender door framed by blossoming flowers; it sets a cheerful tone that mirrors the vibrancy of the season.

As summer arrives, bold colors can take center stage. Think bright reds, sunny yellows, or deep ocean blues that capture the essence of long, sun-drenched days. A striking navy door paired with white or bright yellow accents can create a stunning contrast, making your home stand out in the lush greenery of summer.

When autumn rolls around, rich, earthy tones become the stars of the show. Shades like burnt orange, deep burgundy, and golden mustard can complement the falling leaves and create a cozy, inviting atmosphere. A warm, chestnut-colored door can evoke images of crisp air and gatherings around a fire pit, inviting guests to come in and enjoy the warmth of your home.

In winter, cooler colors take precedence. Consider classic shades such as deep forest green or a crisp, timeless black—colors that offer a sophisticated, elegant look against a backdrop of snow or frost. A black door adorned with a festive wreath can provide a stunning focal point that captures the essence of the holiday season.

Incorporating seasonal considerations into your front door color choice not only enhances your home’s curb appeal but also reflects your personal style throughout the year. By thoughtfully selecting colors that resonate with the season, you can create a welcoming entrance that invites guests to experience the warmth and charm of your home, no matter the time of year.

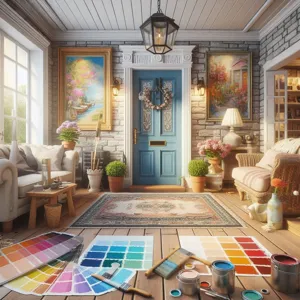
8. Testing Paint Colors: Swatches and Samples

When it comes to selecting the perfect paint color for your front door, the art of testing paint colors is an essential step that can make all the difference in achieving the aesthetic you desire. Swatches and samples are your best friends in this creative journey, allowing you to visualize how different hues will interact with your home’s exterior and the surrounding landscape.

Start by gathering a variety of paint swatches that catch your eye. Many paint stores offer fan decks or sample pots, providing a range of shades from which to choose. Once you have a selection, take the time to hold them up against your door frame or even tape them directly to the door. This initial visual comparison can help you narrow down your options before committing to larger quantities.

However, the real magic happens when you move to the next step: applying actual paint samples. Choose a few of your favorite colors and paint small sections on your door. This will allow you to see how the colors look in different lighting conditions throughout the day, as natural light can dramatically alter the perception of a color. Morning sunlight, afternoon brightness, and evening shadows can all bring out different tones in the paint, revealing undertones that may not have been visible in the store.

Additionally, consider the surroundings of your home. The color of your siding, the style of your home, and even the landscape can influence how a color appears. A vibrant red door may pop beautifully against a neutral façade but could clash with an earthy stone exterior. By testing samples on your door and observing them at various times of the day, you’ll gain valuable insight into how well the colors harmonize with your home’s overall aesthetic.

In the end, this method of testing paint colors not only builds your confidence in your choice but also ensures that your front door becomes a stunning focal point that enhances your home’s curb appeal. So take your time, experiment, and enjoy the creative process of finding that perfect shade that welcomes guests with warmth and style.

9. The Role of Finish: Matte vs. Glossy Paint

When it comes to selecting the perfect paint color for your front door, the finish you choose can be just as important as the hue itself. The debate between matte and glossy finishes may seem minor, but it plays a significant role in both aesthetic appeal and functionality.

**Matte Finish:** A matte finish offers a soft, understated look that exudes elegance and sophistication. It can create a welcoming atmosphere, especially in warmer, earthy tones like terracotta or sage green. However, while matte paint can beautifully conceal imperfections in the door’s surface, it can be less durable when it comes to withstanding the elements. Matte finishes are more prone to showing dirt and scuff marks, which means your door may require more frequent touch-ups to maintain its fresh appearance. If you opt for a matte finish, consider using it in sheltered areas or where the door won’t be exposed to heavy wear and tear.

**Glossy Finish:** On the other hand, a glossy finish radiates vibrancy and energy, making colors appear more vivid. Glossy doors often catch the eye and can create a modern, chic look, particularly in bold shades such as navy blue or bright red. Beyond aesthetics, glossy finishes are also highly durable and resistant to moisture, making them ideal for exterior doors that face harsh weather conditions. They’re easier to clean, as dirt and grime can be wiped off with a damp cloth. However, the reflective nature of glossy finishes can sometimes amplify imperfections, so it’s essential to ensure the door’s surface is in good condition before application.

Ultimately, the choice between matte and glossy finishes should align with your home’s overall style, your maintenance preferences, and the message you want your front door to convey. Whether you lean towards the subtle charm of a matte finish or the striking allure of a glossy coat, both options can significantly enhance your front door’s curb appeal and make a lasting impression on visitors.

10. Enhancing Front Door Accents: Hardware and Accessories

When it comes to making a striking impression, the right paint color for your front door is just the beginning. To truly elevate the curb appeal of your home, you must consider the accessories and hardware that complement your chosen hue. Think of these elements as the jewelry to your door’s outfit—small details that can make all the difference in creating a cohesive and inviting entrance.

Start with the door hardware: doorknobs, hinges, and knockers. Opt for finishes that resonate with your door color while also enhancing its overall aesthetic. For example, a crisp white door pops beautifully against shiny brass or polished chrome hardware, while deeper shades like navy blue or forest green create a stunning contrast with matte black or antique bronze accents. Mixing metals can also add a modern twist, but be mindful to maintain a sense of balance; too many conflicting finishes can detract from your door’s beauty.

Next, consider the addition of accessories such as door mats, wreaths, and decorative house numbers. A vibrant welcome mat can introduce a playful element that draws the eye while also providing functionality. Seasonal wreaths, whether made from fresh blooms or durable faux materials, offer a personal touch and can be easily swapped out to reflect the changing seasons or your mood.

Don’t forget about lighting! Wall sconces or pendant lights flanking your door not only provide practical illumination but also frame the entrance, adding depth and warmth to your home’s exterior. Choose fixtures that coordinate with your door’s style—sleek and modern for contemporary homes, or ornate and vintage for more traditional aesthetics.

By thoughtfully enhancing your front door with complementary hardware and accessories, you create a welcoming atmosphere that invites guests in and leaves a lasting impression. Remember, the front door is the focal point of your home’s facade; treat it as the canvas that deserves attention to detail and a touch of personality.

11. Maintenance Tips for Keeping Your Front Door Color Fresh

Once you’ve chosen the perfect paint color for your front door, the next step is ensuring it remains vibrant and inviting for years to come. Regular maintenance is essential for preserving the aesthetic appeal of your door and protecting it from the elements. Here are some practical tips to keep your front door looking fresh and welcoming:

**1. Regular Cleaning:** Dust, dirt, and grime can accumulate on your front door, dulling its vibrancy. Make it a habit to wipe down your door every few weeks with a soft cloth and a gentle soap solution. For painted surfaces, avoid harsh chemicals that can strip the paint; instead, opt for mild detergents that won’t compromise the finish.

**2. Inspect for Damage:** Periodically check your door for any signs of wear and tear, such as peeling paint, scratches, or dents. Early detection allows you to address these issues before they escalate. If you notice any problems, consider touching up the paint or making minor repairs to maintain the door’s integrity.

**3. Repaint When Necessary:** Depending on your local climate and the quality of the paint used, you may need to repaint your door every few years. Signs that it’s time for a refresh include noticeable fading, chipping, or if the door begins to look dull. Repainting not only revives the color but also fortifies the surface against weather-related damage.

**4. Protect from the Elements:** If your front door is exposed to harsh sunlight or extreme weather conditions, consider using a sealant or protective coat. These products can help shield the paint from UV rays, moisture, and other environmental factors that can cause fading or deterioration.

**5. Seasonal Touch-Ups:** Changes in seasons can impact the appearance of your door. Take advantage of the spring and fall to give it a little extra love with a thorough cleaning and inspection. This seasonal maintenance not only keeps your door looking its best but also prepares it for the harsher weather ahead.

By following these maintenance tips, you can ensure that your front door remains a stunning focal point that enhances your home’s curb appeal. A well-maintained door not only invites guests in but also reflects the care and attention you put into your home’s overall appearance.

12. DIY vs. Professional Painting: What You Need to Know

When it comes to painting your front door, you may find yourself at a crossroads: should you tackle the project as a DIY endeavor, or is it best to enlist the expertise of a professional? Both options come with their own set of advantages and considerations that can significantly impact the outcome of your curb appeal transformation.

**DIY Painting: The Joy of Personal Touch**

Opting for a DIY approach can be incredibly rewarding. It allows you to infuse your personal style into the project, and there’s a certain satisfaction that comes from completing a task with your own hands. Before diving in, however, it’s essential to do your homework. Research the best types of paint for exterior surfaces, and make sure to choose a high-quality primer that will ensure the longevity of your work. Additionally, invest in proper tools—brushes, rollers, and painter’s tape—to achieve a clean and professional finish.

The DIY route also provides flexibility. You can work on your own schedule, take breaks when needed, and experiment with different colors and techniques without the pressure of a deadline. However, be prepared for the possibility of additional time commitment, especially if you’re new to painting.

**Professional Painting: Expertise at Your Service**

On the other hand, hiring a professional painter brings a different set of benefits to the table. With their experience, they can navigate color choices and application techniques that you may not consider, ensuring a flawless finish. Professionals also come equipped with high-quality tools and materials, and they are skilled at preparing surfaces to prevent issues like peeling or chipping down the line.

While the cost of hiring a pro may be higher upfront, the investment can pay off in durability and aesthetic appeal. Moreover, a professional can often complete the job in less time, allowing you to enjoy your newly painted front door sooner rather than later.

**Making the Choice**

Ultimately, the decision between DIY and professional painting hinges on your budget, time, and comfort level with home improvement tasks. If you’re confident in your abilities and eager for a hands-on project, a DIY approach could be perfect for you. However, if you prefer a polished look without the stress, hiring a professional might be the way to go. Whichever path you choose, the end goal remains the same: a beautiful front door that enhances your home’s curb appeal and welcomes guests with warmth and style.

13. Eco-Friendly Paint Options for the Environmentally Conscious

As the movement towards sustainability continues to grow, many homeowners are seeking eco-friendly options that align with their values while enhancing their home’s curb appeal. When selecting a paint color for your front door, consider opting for environmentally conscious paint products that minimize harmful chemicals and promote better air quality both inside and outside your home.

Eco-friendly paints, often labeled as low-VOC (volatile organic compounds) or zero-VOC, reduce the release of toxic fumes and are safer for your family and pets. These paints offer a range of beautiful colors, allowing you to choose shades that reflect your personal style while being gentle on the planet. Popular eco-friendly brands are now creating vibrant color palettes, from deep navy blues to sunny yellows, ensuring that you don’t have to compromise on aesthetics for sustainability.

Beyond the color itself, look for paints that are made from natural materials, such as plant-based oils and minerals, which not only reduce environmental impact but also provide a unique depth to the finish. These paints are often more durable as well, requiring fewer coats and less maintenance over time—perfect for homeowners who want to make a stylish statement without frequent touch-ups.

Additionally, consider the environmental impact of your choice by checking for certifications like Green Seal or the Environmental Protection Agency’s Safer Choice label. These certifications indicate that the product meets strict environmental standards, ensuring that your choice contributes to a healthier planet.

By choosing eco-friendly paint options for your front door, you can unlock a new level of curb appeal while making a positive impact on the environment. Not only will your door stand out with its fresh, vibrant color, but it will also reflect your commitment to sustainable living, inviting friends and neighbors to admire both your home and your values.

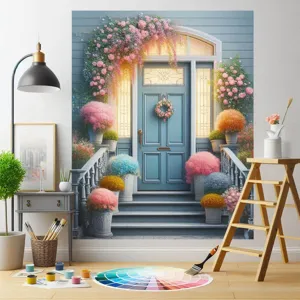
14. Real-Life Examples: Inspiring Front Door Transformations

When it comes to front door transformations, real-life examples can provide not only inspiration but also practical insights into what works and what doesn’t. Take, for instance, the charming yellow door of a quaint cottage in a suburban neighborhood. This vibrant hue instantly brightens the facade, creating a welcoming atmosphere that beckons guests and passersby alike. The homeowners chose a soft butter yellow, which harmonizes beautifully with their muted gray siding and white trim. The result? A cheerful entryway that radiates warmth and positivity.

Another striking example can be found in a more modern setting, where a sleek navy blue door serves as a stunning contrast against warm beige brick. The deep, rich color adds a touch of sophistication and elegance while seamlessly fitting into the contemporary aesthetic of the home. Accented by polished brass hardware, this door not only draws the eye but also elevates the overall curb appeal of the property.

For those leaning towards a more rustic vibe, consider the transformation of a traditional farmhouse with a bold red door. This choice pays homage to classic design while adding a pop of color that stands out against the natural wood and earthy tones of the home. The red door, adorned with a simple wreath, invites visitors with a sense of nostalgia and charm.

These examples illustrate that choosing the right paint color for your front door is more than just a cosmetic update; it’s an opportunity to express your personal style and enhance the overall aesthetic of your home. Whether you opt for a bold statement color or a more subdued tone, the key is to ensure that it complements the surrounding elements and reflects the character of your home. With a little creativity and inspiration from these transformations, you can unlock the full potential of your front door and boost your home’s curb appeal.

15. Final Thoughts: Choosing a Color That Reflects Your Personality

Choosing the perfect paint color for your front door is not just a matter of aesthetics; it’s a reflection of who you are and the welcoming atmosphere you wish to create. As you stand before the daunting array of colors, think about what each hue conveys. A vibrant red door speaks volumes of energy and passion, while a serene blue invokes calmness and tranquility.

Consider the overall style of your home and the surrounding landscape. Is it a modern minimalist abode or a charming cottage? The door color should harmonize with the architecture, enhancing its character rather than clashing with it. Don’t hesitate to draw inspiration from your favorite colors, artwork, or even the seasons. A sunny yellow might evoke feelings of warmth and cheer, while an earthy green can express a connection to nature.

Moreover, your door serves as the first impression for visitors and passersby, so think about the emotions you want to evoke. A classic black door symbolizes elegance and sophistication, while a playful orange invites a sense of fun and creativity.

Ultimately, the best color is one that resonates with you personally. It should make your heart smile every time you come home. Take your time, gather samples, and visualize how different shades will appear at various times of the day. Remember, this is not merely a paint choice; it’s an opportunity to express your individuality and create a welcoming entryway that invites warmth and connection into your home. So go ahead, embrace your creativity, and let your front door become a reflection of your unique personality.

In conclusion, choosing the perfect paint color for your front door is a powerful way to enhance your home’s curb appeal and create a welcoming atmosphere. By considering factors such as your home’s architectural style, the surrounding landscape, and your personal taste, you can select a color that not only stands out but also complements your overall aesthetic. Whether you opt for a bold hue that makes a statement or a soft shade that exudes charm, remember that your front door is the first impression visitors will have of your home. We hope this guide has inspired you to embark on your painting project with confidence and creativity. Transform your entryway into a reflection of your style, and watch as your home radiates warmth and character. Happy painting!

What are the different types of shower doors?

Choosing the right shower door is more than just a matter of aesthetics; it’s a crucial element in enhancing both the functionality and style of your bathroom.

With an array of options available, from sleek frameless designs to traditional sliding doors, each type offers its own unique benefits that can transform your daily bathing experience. Whether you’re aiming for a modern, open feel or seeking a solution that maximizes space in a smaller bathroom, understanding the various styles and their advantages is essential. In this comprehensive guide, we’ll delve into the different types of shower doors, explore their pros and cons, and help you make an informed decision that aligns with your personal taste and practical needs. Get ready to elevate your bathroom oasis as we navigate through the world of shower doors and discover the perfect fit for your sanctuary!

1. Introduction to Shower Doors: Why They Matter

What are the different types of shower doors?
Credit : whatcanu.com

When it comes to bathroom design, shower doors might not be the first element that springs to mind, but their impact on the overall aesthetic and functionality of the space is undeniable. A well-chosen shower door can transform a mundane bathroom into a spa-like retreat, while also providing essential practical benefits. They serve not only as a barrier that keeps water contained within the shower, preventing slips and spills, but they also play a crucial role in the overall ambiance, contributing to the room’s style and flow.

Shower doors come in a variety of materials, styles, and configurations, each offering unique advantages that cater to different preferences and needs. Whether you opt for sleek frameless glass that creates an illusion of space, or a classic framed design that adds a touch of traditional elegance, the right shower door can enhance your bathroom’s design while providing easy access and maintenance.

Moreover, shower doors are an investment in your home’s value. An attractive, high-quality shower door can elevate the look of your bathroom, making it more appealing to potential buyers should you decide to sell your home. As you embark on this journey of exploration into the world of shower doors, consider how the right choice can elevate both the functionality and aesthetic appeal of your bathroom sanctuary. In the sections that follow, we’ll delve into the various types of shower doors available, their benefits, and tips to help you select the perfect option for your space.

2. The Importance of Choosing the Right Shower Door

Choosing the right shower door is more than just an aesthetic decision; it’s a crucial factor that can significantly impact your bathroom’s functionality and overall ambiance. With a plethora of options available, from sleek glass panels to sturdy bi-folds, the right choice can enhance your space, improve water retention, and even elevate your daily shower experience.

First and foremost, the right shower door can transform the look and feel of your bathroom. A beautifully designed glass shower door can create an illusion of space, making even the smallest of bathrooms feel open and airy. It allows natural light to flow through, brightening up the room and creating a welcoming atmosphere. Conversely, a poorly chosen door can make your space feel cramped and cluttered, detracting from your carefully curated bathroom design.

Water containment is another crucial aspect to consider. A well-fitted shower door prevents leaks and splashes, protecting your bathroom floor from water damage and mold growth. Different types of doors offer varying degrees of water retention. For instance, a sliding door might work best in a compact space, while a hinged door can provide a more classic look with a tighter seal.

Moreover, the right shower door can enhance safety. A sturdy, well-designed door reduces the risk of accidents, providing a secure barrier that keeps children and pets safe while bathing. Additionally, tempered glass options are available that are designed to withstand high temperatures and impacts, ensuring peace of mind for you and your family.

Ultimately, selecting the right shower door is an investment in both practicality and style. By carefully considering your space, aesthetic preferences, and functional needs, you can choose a door that not only complements your bathroom decor but also enhances your everyday routine. Embrace the opportunity to make a statement while prioritizing the functionality of your sanctuary — the right shower door is a pivotal piece of the puzzle.

3. Frameless Shower Doors: A Modern and Sleek Option

What are the different types of shower doors?
Credit : whatcanu.com

Frameless shower doors have emerged as a popular choice for homeowners seeking a contemporary and minimalist aesthetic in their bathrooms. With their clean lines and unobstructed views, frameless doors offer a seamless transition between your shower space and the rest of the bathroom, creating an illusion of openness that can make even the smallest of spaces feel more expansive.

one of the most significant advantages of frameless shower doors is their ability to enhance the overall design of your bathroom. Without the bulk of metal frames, these doors allow your tile work, fixtures, and finishes to take center stage, showcasing the beauty and craftsmanship you’ve invested in. The crystal-clear glass provides an unobtrusive barrier that highlights your choice of décor, whether it’s an intricate mosaic tile or a sleek marble surround.

In addition to their stunning visual appeal, frameless shower doors are also known for their durability and ease of maintenance. Constructed from high-quality tempered glass, they are designed to withstand the rigors of daily use while resisting wear and tear. This strength translates to a longer lifespan, making them a worthwhile investment for your home. Cleaning is a breeze too; without metal frames that can trap soap scum and grime, a simple wipe-down is often all that’s needed to keep your shower looking pristine.

Moreover, frameless shower doors can contribute to a more luxurious bathing experience. The absence of bulky hardware creates a more open and inviting atmosphere, allowing you to enjoy the tranquility of your shower without feeling confined. This spaciousness can transform your daily routine into a spa-like escape, making each shower feel like a retreat.

In summary, if you’re looking to elevate your bathroom’s style while enjoying practical benefits, frameless shower doors might just be your perfect solution. They embody the perfect blend of elegance, functionality, and durability, ensuring that your bathroom remains a tranquil haven for years to come.

4. Semi-Frameless Shower Doors: The Best of Both Worlds

When it comes to shower doors, semi-frameless options strike an ideal balance between style and functionality, offering the best of both worlds. These doors feature a blend of sturdy framing and a sleek, glass design that enhances the overall aesthetic of your bathroom while providing the necessary support and durability.

The key characteristic of semi-frameless shower doors is the delicate perimeter frame that runs along the edges, providing structural integrity without overwhelming the visual appeal. This frame is typically made from high-quality aluminum or stainless steel, ensuring resistance to rust and corrosion while maintaining a modern look. The glass panels themselves are usually thicker than standard framed doors, often ranging from 3/8 to 1/2 inch, which not only adds to their sturdiness but also enhances the luxurious feel of your shower space.

One of the significant benefits of semi-frameless shower doors is their versatility. They can seamlessly complement a variety of bathroom styles, from contemporary to traditional. The minimalist design allows for a more open and airy ambiance, making your space feel larger and brighter, while still effectively containing water splashes within the shower area.

Additionally, cleaning these doors is typically easier than fully framed options, as there are fewer crevices for soap scum and grime to accumulate. The smooth surfaces of both the glass and the minimal framing allow for quick wipes with a gentle cleaner, keeping your shower looking pristine and inviting.

For homeowners looking to achieve a sophisticated, modern look without sacrificing practicality, semi-frameless shower doors are an excellent choice. They combine elegance and ease of maintenance, enhancing the beauty of your bathroom while providing the durability and functionality you need for everyday use. Whether you’re renovating or building from scratch, these doors deserve a spot on your shortlist.

5. Framed Shower Doors: Affordable and Functional Choices

What are the different types of shower doors?
Credit : whatcanu.com

Framed shower doors are a classic choice for many homeowners looking to strike a balance between affordability and functionality. Constructed with a sturdy metal frame that surrounds the glass panels, these doors offer a robust and reliable option for enclosing your shower space. The framing not only adds durability but also enhances the overall aesthetic of your bathroom, providing a polished and cohesive look.

One of the standout benefits of framed shower doors is their cost-effectiveness. Compared to their frameless counterparts, framed options are generally more budget-friendly, making them an attractive choice for those looking to remodel without breaking the bank. This affordability doesn’t compromise quality; many framed shower doors are designed to withstand moisture and daily use, ensuring they hold up well over time.

Moreover, framed shower doors come in a variety of styles, finishes, and glass types, allowing you to customize your selection to match your bathroom’s décor. Whether you prefer a sleek chrome finish or a more traditional brushed nickel, there’s a framed door to complement your design vision. Additionally, the glass can be clear, frosted, or patterned, providing further options for privacy and style.

Installation of framed shower doors is typically more straightforward than that of frameless doors, making them a preferred choice for DIY enthusiasts. The framing system offers additional support, which can be particularly beneficial in older bathrooms where wall structures may not be perfectly level.

In summary, framed shower doors are an excellent blend of affordability, functionality, and style. They offer a practical solution for those looking to enhance their bathing experience while keeping costs manageable, making them a popular choice in many households. Whether you’re renovating or building from scratch, framed shower doors are a reliable option that can elevate the look and feel of your bathroom space.

6. Bi-Fold Shower Doors: Space-Saving Solutions for Small Bathrooms

When it comes to maximizing space in smaller bathrooms, bi-fold shower doors emerge as a stylish and practical solution. Designed with functionality in mind, these doors feature panels that fold inwards, allowing for a compact entryway that doesn’t encroach upon the limited square footage of your bathroom.

Bi-fold doors are typically made of lightweight materials, such as glass or acrylic, which not only lend a modern aesthetic but also enhance the sense of openness in a confined space. Their sleek design creates a seamless flow, making your bathroom appear larger and more inviting. This is particularly beneficial for urban dwellers or anyone with a cozy bathroom layout where every inch counts.

One of the standout benefits of bi-fold shower doors is their ease of operation. Unlike traditional hinged doors that swing outwards and require ample clearance, bi-fold doors glide effortlessly along a track, allowing you to enter and exit the shower without hassle. This feature is especially advantageous for individuals with mobility challenges, as it reduces the need for awkward maneuvers in tight quarters.

In addition to their practicality, bi-fold doors can be customized to match your bathroom’s decor. Available in various finishes and styles, from clear glass to frosted designs, they can complement any aesthetic, whether you prefer a contemporary look or a more classic vibe. Plus, the option to incorporate decorative hardware adds an extra touch of elegance.

Moreover, bi-fold shower doors are relatively easy to maintain. With fewer gaps and seams compared to other designs, they are less prone to water buildup, making cleaning a straightforward task. A quick wipe-down after each shower is often all it takes to keep them sparkling and free from soap scum.

In summary, bi-fold shower doors provide an ideal solution for small bathrooms, combining space-saving functionality with stylish design. If you’re looking to enhance your bathing area without sacrificing precious floor space, these doors may just be the perfect choice to elevate your bathroom experience.

7. Sliding Shower Doors: Convenience and Efficiency

What are the different types of shower doors?
Credit : whatcanu.com

When it comes to maximizing space and ensuring a seamless bathroom experience, sliding shower doors stand out as a popular choice among homeowners and designers alike. These doors glide effortlessly along a track, offering a contemporary aesthetic while providing practical benefits that enhance your daily routine.

One of the most significant advantages of sliding shower doors is their space-saving design. Unlike hinged doors that require ample room to swing open, sliding doors operate within their designated space. This makes them ideal for smaller bathrooms where every square inch counts. Whether you have a snug corner shower or a more expansive enclosure, sliding doors can be tailored to fit various configurations, ensuring that your bathroom remains functional and stylish.

In addition to their space efficiency, sliding shower doors are known for their sleek, modern look. They create a clean and unobtrusive barrier between your shower and the rest of the bathroom, contributing to an open and airy feel. Available in a variety of materials—such as glass, acrylic, or even framed and frameless options—sliding doors can be customized to match your decor, from minimalist to luxurious.

Maintenance is another area where sliding shower doors excel. With fewer crevices and nooks compared to traditional doors, they are easier to clean and keep free from mold and mildew. Many sliding doors feature a glass coating that repels water and soap scum, making upkeep even simpler. This means you can spend less time scrubbing and more time enjoying your relaxing shower experience.

Furthermore, sliding shower doors provide excellent accessibility. Their design allows for easy entry and exit, making them a suitable choice for individuals of all ages and mobility levels. For families, this means a safer and more convenient bathing option for kids and seniors alike.

Ultimately, choosing sliding shower doors for your bathroom can enhance not only the aesthetic appeal but also the functionality of your space. Their combination of convenience, efficiency, and style makes them a smart investment for anyone looking to elevate their bathing experience. Whether you’re embarking on a full bathroom remodel or simply upgrading your shower, sliding doors are a compelling option worth considering.

8. Hinged Shower Doors: Classic Elegance

Hinged shower doors exude a timeless charm that can elevate any bathroom space. Often seen as the quintessential choice for traditional and contemporary designs alike, these doors are characterized by their ability to swing open, much like a standard door, offering a seamless transition between your bathroom and shower area. Their classic elegance lies not only in their aesthetic appeal but also in their functionality.

One of the most significant advantages of hinged shower doors is their versatility. Available in a variety of materials, including glass and metal, they can be customized to suit your specific style and preferences. Clear glass options create an open, airy feel, allowing light to flow freely and making smaller bathrooms appear larger. On the other hand, frosted or textured glass provides a touch of privacy while still maintaining an inviting atmosphere.

In addition to their beautiful design, hinged shower doors are remarkably easy to operate. The swinging motion requires minimal effort, making them ideal for families or anyone who values convenience. They also tend to provide a more watertight seal compared to sliding doors, which can sometimes leave gaps where water can escape. With proper sealing, you can enjoy a splash-free shower experience, keeping your bathroom floor dry and safe.

Moreover, hinged doors can be an excellent option for those looking to incorporate a luxurious feel into their space. Pairing them with elegant hardware—like polished chrome or brushed nickel handles—can add a sophisticated touch that enhances the overall decor of your bathroom. Whether you opt for a single door or a double door configuration, hinged shower doors can transform your bathing area into a chic retreat.

In conclusion, hinged shower doors are more than just functional; they are a statement piece that combines beauty and practicality. Their classic design, versatility, and ease of use make them a popular choice among homeowners looking to create an inviting bathroom sanctuary. If you’re considering a bathroom upgrade, hinged shower doors might just be the elegant solution you’ve been searching for.

9. Glass Thickness and Quality: What You Need to Know

When it comes to choosing the perfect shower door, understanding glass thickness and quality is essential for both aesthetics and functionality. The thickness of the glass not only affects the overall look of your shower but also plays a significant role in its durability and safety. Generally, shower doors come in thicknesses ranging from 3/16 inch to 1/2 inch.

**3/16-Inch Glass**: This thinner option is often more affordable and can be suitable for lighter use in less demanding environments. However, it may not provide the same level of sturdiness or sound insulation as thicker glass.

**1/4-Inch Glass**: This is a popular choice for many homeowners, offering a balance between cost, durability, and appearance. It tends to be more stable than 3/16-inch glass and provides better resistance to impact, making it a reliable option for everyday use.

**3/8-Inch and 1/2-Inch Glass**: If you’re looking for the ultimate in strength and elegance, consider investing in 3/8-inch or 1/2-inch glass. These thicker panels not only convey a luxurious feel but also ensure maximum durability and safety, reducing the likelihood of breakage or warping over time.

In addition to thickness, the quality of the glass is paramount. Look for tempered glass, which has been heat-treated to withstand higher levels of stress and is significantly more resilient than standard glass. In the event of a break, tempered glass shatters into small, blunt pieces rather than sharp shards, significantly reducing the risk of injury.

Another aspect to consider is the glass finish. Options like clear, frosted, or patterned glass can enhance privacy while adding a unique touch to your bathroom’s décor.

By paying attention to the thickness and quality of your shower door glass, you can ensure that it not only complements your space but also provides the durability and safety needed for years to come. Investing in high-quality materials may require a higher initial cost, but it will pay off in longevity and satisfaction, making your shower experience even more enjoyable.

10. Custom vs. Prefabricated Shower Doors: Pros and Cons

When it comes to choosing the right shower door for your bathroom, the dilemma often lies between custom and prefabricated options. Each choice has its own set of advantages and drawbacks that can significantly impact both the aesthetics and functionality of your space.

**Custom Shower Doors** are designed specifically for your bathroom’s dimensions and style. This tailored approach allows for a perfect fit, accommodating any unique angles or architectural features in your shower. One of the most significant benefits of custom doors is the vast array of materials, finishes, and designs available. Whether you prefer sleek glass, framed or frameless styles, or even artistic etched patterns, the possibilities are nearly limitless. Custom doors also allow for personalized features, such as special hardware or unique installation options that can enhance the overall look of your bathroom.

However, this level of customization comes at a cost. Custom shower doors tend to be more expensive than their prefabricated counterparts due to the bespoke design and labor involved. Additionally, the lead time for production and installation can be longer, as each piece is made to order.

On the other hand, **Prefabricated Shower Doors** offer a more budget-friendly and quicker solution. These doors are mass-produced and come in standard sizes and styles, which means they can often be purchased and installed with minimal wait time. The simplicity of prefabricated options makes them an attractive choice for homeowners looking to renovate quickly or for those on a tighter budget. Many prefabricated options still offer a good range of designs and finishes, catering to various tastes.

However, the main drawback of prefabricated doors is their lack of flexibility in terms of size and style. If your shower doesn’t conform to standard dimensions, you may end up with gaps or awkward fitments. Additionally, the limited customization options can sometimes mean a compromise on personal style or the overall aesthetic of your bathroom.

Ultimately, the choice between custom and prefabricated shower doors hinges on your specific needs, budget, and design preferences. Whichever route you choose, understanding the pros and cons of each will help you make a decision that enhances your bathroom experience while reflecting your personal style.

11. Benefits of Glass Shower Doors: Style and Practicality

When it comes to bathroom upgrades, glass shower doors stand out as a perfect blend of style and practicality. Unlike traditional shower curtains, which can look dated and often harbor mold and mildew, glass doors offer a sleek aesthetic that elevates the overall look of your bathroom. The transparent nature of glass creates an illusion of space, making even smaller bathrooms feel more open and airy. With a variety of designs available—from frameless to semi-frameless and even sliding doors—there’s a glass option to suit every decor style, whether it’s modern, minimalist, or classic.

But the benefits extend well beyond aesthetics. Glass shower doors are incredibly easy to maintain. A quick wipe down with a squeegee after each use can prevent water spots and soap scum from building up, keeping your shower looking pristine. Plus, many manufacturers now offer glass with protective coatings that repel water and reduce mineral deposits, making cleaning even easier.

Another practical advantage is the durability of glass doors. Made from tempered safety glass, they are designed to withstand daily use without the risk of shattering. This robustness adds an element of safety, especially for families with children or elderly members. Additionally, glass shower doors can increase your home’s value, offering a modern touch that potential buyers often find appealing.

In summary, glass shower doors not only enhance the visual appeal of your space but also provide a functional and durable solution that can withstand the test of time. Choosing glass for your shower enclosure is a smart investment that combines elegance with everyday practicality, ensuring your bathroom remains a sanctuary of comfort and style.

12. Maintenance Tips for Shower Doors: Keeping Them Sparkling

Maintaining the pristine appearance of your shower doors is essential not only for aesthetic appeal but also to ensure their longevity. With the right care, you can keep them sparkling and free from damage caused by hard water, soap scum, and mildew. Here are some effective maintenance tips that will help you preserve the beauty of your shower doors.

**1. Regular Cleaning:** Establish a consistent cleaning routine by wiping down your shower doors after each use. A squeegee or microfiber cloth can effectively remove water spots and prevent soap scum buildup. Aim to do this daily or after each shower to make cleaning easier and maintain clarity.

**2. Use the Right Cleaners:** Avoid harsh chemicals that can damage the finish of your shower doors. Instead, opt for natural solutions like vinegar and baking soda. A mixture of equal parts vinegar and water can dissolve mineral deposits, while baking soda can be used as a gentle scrub to tackle tougher stains. For glass doors, a high-quality glass cleaner will provide a streak-free shine.

**3. Address Hard Water Stains Promptly:** If you live in an area with hard water, you may notice stubborn stains building up over time. To combat this, apply a mixture of vinegar and water to the affected areas and let it sit for a few minutes before wiping it away. For persistent stains, a specialized hard water stain remover can be beneficial.

**4. Prevent Mold and Mildew:** Shower doors can be prone to mold and mildew, especially in humid environments. To combat this, ensure proper ventilation in your bathroom by using an exhaust fan or opening a window during showers. Additionally, consider using a mildew-resistant shower curtain or liner if applicable.

**5. Check Seals and Hardware:** Regularly inspect the seals and hardware of your shower doors for any signs of wear or damage. Cracked seals can lead to leaks and water damage, while loose hardware can compromise the door’s stability. Tighten screws and replace seals as needed to maintain functionality.

By incorporating these simple maintenance tips into your routine, you can keep your shower doors looking sparkling clean and functioning optimally for years to come. A little effort goes a long way in preserving their beauty and ensuring a fresh, inviting bathing space.

13. Common Mistakes to Avoid When Choosing Shower Doors

When it comes to selecting the perfect shower doors for your bathroom, avoiding common pitfalls can make all the difference in achieving both functionality and aesthetic appeal. Here are some typical mistakes that homeowners often encounter, along with tips on how to sidestep them.

**1. Ignoring Measurements:** One of the most critical errors is failing to take accurate measurements of your shower space. Before you even begin to browse styles and materials, ensure that you have precise dimensions. A door that’s too small may leave your bathroom feeling drafty and wet, while one that’s too large can lead to installation issues and an awkward fit. Always measure height and width, accounting for any fixtures or obstructions.

**2. Overlooking Style Compatibility:** Shower doors come in a variety of styles, including sliding, hinged, and bi-fold. It’s essential to choose a style that harmonizes with your bathroom’s overall design. For instance, a sleek, modern bathroom might benefit from frameless glass doors, while a more traditional space could be better suited for framed options. Failing to consider your bathroom’s aesthetic can result in a disjointed look that detracts from the overall vibe.

**3. Neglecting Maintenance Needs:** Different shower door materials have varied maintenance requirements. For example, glass doors may require regular cleaning to prevent water spots and soap scum buildup, while acrylic doors may be more prone to scratches. When selecting your shower doors, think about how much time and effort you’re willing to invest in upkeep. Opting for low-maintenance options can save you headaches down the line.

**4. Skimping on Quality:** While it might be tempting to go for the cheapest option, shower doors are an investment that should withstand daily use. Poor-quality doors can lead to leaks, rust, or even safety hazards if they shatter. Instead, consider durable materials and reputable brands that offer warranties, ensuring that you won’t have to replace them sooner than expected.

**5. Forgetting About Safety Features:** Safety should always be a top priority when choosing shower doors. Look for tempered glass options that are less likely to break and shatter. Additionally, consider features like rounded edges or anti-slip surfaces to prevent accidents. Ignoring safety can lead to costly repairs and potential injury, especially in households with children or elderly individuals.

By steering clear of these common mistakes, you can confidently choose shower doors that not only enhance the beauty of your bathroom but also provide lasting functionality and safety. Being informed and thoughtful in your selection process will lead to a satisfying shower experience for years to come.

14. Design Trends in Shower Doors: What’s Popular Now

As we step into a new era of bathroom design, shower doors have evolved beyond mere functionality to become stunning focal points that enhance the overall aesthetic of the space. In 2023, several design trends are taking center stage, showcasing innovative materials, sleek lines, and a blend of form and function.

One of the most popular trends is the use of **frameless glass shower doors**. These minimalist designs create an open and airy feel, allowing natural light to flow freely while showcasing beautiful tile work. Frameless doors are celebrated not only for their modern look but also for their ease of cleaning, making them a favorite among homeowners seeking both style and practicality.

Another trend gaining momentum is the **use of bold, textured glass**. From frosted patterns to etched designs, textured glass adds a unique touch and can provide a sense of privacy without sacrificing light. This trend allows homeowners to express their individuality while still maintaining that coveted open feel.

**Color and finish are also making waves** in shower door design. While clear glass remains timeless, homeowners are increasingly opting for tinted or colored glass options to introduce an unexpected pop of color. Matte black and brushed gold finishes for hardware are particularly popular, adding a touch of sophistication and elegance to the overall design.

Furthermore, the integration of **smart technology** in shower doors is on the rise. From automatic opening mechanisms to integrated lighting that enhances the mood, technology is becoming an essential part of the modern bathroom experience.

Lastly, **eco-friendly materials** are becoming a priority for many consumers. Shower doors made from recycled glass or sustainable materials not only look great but also align with the growing trend of environmentally conscious living.

Incorporating these design trends can transform your bathroom into a luxurious retreat. Whether you prefer the sleekness of frameless glass, the uniqueness of textured designs, or the sophistication of bold finishes, there is a shower door option that can elevate your space and reflect your personal style. Embrace these trends to create a bathroom that is not only functional but also a true expression of your taste.

15. Conclusion: Making the Right Choice for Your Bathroom

As we wrap up our exploration of shower doors, it’s clear that the right choice can dramatically enhance both the functionality and aesthetic appeal of your bathroom. With various types—from sliding and hinged to bi-fold and frameless—each option brings its own unique benefits to the table. The key is to align your selection with your specific needs, preferences, and the overall design of your space.

Consider the size of your bathroom first. In smaller areas, sliding shower doors can save precious space, while larger bathrooms might benefit from the grandeur of a frameless design that creates an open, airy feel. Maintenance is another critical factor; glass doors are often easier to clean and maintain than traditional shower curtains, providing a more polished look that enhances your bathroom’s elegance.

Additionally, think about your lifestyle. If you have children or pets, a sturdy hinged door might offer the durability and security you need, while a simple bi-fold door could be the perfect blend of style and convenience for a guest bathroom. And let’s not forget the style element—choosing a shower door that complements your existing decor can create a cohesive look that ties the whole bathroom together.

Ultimately, the right shower door will not only meet your practical needs but will also elevate your bathroom into a sanctuary of relaxation and style. As you embark on this decision-making journey, take the time to weigh your options carefully, envision how each type fits into your space, and remember that this choice is an investment in your home’s comfort and appeal. Embrace the possibilities, and you’ll find the perfect shower door that transforms your daily routine into a luxurious experience.

In conclusion, choosing the right shower door can significantly enhance both the functionality and aesthetic appeal of your bathroom. From sleek frameless designs that evoke a sense of openness to classic framed options that offer durability and style, there’s a perfect fit for every taste and space. As you explore the various types of shower doors, consider how each option aligns with your lifestyle, maintenance preferences, and design vision. By understanding the benefits of each style, you can make an informed decision that elevates your bathing experience. We hope this guide has illuminated your choices and inspired you to transform your bathroom into a personal retreat. Happy renovating, and may your new shower door bring you countless refreshing moments!

What are the best ways to improve your home’s curb appeal?

First impressions matter, and your home’s exterior is the first thing visitors and passersby see.

Whether you’re looking to sell your home or simply want to enhance its beauty, boosting curb appeal can make a significant difference. A well-maintained exterior not only elevates the overall aesthetic of your property but also reflects the care and attention you put into your living space. From revitalizing your landscaping to choosing the right color palette for your front door, there are countless ways to transform your home and make it stand out in the neighborhood. In this blog post, we’ll explore top tips that can instantly elevate your curb appeal, making your home not just a place to live, but a welcoming haven that exudes charm and character. Get ready to roll up your sleeves and discover the simple yet effective changes that can turn your house into a stunning showcase!

1. Understanding Curb Appeal: What It Means and Why It Matters

What are the best ways to improve your home's curb appeal?
Credit : whatcanu.com

Curb appeal is more than just a catchy term; it encapsulates the first impression your home makes from the street. It’s the visual allure that captures the attention of passersby, potential buyers, and even neighbors—essentially anyone who catches a glimpse of your property. Think of it as the “face” of your home; just like how we dress to impress in social situations, your home needs to do the same.

But why does curb appeal matter? The reasons are manifold. First and foremost, a home with strong curb appeal stands out in a competitive real estate market. Whether you are looking to sell or simply wish to enhance your living environment, an inviting exterior can significantly increase your home’s value and desirability. Statistics show that homes with appealing exteriors often sell faster and at higher prices compared to their less attractive counterparts.

Moreover, curb appeal isn’t just for potential buyers; it also boosts your own pride in homeownership. An attractive front yard, a fresh coat of paint, and well-maintained landscaping create a welcoming atmosphere, making your home a joy to return to every day. It fosters a sense of community and can even inspire your neighbors to elevate their own properties.

In short, understanding and investing in curb appeal can transform your home’s exterior from ordinary to extraordinary, enhancing both its market value and your personal enjoyment. So, let’s dive into the essential tips that will elevate your home’s curb appeal instantly!

2. The First Impression: Importance of a Welcoming Entrance

The entrance of your home serves as the first impression to visitors and passersby alike, making it one of the most crucial aspects of your property’s curb appeal. A welcoming entrance sets the tone for what lies beyond, creating an inviting atmosphere that reflects your personal style and attention to detail. Imagine approaching a home with a beautifully adorned front door, perhaps painted in a cheerful hue, framed by elegant sidelights and an attractive doorbell; it instantly evokes a sense of warmth and hospitality.

To elevate your entrance, consider the elements that can enhance its appeal. Start with the door itself—updating its color or adding a fresh coat of paint can work wonders. Opt for a bold, eye-catching color that complements the overall color palette of your home, giving it a contemporary flair. Don’t forget the hardware; new handles and locks can add a touch of sophistication.

Next, think about lighting. Well-placed outdoor lights can illuminate your entrance beautifully, providing both safety and charm. Lantern-style fixtures or wall sconces flanking the door create a cozy glow, while string lights can add a whimsical touch, perfect for those evening gatherings.

Landscaping also plays a pivotal role in enhancing your entrance. Neatly trimmed hedges, vibrant flower beds, or even a simple potted plant can add life and color to the area. Consider creating a small pathway lined with inviting stepping stones or decorative gravel leading to the door, guiding guests with a sense of purpose and intrigue.

Lastly, don’t underestimate the power of seasonal decor. A welcoming wreath, festive welcome mat, or seasonal planters can transform your entrance throughout the year, making it feel fresh and inviting. By focusing on these aspects of your entrance, you not only boost your home’s curb appeal but also cultivate an atmosphere that makes friends and neighbors feel right at home from the very first step.

3. Landscaping Basics: Adding Color and Life to Your Yard

What are the best ways to improve your home's curb appeal?
Credit : whatcanu.com

Landscaping is one of the most effective ways to enhance your home’s curb appeal and create a welcoming atmosphere. A well-maintained yard can transform the entire look of your property, adding vibrancy and life that draws the eye. Begin with the basics: assess your current landscape and identify areas that could benefit from a little love and attention.

Start by introducing a splash of color with seasonal flowers. Planting a mix of perennials and annuals will ensure that your garden remains lively throughout the year. Consider bold blooms like dahlias, petunias, or marigolds for a cheerful pop against the greenery. For structure, incorporate shrubs that provide both height and texture. Evergreens are a fantastic choice, as they offer year-round appeal and require minimal maintenance.

Don’t forget about the power of foliage! Different shades of green can create visual interest, so mix various leaf shapes and colors. For added depth, consider layering your plants by placing taller varieties in the back and shorter ones in the front, creating a lush, tiered effect that draws the eye upward.

In addition to flowers and shrubs, consider adding hardscape elements like decorative stones, a gravel path, or a stylish border to define your beds. These features create contrast and can help organize the space, making your yard look polished and intentional.

Finally, don’t underestimate the importance of upkeep. Regularly trimming hedges, mowing the lawn, and weeding will ensure your landscape looks its best. By investing in these landscaping basics, you’ll add color and life to your yard, making a memorable first impression that enhances your home’s overall curb appeal!

4. Choosing the Right Paint Colors for Your Exterior

Choosing the right paint colors for your exterior can make a dramatic difference in your home’s curb appeal. First impressions matter, and the colors you select will set the tone for your entire property. When considering paint hues, think about how they harmonize with the architectural style of your home and the surrounding environment.

Begin by assessing the existing elements, such as the roof, brickwork, or stone accents. Neutral palettes—like soft grays, warm beiges, or crisp whites—provide a timeless foundation that can enhance traditional or modern designs alike. For a more vibrant touch, consider adding a bold color to your front door or shutters to create a stunning focal point that draws the eye. Rich navy blues, deep forest greens, or even bright reds can evoke a sense of warmth and welcome.

Additionally, don’t forget to take into account the psychological impact of color. For instance, blues and greens can evoke tranquility and calmness, while yellows and oranges bring a cheerful, inviting vibe. It’s also wise to consider your neighborhood’s aesthetic; aligning your color choices with nearby homes can create a sense of cohesion while still allowing your personality to shine through.

Before making a final decision, test your chosen colors on a small section of your home. Lighting conditions can dramatically affect how paint appears, so observe the colors throughout the day. Consulting a color wheel or working with a professional can also provide valuable insight into complementary shades and combinations that will enhance your home’s charm. By carefully selecting the right paint colors, you can transform your exterior from ordinary to extraordinary, boosting your curb appeal in an instant!

5. Upgrading Your Front Door: Styles and Accessories

What are the best ways to improve your home's curb appeal?
Credit : whatcanu.com

The front door of your home serves as the gateway to your personal sanctuary, and upgrading it can dramatically enhance your curb appeal. A striking entrance not only welcomes guests but also sets the tone for the entire property. When considering an upgrade, think about both style and functionality.

Start with the door itself—perhaps you want to replace an old, weathered door with a modern, sleek design. Fiberglass or steel doors offer durability and security, while wooden doors can provide a classic charm. Opt for bold colors that make a statement; a vibrant red, deep navy, or even a cheerful yellow can turn an ordinary door into a focal point. If a full door replacement isn’t in the cards, consider a fresh coat of paint to breathe new life into your existing door.

Next, accessorize! Hardware can make a world of difference. Elegant door handles, stylish knockers, and sophisticated house numbers not only enhance the visual appeal but also reflect your personal style. Consider a matching set of hardware for a cohesive look. Additionally, the addition of a decorative wreath or seasonal garland can add warmth and personality, inviting passersby to take a closer look.

Don’t forget about lighting! Flanking your door with stylish sconces or installing a statement pendant light can illuminate your entrance beautifully and improve safety at night. Choose fixtures that complement the architectural style of your home for a polished appearance.

Finally, consider adding a welcoming mat and some potted plants or flowers near your doorstep. This simple touch can create a cozy atmosphere that makes your home feel inviting. By upgrading your front door and its surroundings, you’ll create a stunning first impression that boosts your home’s curb appeal and leaves a lasting impact on visitors.

6. Lighting Matters: Enhancing Curb Appeal with Outdoor Lighting

When it comes to enhancing your home’s curb appeal, one often-overlooked element is lighting. Outdoor lighting not only serves a practical purpose but also adds a touch of elegance and warmth to your home’s exterior. Imagine returning home after a long day and being greeted by a beautifully illuminated pathway or a softly lit porch that invites you in. Proper lighting can transform your outdoor space into a welcoming oasis.

Start by assessing key areas of your home that could benefit from additional light. Consider installing stylish fixtures along your walkway to guide guests safely to your door while showcasing your landscaping. Solar-powered path lights are an eco-friendly option that adds charm without breaking the bank. For a more dramatic effect, accentuate architectural features like columns or eaves with uplighting, casting a warm glow that highlights the unique character of your home.

Don’t forget about the importance of layering your lighting. Combine ambient lights, such as soft sconces near the entrance, with task lighting for functional areas like the driveway or garage. Finally, consider incorporating decorative elements such as string lights or lanterns to create a cozy atmosphere for evening gatherings. With thoughtful outdoor lighting, you can not only elevate your home’s curb appeal but also extend your living space into the night, making your home a beacon of warmth and style.

7. Window Treatments: Improving Aesthetics from the Outside

What are the best ways to improve your home's curb appeal?
Credit : whatcanu.com

When it comes to enhancing your home’s curb appeal, window treatments are often an overlooked yet impactful element. The right window treatments can not only elevate the aesthetic of your home but also provide a cohesive look that ties your exterior design together. From the street, windows serve as the “eyes” of your home, so it’s essential to dress them thoughtfully.

Start by considering the style of your home. For traditional homes, elegant drapes in rich fabrics can add a touch of sophistication, while modern homes might benefit from sleek, minimalist shades that offer a contemporary edge. For a more rustic or farmhouse feel, wooden shutters can introduce warmth and charm, creating a welcoming vibe.

Color is another crucial factor in selecting window treatments. Opt for shades that complement your home’s exterior color palette. Neutral tones can provide a timeless look, while bold colors can make a statement and draw attention to your windows. Don’t shy away from patterns either; floral or geometric designs can infuse personality and flair, making your home stand out in a delightful way.

In addition to aesthetics, consider the functionality of your window treatments. Options like external roller shades or sheer curtains can help regulate light and improve energy efficiency while maintaining an attractive facade. You can also explore smart window treatments that can be adjusted effortlessly, keeping your home both stylish and practical.

Finally, don’t forget to maintain your window treatments. Clean, well-kept windows and treatments reflect a sense of pride in your home, enhancing curb appeal even further. By investing in thoughtful window treatments, you’ll not only improve the look of your home from the outside but also create a welcoming environment that invites friends and passersby to take a closer look.

8. Paving the Way: The Impact of Driveways and Walkways

When it comes to enhancing your home’s curb appeal, the pathways leading to your front door play a pivotal role. Driveways and walkways are not merely functional elements; they are the first impressions that visitors and potential buyers have of your property. A well-designed and maintained driveway or walkway can set the tone for the entire home, guiding eyes and feet toward your front door with elegance and style.

Start by assessing the current condition of your driveway and walkways. Cracked concrete, overgrown weeds, or faded asphalt can detract from the overall appearance of your home. Consider resurfacing or repairing these surfaces to create a smooth, inviting path. If budget allows, upgrading to materials like pavers or natural stone can add a touch of luxury while also increasing durability.

Color and pattern are key elements that can dramatically affect the aesthetic appeal of your entryway. Opt for colors that complement your home’s exterior and landscaping. For a classic look, neutral tones work beautifully, while bold colors can add a modern twist. Incorporating patterns, such as herringbone or circular designs, can create visual interest and make your driveway or walkway stand out.

Lighting is another important factor in enhancing the curb appeal of your driveways and walkways. Strategically placed solar lights or elegant lanterns not only illuminate the path for evening arrivals but also enhance the beauty of your landscape at night. This added layer of functionality can create a welcoming ambiance that draws the eye.

Lastly, don’t forget about the borders! Adding flower beds, decorative stones, or low hedges alongside your driveway or walkway can soften the hard edges and provide a splash of color throughout the seasons. These finishing touches will not only elevate the visual appeal but also reflect your personal style, making your home truly stand out in the neighborhood.

In summary, investing time and resources into improving your driveways and walkways can yield instant returns in curb appeal. A well-maintained pathway beckons guests with charm and elegance, ensuring your home makes a lasting impression.

9. Outdoor Décor: Using Furniture and Accessories Wisely

When it comes to enhancing your home’s curb appeal, outdoor décor plays a pivotal role in creating an inviting first impression. Thoughtfully chosen furniture and accessories can transform your front yard into an extension of your living space, blending style and functionality. Start by evaluating your current outdoor seating arrangements; a well-placed bench or a pair of inviting chairs can create a warm and welcoming atmosphere. Opt for weather-resistant materials that not only withstand the elements but also maintain their aesthetic charm.

Consider the colors and textures of your outdoor furniture. Bright, vibrant hues can infuse cheerfulness into your space, while neutral tones lend a sophisticated touch. Layering different textures—such as wicker chairs paired with plush cushions or a sleek metal table alongside a rustic wooden bench—adds visual interest and warmth.

In addition to furniture, accessories are key to personalizing your outdoor area. Incorporate decorative pillows, throws, and outdoor rugs to create cozy nooks perfect for sipping morning coffee or enjoying evening sunsets. A strategically placed outdoor lantern or string lights can provide a magical ambiance as dusk falls, making your home feel more inviting.

Don’t forget about planters and garden accessories! Vibrant flowers, lush greenery, or even a small herb garden can breathe life and color into your entryway. Choose planters that complement your existing architecture, whether it’s sleek and modern or charmingly rustic.

Lastly, don’t underestimate the power of seasonal décor. Changing accessories according to the season—like pumpkins in the fall or festive wreaths during the winter—keeps your space fresh and engaging throughout the year. By using furniture and accessories wisely, you can effortlessly elevate your home’s curb appeal and create a stunning outdoor space that invites admiration from neighbors and passersby alike.

10. Seasonal Touches: Maintaining Appeal Year-Round

Maintaining your home’s curb appeal throughout the changing seasons is crucial for making a lasting impression and ensuring your property remains inviting all year long. Seasonal touches not only enhance your home’s exterior but also reflect the warmth and care you put into your living space.

As the seasons shift, so should your approach to curb appeal. In spring, consider planting vibrant flowers or adding colorful window boxes brimming with blossoms. This is the perfect time to declutter your yard and give those neglected areas a fresh start with a thorough clean-up and a pop of color.

Summer calls for a lush, green lawn and well-kept hedges. Invest time in regular mowing, edging, and watering to ensure your landscape looks its best. Consider adding outdoor furniture or a cozy seating area to create a welcoming atmosphere for gatherings. Brightly colored outdoor cushions and decor can add a cheerful vibe, making your home the go-to spot for summer barbecues.

As autumn arrives, it’s the season to embrace warm hues and textures. Swap out your summer flowers for rich, fall-colored plants and decorative pumpkins. A simple wreath made of seasonal foliage on your front door can exude charm and hospitality. Ensure your pathways are lined with twinkling lights or lanterns to create a cozy ambiance as the days grow shorter.

When winter rolls in, focus on creating a peaceful and inviting aesthetic. Keep your walkways clear of snow and add a layer of evergreen garlands to your porch for a touch of seasonal cheer. A festive, well-lit display can bring warmth to the cold months, while incorporating natural elements like pine cones or holly can keep your home looking fresh and appealing.

By embracing seasonal touches, you not only enhance your home’s exterior but also show a level of care and attention that can significantly boost curb appeal. No matter the time of year, a little seasonal flair can transform your home into a welcoming haven that draws admiration from neighbors and passersby alike.

11. DIY Projects vs. Hiring Professionals: Finding the Right Balance

When it comes to enhancing your home’s curb appeal, the decision between tackling DIY projects and hiring professionals can feel overwhelming. Both options have their merits, and striking the right balance can lead to stunning results without breaking the bank.

DIY projects allow you to infuse your personal touch into your home’s exterior. Simple tasks like painting the front door, planting vibrant flowers, or even creating a charming pathway can be incredibly rewarding. These projects not only save you money but also provide a sense of accomplishment as you watch your efforts transform your space. Imagine the satisfaction of stepping back to admire a freshly painted fence or a meticulously landscaped garden that you nurtured with your own hands.

However, it’s essential to recognize when a project is best left to the professionals. Complex tasks—such as roof repairs, extensive landscaping, or structural changes—require specialized skills and knowledge to ensure safety and quality. Hiring professionals can save you time and stress, allowing you to focus on the aspects of the project that truly excite you. Plus, their expertise can elevate your curb appeal in ways that a DIY approach might not achieve, such as ensuring proper drainage in landscaping or choosing the right materials for a stunning new facade.

Finding the right balance means assessing your skills, the time you can dedicate, and the potential impact on your home’s value. Consider starting with small DIY projects that build your confidence and enhance your space, while reserving larger, more intricate tasks for experienced hands. By blending your personal touch with professional quality, you can create a home that not only looks fabulous but also reflects your unique style. Ultimately, the goal is to create a welcoming exterior that draws in admirers and elevates your home’s overall charm.

12. Maintenance Tips: Keeping Your Home Looking Its Best

Maintaining the curb appeal of your home is like nurturing a beautiful garden; it requires consistent care and attention. To ensure your home always looks its best, consider establishing a regular maintenance routine that targets both the exterior and the surrounding landscape.

Start with your lawn, as it often serves as the first impression of your property. Regular mowing, edging, and watering keep the grass lush and vibrant. Consider seasonal treatments like fertilization or aeration to promote healthy growth. Don’t forget about weeds; a quick pull here and there can prevent them from taking over and detracting from your home’s appearance.

Next, pay attention to your landscaping. Trim back overgrown shrubs, deadhead flowers, and replace any wilted plants to keep your garden looking fresh and inviting. Mulching not only enhances the visual appeal but also helps retain moisture and suppress weeds. Adding colorful annuals or perennials can provide seasonal bursts of color and charm.

Your home’s exterior surfaces also require care. Regularly wash windows, siding, and any outdoor furniture to remove dirt and grime. A fresh coat of paint on the front door or shutters can work wonders, instantly rejuvenating your home’s facade. Inspect for any peeling paint or damaged areas that may need repair, as these can quickly detract from your home’s overall appeal.

Lastly, don’t underestimate the power of details. Clean and polish house numbers, replace old fixtures, and ensure that walkways are free of debris. Adding outdoor lighting not only enhances safety but also creates a warm, welcoming atmosphere at dusk. By committing to these maintenance tips, you can ensure your home remains an eye-catching masterpiece, boosting its curb appeal and making it the envy of the neighborhood.

13. Eco-Friendly Options: Sustainable Choices for Curb Appeal

In today’s world, transforming your home’s curb appeal doesn’t just mean enhancing its visual aesthetics; it also offers an opportunity to make sustainable choices that benefit both your home and the environment. Eco-friendly options are not only appealing to the eye—they can also significantly boost your home’s value while promoting a healthier planet.

Start with landscaping: consider replacing your traditional grass lawn with drought-resistant plants or native species that thrive in your local climate. These plants require less water, attract pollinators, and provide vibrant colors throughout the seasons. A rock garden or a well-placed mulch bed can also reduce water consumption while giving your yard a polished look.

Next, focus on sustainable materials for your exterior updates. If you’re thinking about a fresh coat of paint, opt for low-VOC (volatile organic compounds) paints that minimize harmful emissions and contribute to better indoor air quality. For decking or fencing, look for reclaimed wood or composite materials made from recycled plastics. These options not only reduce waste but also offer durability and style.

Don’t forget about energy-efficient lighting! Installing solar-powered pathway lights or LED fixtures can illuminate your home beautifully while cutting down on energy costs. Additionally, consider adding a rain garden to manage stormwater runoff, which can help filter pollutants and provide a stunning focal point in your yard.

By incorporating these eco-friendly choices into your home’s exterior, you will not only enhance your curb appeal but also make a positive impact on the environment. Plus, today’s homebuyers are increasingly looking for homes that reflect sustainability, making your eco-conscious decisions a smart investment for the future. Embrace the beauty of a greener home—your curb appeal will shine, and so will your commitment to the planet!

14. Budget-Friendly Ideas for Instant Transformation

When it comes to enhancing your home’s curb appeal without breaking the bank, there are plenty of budget-friendly ideas that can lead to an instant transformation. First and foremost, consider a fresh coat of paint. A vibrant door color can make a striking impression, while a neutral palette can create a sense of harmony. Choose a hue that complements your home’s architecture and surrounding landscape.

Next, focus on landscaping. By simply trimming overgrown bushes, weeding flower beds, and planting seasonal flowers, you can add a pop of color and freshness to your outdoor space. Consider using mulch to define flower beds and retain moisture; it’s an inexpensive way to make your garden look tidy and well-maintained.

Another impactful yet affordable idea is to upgrade your house numbers. Swapping your old, faded numbers for sleek, modern alternatives can make your home stand out. Pair them with a well-lit porch or stylish lighting fixtures to enhance visibility during the evening hours, adding both safety and charm.

Don’t underestimate the power of outdoor decor. Adding a few well-placed potted plants, a charming welcome mat, or even a decorative bench can create an inviting atmosphere. Look for items at thrift stores or garage sales to save even more money while adding some unique character to your entryway.

Lastly, consider creating a clean and welcoming pathway leading up to your front door. You can do this by power washing your existing walkway or laying down inexpensive pavers to define the path. A clear, well-defined route not only directs visitors but also enhances the overall look of your home.

These budget-friendly ideas can significantly enhance your home’s curb appeal, making it more inviting and attractive to passersby, all without straining your finances. With just a little creativity and effort, your home will radiate charm and warmth, instantly boosting its visual appeal.

15. Final Thoughts: Crafting a Home You Love to Come Home To

When it comes to transforming your home and enhancing its curb appeal, the ultimate goal is to create a space that resonates with you—a sanctuary that invites you in and reflects your personal style. As you embark on this journey, remember that curb appeal is not just about aesthetics; it’s about crafting an experience that makes you proud every time you arrive.

Consider the emotions you want to evoke when you step through your front door. Is it warmth, comfort, or perhaps a sense of tranquility? Start by incorporating elements that speak to those feelings. A vibrant garden bursting with colors, charming outdoor lighting that casts a welcoming glow, or a freshly painted front door in a hue that makes your heart sing can all contribute to an inviting atmosphere.

Engaging with your home’s exterior should be an enjoyable process. Take the time to explore different design ideas, whether it’s through inspiration from home improvement shows, magazines, or even your neighbors’ beautiful spaces. Involve family members in the decision-making process; after all, everyone deserves to feel a sense of ownership over their home.

Lastly, keep in mind that your home is a living entity, one that evolves with you. Regular updates, no matter how small, can ensure that your space remains a reflection of your changing tastes and lifestyle. By investing time and effort into enhancing your home’s curb appeal, you’re not just improving its look—you’re cultivating a place where cherished memories are made and where you’ll always love to come home to.

In conclusion, enhancing your home’s curb appeal doesn’t have to be a daunting or expensive task. By implementing the tips we’ve shared, from refreshing your landscaping to giving your front door a vibrant new coat of paint, you can transform your home’s exterior into a welcoming sight that reflects your personal style. Remember, first impressions matter, whether you’re looking to sell or simply want to enjoy a more beautiful living space. Take the time to invest in these small yet impactful changes, and watch as your home’s charm and value increase. We hope these ideas inspire you to start your curb appeal journey today. Happy transforming!

How to install a new door?

Installing a new door may seem like a daunting task, but with the right guidance, it can be a rewarding DIY project that transforms the look and function of your space.

Whether you’re upgrading for aesthetics, improving energy efficiency, or enhancing security, knowing how to properly install a door can save you time and money while giving you the satisfaction of a job well done. In this comprehensive step-by-step guide, we’ll take you through the entire process—from selecting the perfect door for your home to the final touches that ensure a flawless fit. With practical tips, essential tools, and expert advice, you’ll be equipped to tackle this project with confidence, making your new door installation feel like a professional achievement. So roll up your sleeves and get ready to elevate your home’s entrance with our easy-to-follow instructions!

1. Introduction: Why Installing a Door Yourself is a Great Idea

How to install a new door?
Credit : whatcanu.com

Installing a new door might seem like a daunting task, but taking it on yourself can be a rewarding and cost-effective endeavor. There are several compelling reasons why installing a door yourself is not only practical but also a fantastic opportunity to enhance your home.

First and foremost, DIY door installation allows you to save money. Hiring a professional can quickly add up in costs, with labor charges often exceeding the price of the door itself. By rolling up your sleeves and tackling the project on your own, you not only gain financial savings but also the satisfaction of knowing you accomplished it yourself.

Additionally, installing a door gives you complete control over the design and materials used. You can select the perfect style, color, and finish that complements your home’s aesthetic. Whether you prefer a classic wooden door, a sleek modern design, or a sturdy steel option, the choice is entirely yours. This personal touch can greatly enhance your home’s curb appeal and overall value.

Moreover, the sense of accomplishment that comes with completing a home improvement project cannot be overstated. Each step in the installation process, from measuring and cutting to hanging the door and securing the hardware, provides an opportunity to learn new skills and boost your confidence as a DIYer.

Lastly, the process of installing a door yourself fosters a deeper connection with your home. Each time you pass through that newly installed entrance, you’ll be reminded of your hard work and dedication. You’ll appreciate the time and effort you put into creating a welcoming space for family and friends.

In this guide, we’ll walk you through the step-by-step process of installing your new door like a pro, ensuring you have all the information you need to achieve a flawless finish. So grab your tools, roll up your sleeves, and let’s get started on this exciting home improvement journey!

2. Tools and Materials You’ll Need

Before diving into the installation process, it’s crucial to gather all the necessary tools and materials to ensure a smooth and efficient project. Having everything at your fingertips will not only save you time but also prevent frustration mid-installation. Here’s a comprehensive list of what you’ll need:

**Tools:**
1. **Tape Measure:** A reliable tape measure is essential for ensuring precise measurements of your new door and the frame.
2. **Level:** A level will help you confirm that your door is perfectly aligned, preventing any unwanted gaps or misalignment.
3. **Screwdriver Set:** Both flathead and Phillips screwdrivers will be needed for various screws throughout the installation.
4. **Drill:** A power drill with drill bits is critical for creating pilot holes and securing screws efficiently.
5. **Hammer:** A good hammer will be useful for tapping in shims or prying out old door frames if you’re replacing an existing door.
6. **Chisel:** If your new door requires mortising for hinges, a sharp chisel will ensure clean and precise cuts.
7. **Utility Knife:** This will come in handy for various cutting tasks, such as trimming shims or removing old weather stripping.

**Materials:**
1. **New Door:** Choose a door that fits your style and the dimensions of your door frame. Don’t forget to check if it comes pre-hung or as a slab!
2. **Hinges:** Be sure to select sturdy, high-quality hinges that can support the weight of your new door.
3. **Door Handle/Lockset:** Depending on your preference, choose a handle and lockset that complements your door and enhances security.
4. **Shims:** These small, wedge-shaped pieces will help you adjust the door frame for a perfect fit and level installation.
5. **Weather Stripping:** If you’re replacing an exterior door, weather stripping will help improve energy efficiency by blocking drafts.
6. **Wood Glue or Construction Adhesive:** This will be useful for securing shims in place or reinforcing joints.

With these tools and materials ready, you’ll be well-equipped to tackle your door installation with confidence. Remember, preparation is key to achieving a professional finish, so take the time to gather everything you need before you start. Happy installing!

3. Choosing the Right Door for Your Space

How to install a new door?
Credit : whatcanu.com

Choosing the right door for your space is a pivotal step in your installation journey, as it sets the tone for both aesthetics and functionality. Before you head to the store or browse online, consider the following factors to ensure you select a door that complements your home and meets your needs.

First and foremost, assess the style of your home. Whether you have a modern, traditional, or eclectic design, the door should harmonize with the overall aesthetic. For a contemporary space, sleek and minimalistic designs work wonders, while a classic home may benefit from a solid wood door with intricate details.

Next, think about the material. Doors come in various materials, each offering unique benefits. Solid wood doors exude warmth and durability, while fiberglass doors provide insulation and are resistant to the elements. Steel doors are incredibly secure and great for exterior use, while hollow-core doors are a budget-friendly option for interior spaces. Consider your climate and the level of maintenance you’re willing to commit to when making your choice.

Don’t forget to measure your door frame carefully! A door that’s too large or too small can lead to installation headaches and can compromise energy efficiency. Make sure to note the height, width, and thickness of your existing door frame, and double-check these measurements against the specifications of your chosen door.

Finally, think about the door’s functionality. Do you want a door that swings open, slides, or even folds? Each option has its advantages depending on the space you are working with. For narrow hallways, pocket doors can save space, while traditional swinging doors are ideal for larger openings.

By taking the time to carefully select the right door for your space, you’ll ensure that your installation goes smoothly and that the final result enhances the beauty and functionality of your home. With the right door in hand, you’ll be one step closer to a professional-looking installation!

4. Measuring Your Door Frame Accurately

Measuring your door frame accurately is a crucial step that can make or break the success of your installation. Even the slightest miscalculation can lead to gaps, drafts, or an ill-fitting door that could compromise both aesthetics and functionality. To begin, gather your tools: a tape measure, a level, and a pencil for marking your measurements.

Start by measuring the width of the door frame. Place your tape measure at the inside edge of one side of the frame and extend it to the inside edge of the opposite side. Jot down this measurement; it’s essential to take at least three width measurements at different heights—top, middle, and bottom—to account for any irregularities in the frame. The smallest of these measurements will determine the width of your new door.

Next, measure the height of the door frame. Again, measure from the top inside edge down to the bottom inside edge at both the left and right sides of the frame. Just like with the width, take multiple measurements here to ensure accuracy; the shortest measurement will be your final height.

Additionally, check the squareness of the frame using a level. Place the level diagonally from one corner of the frame to the opposite corner. If the level does not sit evenly, this indicates that your frame may be out of square, which can affect the fit of your new door.

Lastly, don’t forget to note the thickness of the frame and any other relevant details, such as the presence of molding or trim. Accurate measurements are the foundation of a successful door installation, so take your time and double-check your figures. A well-measured door frame sets the stage for a smooth installation process and ensures that your new door will function perfectly for years to come.

5. Preparing the Old Door Frame for Installation

How to install a new door?
Credit : whatcanu.com

Preparing the old door frame for installation is a crucial step that can make or break your project. Before you dive into the installation of your new door, take a moment to assess the condition of the existing frame. look for any signs of damage, such as warping, rot, or cracks, which could compromise the integrity of your new door. If you notice any issues, it may be wise to repair or replace the frame to ensure a snug fit and long-lasting performance.

Once the frame’s condition is confirmed, it’s time to clean it thoroughly. Remove any dust, debris, or old paint that may have accumulated over the years. A clean surface is key to achieving a smooth installation. Use a putty knife to scrape away any peeling paint, and a vacuum or a damp cloth to pick up the remnants. If you encounter stubborn old caulk or adhesive, a heat gun can help soften it for easier removal.

Next, check the level and plumb of the door frame. Use a spirit level to make sure the frame is straight and aligned correctly; this will help prevent any future issues with your new door not closing properly or getting stuck. If the frame is out of square, you may need to shim it with small pieces of wood to correct its alignment.

Finally, take the time to measure the door frame accurately. Use a tape measure to determine the height and width of the frame, noting down these dimensions. It’s always best to double-check your measurements to ensure a proper fit for your new door. With the old door frame prepped and ready, you’re now set to bring in your new door and transform your space with ease!

6. Removing the Old Door Safely

Removing the old door safely is a crucial step in the installation process, and it requires a bit of care and precision. Begin by gathering your tools: a screwdriver, a pry bar, and a utility knife. Before you start, ensure you have someone to assist you, as doors can be heavy and cumbersome, making it easier to handle with an extra set of hands.

First, close the door and inspect the hinges. Using your screwdriver, carefully remove the screws from the hinges, working from the bottom hinge to the top. This method helps to relieve the weight gradually, minimizing the risk of the door falling unexpectedly. As you remove each screw, place them in a small container to avoid losing them, as you may need them later for your new door.

Once the hinges are detached, gently push the door towards you and lift it off the frame. If the door feels stuck, check for any additional screws that may be holding it in place, or use a utility knife to cut through any paint or caulk that may be sealing it. When you finally have the door free, set it aside safely so it won’t fall or get damaged.

Next, inspect the door frame for any lingering hardware, like strike plates or latches. Removing these components will ensure a clean and smooth installation for your new door. If necessary, use your pry bar to carefully remove any nails or screws that may have been left behind.

Taking your time during this process is vital. Rushing can lead to accidents or damage, so be mindful of your surroundings and the materials you’re working with. With the old door safely removed, you’re one step closer to transforming your entryway with a fresh, new door that will enhance both the functionality and aesthetic of your home.

7. Unpacking and Inspecting Your New Door

How to install a new door?
Credit : whatcanu.com

Unpacking and inspecting your new door is a crucial step that sets the stage for a smooth installation process. Once your door arrives, take a moment to find a clean, spacious area where you can safely unbox it. Gently remove the packaging, being careful not to damage the door itself. Most doors come wrapped in protective materials like cardboard or foam, so handle everything with care as you peel back these layers.

As you unveil your new door, conduct a thorough inspection. Start by checking for any visible damage, such as dents, scratches, or warping. It’s essential to catch these issues early, as they may affect the door’s functionality and aesthetic appeal. Don’t just rely on a cursory glance—run your hands over the surface to feel for any imperfections that might not be immediately visible.

Next, confirm that all components of your door are included in the package. This typically includes the door itself, hinges, a handle or knob, and any additional hardware necessary for installation. Refer to the manufacturer’s instructions to ensure you have everything you need. If something is missing or damaged, reach out to the supplier promptly to arrange for replacements.

Lastly, take a moment to familiarize yourself with the door’s features, whether it’s a solid wood door with intricate designs or a sleek, modern fiberglass model. Knowing the specifics can help you make informed decisions during the installation process, ensuring that you not only install the door correctly but also appreciate its design and functionality to the fullest.

By taking the time to unpack and inspect your new door carefully, you’re ensuring a successful installation ahead. This diligence will save you time and potential headaches down the road, allowing you to enjoy your new door with confidence.

8. Installing Door Hinges: Step-by-Step

Installing door hinges may seem like a small detail, but it’s a crucial step that ensures your door functions smoothly and securely. Follow this step-by-step guide to install your new door hinges like a pro!

**Step 1: Gather Your Tools and Materials**
Before you begin, make sure you have everything you need at hand. You’ll require a drill, a screwdriver, a measuring tape, a chisel, and, of course, your door hinges. Most hinges come with screws, but double-check to ensure you have the correct size for your door.

**Step 2: Mark the Hinge Placement**
Using your measuring tape, measure down from the top of the door to where you want the top hinge to go—typically around 7 inches from the top edge. Mark this spot with a pencil. Repeat this process for the bottom hinge, generally placed about 11 inches from the bottom. If you’re adding a third hinge, position it halfway between the top and bottom hinges.

**Step 3: Create the Hinge Recesses**
Place the hinge flat against the door where you marked it. Using your chisel, carefully carve out a shallow recess for the hinge to sit flush with the door surface. This step is crucial for a clean, professional look and ensures the door swings smoothly.

**Step 4: Attach the Hinges to the Door**
Align the hinge with the recess you created. Using your drill, insert the screws provided with the hinge into the pre-drilled holes. Tighten them securely but avoid overtightening, as this could strip the screws or damage the wood.

**Step 5: Position the Door in the Frame**
With the hinges attached to the door, it’s time to position the door in the frame. You may need a helper for this step to hold the door steady. Align the hinges with the corresponding plates in the door frame.

**Step 6: Secure the Hinges to the Frame**
Once the door is in place, attach the other half of the hinge to the door frame by drilling screws into the hinge plates. Make sure the door swings freely and check for alignment. If it’s too tight or doesn’t close properly, you may need to adjust the hinges slightly or add shims to the frame.

**Step 7: Test the Door**
After everything is secured, give the door a few test swings. It should open and close smoothly without any sticking or rubbing. If there are issues, revisit the hinge placements and make minor adjustments as needed.

**Step 8: Final Touches**
Once you’re satisfied with the installation, clean any dust or debris from the installation process. If your hinges are visible, consider applying a coat of lubricant to ensure they remain functional and quiet.

By carefully following these steps, you’ll have installed your door hinges like a pro, ensuring your new door not only looks fantastic but operates seamlessly in your space! Happy DIY-ing!

9. Hanging the New Door: Tips for Alignment

Hanging a new door can seem daunting, but with a few expert tips on alignment, you can ensure that your installation goes off without a hitch. Proper alignment is crucial not only for aesthetics but also for functionality; a misaligned door can lead to issues such as sticking, gaps, or even security concerns. Here’s how to get it just right.

First, before you even attempt to hang the door, make sure your hinges are properly installed on the door frame. Use a level to check that the hinge side of the frame is plumb, adjusting as necessary with shims. If the frame isn’t square, you may find that your door doesn’t fit correctly, so take the time to get this step right.

Once your hinges are secured, it’s time to position the door. Hold the door in place with the help of a friend or use a door jig to support it temporarily. Begin by securing the top hinge first. This will help anchor the door and allow you to check its alignment without it swinging open or closed unexpectedly.

Next, check the gap between the door and the frame on both the hinge and latch sides. Ideally, you want a consistent gap of about 1/8 inch. If you notice that the door is leaning or there are uneven gaps, adjust the lower hinge by adding or removing shims until the door hangs evenly. It may take a bit of trial and error, but patience is key.

Once you’re satisfied with the alignment, secure the bottom hinge. Before closing the door completely, open and shut it a few times to ensure it swings smoothly without dragging. If you encounter any resistance, it’s likely a sign that further adjustments are needed.

Finally, after confirming that the door is properly aligned and functions smoothly, you can drive in the screws fully and install any additional hardware, such as doorknobs or locks. A well-hung door not only enhances the aesthetic appeal of your space but also contributes to the overall security and efficiency of your home. With these alignment tips, you’ll be hanging doors like a pro in no time!

10. Securing the Door Frame: Shims and Screws

Securing the door frame is a crucial step that ensures your new door operates smoothly and stands the test of time. This process involves using shims and screws to create a sturdy, level framework that can withstand daily use.

Begin by inserting shims—small, wedge-like pieces of wood—into the gaps between the door frame and the rough opening of the wall. Shims are essential for adjusting the alignment of the door; they help fill any uneven spaces, ensuring that the door hangs straight and operates without obstruction. Start at the bottom hinge side and gently tap the shim into place, checking frequently with a level to ensure the frame is perfectly plumb. You want the door to swing effortlessly, so this step cannot be rushed.

Once the shims are in position, it’s time to secure the frame with screws. Using a power drill, fasten screws through the frame into the wall studs. Place screws approximately every 12 to 16 inches along the sides and top of the frame, ensuring they penetrate the studs for maximum stability. Be careful not to over-tighten the screws, as this can warp the frame and affect the door’s functionality.

After securing the frame, double-check the door’s alignment and operation. Open and close the door to make sure it swings freely without sticking or dragging. If adjustments are necessary, you can easily add or remove shims as needed. By carefully securing the door frame with shims and screws, you’ll create a solid base that will enhance the longevity and performance of your new door, giving it the professional finish you desire.

11. Installing the Door Handle and Lockset

Once your door is hung securely in its frame, it’s time to add the finishing touches that not only enhance its functionality but also add to its aesthetic appeal: the door handle and lockset. Installing these components may seem like a straightforward task, but a careful approach ensures smooth operation and a polished look.

Start by selecting the right handle and lockset that matches your door style and complements your home decor. Before you dive into installation, gather your tools: a tape measure, screwdriver, chisel, and a level. Having everything on hand will streamline the process and minimize interruptions.

Begin by determining the correct height for your door handle. A common standard is around 36 inches from the floor, but you can adjust based on your preference or the specific ergonomic needs of your household. Mark the spot lightly with a pencil.

Next, position the lockset, which typically consists of two main components: the latch and the deadbolt (if applicable). Use your chisel to create a mortise for the latch, following the manufacturer’s instructions for depth and width. This step is crucial; a snug fit will prevent any wobbling and ensure the latch operates smoothly.

Once the mortises are cut, insert the latch into the side of the door. Secure it with screws, ensuring that it is flush with the door’s edge. Then, place the strike plate in the door frame, marking the location where it will fit. Chisel out a small recess if necessary to accommodate it, and screw it into place.

Now, it’s time to install the door handle. Align the handle’s spindle with the latch and push it through the hole you’ve prepared. Attach the outer handle by securing it with the provided screws. Make sure both handles are aligned properly and turn smoothly.

Finally, if your lockset includes a deadbolt, repeat the process for this component. Mark the position for the deadbolt, drill the necessary holes, and secure it in place. Once everything is installed, test the lock and handle to ensure they function correctly, making any adjustments as needed.

With the handle and lockset securely in place, you can step back and admire your handiwork. Not only have you successfully enhanced the functionality of your door, but you’ve also added a stylish touch that will welcome guests and provide security for your home.

12. Adjusting the Door for a Perfect Fit

Once your new door is securely hung and you’ve taken a moment to admire your handiwork, it’s time to ensure it fits perfectly within its frame. Proper adjustment is crucial for both aesthetics and functionality, as a misaligned door can lead to operational issues and compromise security.

Start by checking the gaps between the door and the frame. Ideally, there should be an even space of about 1/8 inch on the top and sides, allowing for smooth operation and easy opening and closing. If you notice uneven gaps, it may be necessary to adjust the hinges. Loosen the screws on the hinge plate slightly, use a shim to raise or lower the door as needed, and then retighten the screws. This might take a few attempts, so don’t be discouraged if it takes a bit of tweaking to achieve that perfect alignment.

Next, check how the door swings. It should open and close without catching or scraping against the frame or floor. If the door drags on the floor, you may need to trim the bottom edge. Measure from the floor to the bottom of the door, and then mark where the cut will be. Using a circular saw or hand saw, make a clean cut, and be sure to sand down the edges to prevent splintering.

Finally, test the latch and strike plate. Close the door and ensure that the latch easily engages with the strike plate without excessive force. If the latch doesn’t align properly, you may need to reposition the strike plate. Mark the new position, drill pilot holes, and install it at the adjusted height.

Once you’ve made these adjustments, step back and appreciate your efforts. A well-fitted door not only enhances the overall look of your home but also ensures that it functions seamlessly for years to come. With a little patience and attention to detail, you can achieve a professional finish that reflects your hard work and dedication.

13. Finishing Touches: Painting or Staining Your Door

Once your new door is securely installed and all adjustments have been made, it’s time to focus on the finishing touches that will elevate its appearance and protect it from the elements. Painting or staining your door not only enhances its aesthetic appeal but also adds a layer of protection against wear and tear, moisture, and sunlight.

Before you start, ensure the surface of the door is clean and free of dust. If you’ve just installed a wooden door, consider sanding it lightly to create a smooth surface that will better absorb your chosen finish. For painted doors, a primer may be necessary, especially if you’re transitioning from a darker color to a lighter one or if the door has never been painted before.

When it comes to choosing between paint and stain, consider the look you want to achieve. Paint offers a vibrant, opaque finish that can complement the color scheme of your home, while stain highlights the natural grain of the wood, providing a warm and timeless appearance. If you opt for stain, be sure to select a high-quality product that’s designed for exterior use to ensure durability.

Apply your chosen finish using a high-quality brush or roller for a smooth, even application. For paint, start with the edges and grooves before moving to the flat surfaces, making sure to apply multiple thin coats rather than one thick coat for the best results. If staining, work in the direction of the wood grain and wipe off any excess with a clean cloth to avoid blotches.

Allow ample drying time between coats, and don’t forget to finish with a clear sealant if you chose stain, as this will provide additional protection against moisture and UV damage. Once everything is dry and set, step back and admire your handiwork—your newly installed door not only looks professional but is now ready to withstand the elements while adding curb appeal to your home.

14. Troubleshooting Common Installation Issues

Installing a new door can be a rewarding DIY project, but it’s not without its challenges. Encountering issues during installation is common, and knowing how to troubleshoot these problems can save you time, frustration, and potentially costly repairs. Here are some typical installation issues you might face and how to resolve them like a pro.

**1. Door Doesn’t Fit Properly:**
If your door doesn’t seem to fit in the frame correctly, start by checking the measurements. Ensure that the door is aligned with the hinges and that the frame is square. Use a level to check for evenness; if the frame is out of square, shimming may be necessary. Adjust or trim the door edges slightly if it’s too large, but be cautious—removing too much material can lead to gaps.

**2. Alignment Issues with Hinges:**
Misalignment of hinges can cause your door to sag or not close properly. Check that the screws are tight and that the hinges are mounted flush against the door and the frame. If the door is still misaligned, consider repositioning the hinge plates or using additional shims to elevate the door back into proper alignment.

**3. The Door Sticks or Gets Jammed:**
A sticking door can be a major annoyance. This issue often arises from humidity causing wood to swell or an improper installation. Inspect the door and frame for any obstructions or debris that might be causing the sticking. Sanding down the edges of the door slightly can help alleviate this issue. If the door is swelling due to moisture, consider applying a sealant to protect it from humidity in the future.

**4. Gaps Around the Door:**
If you notice gaps between the door and the frame, it could affect energy efficiency and security. Check that the door is hung evenly and make adjustments as needed. Weather stripping can also be an effective solution for sealing these gaps, as it not only improves insulation but also enhances the overall appearance of your installation.

**5. Difficulty With Lock Mechanism:**
Sometimes, the lock may not align properly, which can be frustrating. Ensure that the strike plate is correctly positioned and that the hole in the door is drilled at the right depth. If the lock cylinder is sticking, lubricate it with graphite or a silicone spray to ensure smooth operation.

By anticipating these common installation issues and knowing how to troubleshoot them, you’ll not only save time but also ensure that your new door functions perfectly for years to come. Remember, every challenge you face is an opportunity to learn and improve your DIY skills!

15. Conclusion: Enjoying Your New Door and Final Thoughts

Congratulations on successfully installing your new door! As you step back and admire your handiwork, take a moment to appreciate not just the aesthetic upgrade but also the functional benefits it brings to your home. A new door can enhance your home’s energy efficiency, improve security, and elevate curb appeal, making it an investment that pays off in more ways than one.

Now that your door is in place, it’s time to revel in the satisfaction of a job well done. Enjoy the fresh look and feel it adds to your space, and take note of how it complements your interior and exterior design. Whether you chose a sleek modern style or a classic wooden finish, your new door serves as a testament to your DIY skills and attention to detail.

Remember, the journey doesn’t end here. Regular maintenance is key to keeping your door looking and functioning at its best. Periodically check the hinges and hardware, clean the surface, and apply any necessary treatments to protect against the elements. Establishing a routine will ensure that your door remains a stunning feature for years to come.

As you close this chapter of your home improvement project, consider sharing your experience with others. Post pictures of your newly installed door on social media, or share tips and tricks with friends and family who may be considering a similar upgrade. Your insights could inspire someone else to take the plunge into their own home improvement journey.

In conclusion, installing your new door is not just about the end result; it’s about the pride you feel in transforming your space. So, enjoy the beauty and functionality it brings, and let it be a reminder of your ability to tackle DIY projects like a pro! Happy home improving!

In conclusion, we hope this step-by-step guide has empowered you with the knowledge and confidence to install your new door like a pro! From selecting the right tools to ensuring a perfect fit, each step is crucial in achieving a polished and professional finish. Remember, patience and precision are your best friends throughout this process. As you stand back and admire your handiwork, take pride in knowing you transformed your space with your own two hands. Whether you’re upgrading for aesthetic appeal, energy efficiency, or security, your new door will undoubtedly enhance your home. We encourage you to share your installation experience and photos with us; we’d love to celebrate your achievement! Happy DIYing!

How to fix a broken door handle?

A broken door handle may seem like a minor inconvenience, but it can quickly become a frustrating obstacle in your daily routine.

Whether it’s a stubborn handle that won’t turn, a loose knob that jiggles unnervingly, or a completely detached mechanism, dealing with a malfunctioning door handle can disrupt the flow of your home. Thankfully, you don’t need to call in a professional or invest in costly replacements to restore functionality. With just a few common tools and a little bit of know-how, you can tackle this DIY project and have your door handle working like new in no time. In this guide, we’ll walk you through five easy steps that will not only empower you to fix your door handle efficiently but also enhance your overall home repair skills. Say goodbye to those pesky door handle dilemmas and hello to newfound confidence in your DIY abilities!

1. Introduction: Why Fixing a Broken Door Handle Matters

How to fix a broken door handle?
Credit : whatcanu.com

A broken door handle might seem like a minor inconvenience, but its impact can resonate throughout your home. Think about it: every time you encounter a door that won’t open smoothly, you’re faced with frustration, and that can disrupt the flow of your day. A functioning door handle is not just about convenience; it’s a fundamental aspect of security and privacy. A broken handle can leave your home vulnerable, compromise your peace of mind, and even lead to larger issues if left unaddressed.

Moreover, a faulty door handle can detract from the overall aesthetic of your space. Whether it’s a sleek modern design or a vintage charm, door handles play a significant role in your home’s decor. Fixing a broken handle not only restores functionality but also enhances the visual appeal of your doors, making them inviting and polished.

In this DIY guide, we’ll walk you through five easy steps to repair your broken door handle, empowering you to take control of your home maintenance. With just a few tools and a bit of time, you’ll find that fixing your door handle is not only achievable but also rewarding. Let’s dive into the details and get your doors back in working order!

2. Tools and Materials Needed for the Repair

Before diving into the repair process, it’s essential to gather all the necessary tools and materials to ensure a smooth and efficient fix. Here’s a handy list of what you’ll need:

**Tools:**
1. **Screwdriver**: Depending on your door handle, you’ll likely need either a Phillips or flathead screwdriver. A multi-bit screwdriver can be particularly useful, as it allows you to switch between different types of screws without needing multiple tools.

2. **Pliers**: A pair of pliers can help you grasp and manipulate small components, especially if they’re tightly fitted or difficult to reach.

3. **Utility Knife**: This can be useful for cutting away any old adhesive or seals, should your door handle be held in place by sticky materials.

4. **Drill**: If you need to replace screws or install a new handle, a drill will save you time and effort. Make sure to have the correct drill bits on hand.

**Materials:**
1. **Replacement Handle**: Ensure you have a handle that matches the style and size of your existing one. You can find suitable replacements at your local hardware store or online.

2. **Screws**: If your handle came without screws, or if the old screws are stripped or damaged, it’s wise to have a few extra screws of the correct size.

3. **Lubricant**: A silicone-based lubricant can help ensure smooth operation once your repair is complete, particularly if the handle mechanism feels stiff.

4. **Cleaning Supplies**: A cloth and some mild cleaner will help you tidy up the area around the door handle before and after the repair.

By gathering these tools and materials in advance, you’ll set yourself up for success, making the repair process as straightforward and hassle-free as possible. Once you have everything ready, you’ll be just a few steps away from restoring your door handle to its former glory!

3. Step 1: Identify the Type of Door Handle

How to fix a broken door handle?
Credit : whatcanu.com

Before diving into repairs, the first crucial step is to identify the type of door handle you’re dealing with. Door handles come in various styles and mechanisms, each requiring a different approach for repair. Start by examining your door handle closely. Is it a traditional knob, a lever, or a more modern pull handle? Understanding the design can help you determine the tools and techniques you’ll need.

Next, pay attention to the mechanism itself. Is it a simple passage handle that allows free entry and exit, or does it have a locking mechanism that adds a layer of complexity? If it’s a lockable handle, you’ll want to check if the key is still functioning properly or if the lock cylinder is contributing to the problem.

Additionally, consider the material of the door handle. Is it made of metal, plastic, or perhaps wood? Different materials may require specific repair methods or replacement parts. For instance, a plastic handle may break more easily and could require a different approach than a robust metal one.

Once you’ve identified the type and mechanism of your door handle, you’re ready to move on to the next steps. Having a clear understanding of what you’re working with not only sets the stage for a smoother repair process but also saves you time and frustration down the line. So, take a moment to analyze your door handle—it’s a small but vital step in ensuring a successful fix!

4. Step 2: Remove the Broken Door Handle

Once you’ve gathered your tools and assessed the situation, it’s time to remove the broken door handle—a crucial step that sets the stage for a successful repair. Start by inspecting the handle itself; if it’s equipped with visible screws, grab your screwdriver and gently unscrew them. Be sure to keep these screws in a safe place, as you’ll need them later for reassembly.

If the handle is held in place by a decorative cover plate, you may need to pry it off carefully using a flathead screwdriver. Take your time with this step to avoid damaging the surrounding door surface. Once the cover is off, you’ll have clear access to the screws anchoring the handle.

In cases where the handle is stuck or the screws are stripped, a little finesse is required. Try wiggling the handle gently while turning the screws counterclockwise; this can sometimes help loosen stubborn components. If the handle is broken beyond repair, it might be necessary to apply a bit of force—just be cautious not to damage the door itself.

Once you’ve successfully unscrewed the handle, gently pull it away from the door. If you encounter resistance, double-check for any hidden screws or clips that may be holding it in place. With the broken handle removed, take a moment to clean the area around the door latch and inspect it for any damage that may need attention. Now you’re one step closer to restoring functionality to your door!

5. Step 3: Inspect the Mechanism for Damage

How to fix a broken door handle?
Credit : whatcanu.com

Once you’ve removed the door handle, it’s time to take a closer look at the internal mechanism. This step is crucial, as it allows you to identify any underlying issues that may be causing the malfunction. Start by inspecting the latch and the surrounding components for any signs of wear, rust, or misalignment. A damaged latch might be the reason your door handle isn’t functioning properly, so give it a thorough examination.

Next, check the screws and springs within the mechanism. Sometimes, a simple tightening of screws can resolve the issue, while other times, a spring might be broken or dislodged, requiring replacement. If you notice any components that are cracked or bent, it’s essential to replace them before reassembling the handle.

Additionally, take note of how the mechanism operates. If it feels stiff or doesn’t engage smoothly, it may need lubrication. A quick application of a silicone-based lubricant can often restore fluidity to the movement and enhance the overall performance of the door handle.

By carefully inspecting the mechanism and addressing any damage or wear, you set the foundation for a successful repair. This step ensures that when you reassemble the handle, it will function like new, allowing your door to open and close seamlessly once again. After completing this inspection, you’ll be ready to move on to the next step, where you’ll make any necessary repairs or replacements before putting everything back together.

6. Step 4: Replace or Repair the Broken Parts

In Step 4, you’ll tackle the heart of the repair process: replacing or repairing the broken parts of your door handle. This step is crucial since the functionality of your door handle hinges on the condition of its components. Start by examining the damaged parts closely. If the handle is cracked or the mechanism is jammed, you may need to replace the entire handle or just specific components, like screws, springs, or the latch.

If you’re opting for a replacement, head to your local hardware store with the old handle in hand. This will ensure you find a compatible replacement that matches both the style and size of your existing setup. Look for durable materials that can withstand daily use, such as stainless steel or brass, which not only offer longevity but also add a touch of elegance to your door.

However, if you prefer to repair, clean the broken parts thoroughly to remove any debris or rust that may be contributing to the malfunction. For minor cracks, a strong adhesive or epoxy can work wonders, providing a sturdy fix once it dries. For stripped screws or fittings, consider using a thread repair kit or larger screws that can hold the components firmly in place.

Once you have either replaced or repaired the parts, reassemble the handle carefully, ensuring everything is aligned correctly. As you reattach the screws, don’t overtighten them, as this may cause additional damage. Finally, give the handle a few test turns to ensure it operates smoothly. With these steps completed, you’ll be well on your way to restoring functionality to your door handle and enhancing the overall security of your space.

7. Step 5: Reinstall the Door Handle

How to fix a broken door handle?
Credit : whatcanu.com

After you’ve successfully replaced the broken components and ensured everything is in working order, it’s time for the final step: reinstalling the door handle. This is where your efforts truly come together, and you can take a moment to appreciate the progress made throughout the repair process.

Begin by aligning the handle with the door’s edge, ensuring that any screws or mounting holes line up correctly. Gently push the handle into place, taking care not to force anything, as this could damage both the handle and the door. If your door handle includes a spindle—a metal rod that connects the two handles—make sure it fits snugly through the hole in the door.

Next, grab your screws and a screwdriver, and secure the handle by tightening the screws—be careful not to over-tighten, as this can strip the holes or cause the handle to misalign. If your handle has a decorative cover or plate, now is the time to attach it, giving the handle a polished finish and concealing any visible screws.

Once everything is securely in place, test the handle by turning it several times to ensure it operates smoothly and without resistance. If you notice any sticking or unevenness, double-check that all screws are properly fastened and that the handle is aligned correctly.

Finally, take a step back and admire your handiwork! Reinstalling the door handle not only restores functionality but also enhances the overall aesthetic of your door. With just a few simple steps, you’ve successfully fixed a common household issue, saving time and money while boosting your confidence in DIY repairs. Now, go ahead and open that door with pride!

8. Tips for Ensuring a Secure Fit

When it comes to fixing a broken door handle, ensuring a secure fit is crucial for both functionality and safety. A wobbly or loose handle can lead to frustration and even compromise the security of your home. Here are some essential tips to guarantee that your newly installed handle is snug, secure, and ready for daily use.

**1. Choose the Right Size:** Before you begin, ensure that the replacement handle you’ve selected is the correct size for your door. Measure the diameter of the existing holes and the thickness of the door to avoid any surprises during installation. A properly sized handle not only fits better but also enhances the overall aesthetic of your door.

**2. Use Quality Hardware:** Investing in high-quality screws and fittings is vital. Cheap or worn-out screws can strip easily and lead to a loose handle over time. Opt for stainless steel or brass screws, which provide durability and resist corrosion, ensuring that your handle stays firmly in place even in varying weather conditions.

**3. Align Components Properly:** As you assemble the handle, take extra care to align the internal components accurately. Misalignment can lead to unnecessary strain on the handle, resulting in premature wear or breakage. Use a level or a guide to ensure everything is straight and properly aligned before tightening any screws.

**4. Tighten Securely but Not Overly:** As you fasten the screws, aim for a firm but gentle grip. Over-tightening can strip the screw holes or damage the door material, compromising the integrity of the installation. A well-secured handle should feel solid without excessive force.

**5. Test the Handle:** Once your handle is installed, give it a few test turns and pushes. Check for any wobbling or looseness. If you notice any movement, double-check your installation steps. It may be necessary to adjust the screws or realign the components to achieve that perfect, secure fit.

By following these tips, you can ensure that your door handle not only looks great but functions flawlessly, providing you with peace of mind and years of reliable use. With a little attention to detail, you’ll have a secure fit that allows you to open and close your door with confidence.

9. Common Mistakes to Avoid During the Repair

When tackling the task of fixing a broken door handle, it’s easy to overlook some crucial details that can lead to frustration or even further damage. Here are some common mistakes to avoid during your repair process, ensuring a smoother and more effective experience.

**1. Skipping the Diagnostic Step:**
Before you grab your tools, take a moment to thoroughly assess the door handle and the surrounding mechanism. Failing to identify the specific issue—whether it’s a loose screw, a broken latch, or a misaligned plate—can lead to unnecessary repairs or the wrong replacement parts being purchased.

**2. Using Incorrect Tools:**
Using the right tools is essential for a successful repair. Many DIYers might try to make do with whatever is on hand, but this can lead to stripped screws or damaged components. Ensure you have the correct screwdriver, pliers, and any other necessary tools specific to your door handle type.

**3. Over-tightening Screws:**
While it might seem logical to tighten the screws as much as possible to secure the handle, over-tightening can actually cause damage to the handle or the door itself. Instead, find a comfortable snugness—just enough to hold the handle securely without straining the material.

**4. Neglecting Lubrication:**
After you’ve successfully reattached your door handle, it’s easy to overlook lubrication. A bit of grease or a silicone spray can go a long way in ensuring the handle operates smoothly and prolongs its lifespan. Skipping this step can lead to future sticking or squeaking.

**5. Ignoring Aesthetic Details:**
A repair isn’t just functional; it should also look good. After completing the fix, take a moment to clean up any smudges or dirt around the handle and door area. This attention to detail not only improves the appearance but can also add a finishing touch that makes your DIY effort stand out.

By being mindful of these common pitfalls during your door handle repair, you can streamline the process and achieve a professional-looking fix with ease.

10. Maintenance Tips for Preventing Future Breakages

Maintaining your door handles is essential for ensuring their longevity and functionality. Just like any other part of your home, door handles require attention and care to prevent future breakages. Here are some simple yet effective maintenance tips to keep your door handles in top condition.

**1. Regular Cleaning:** Dust and debris can accumulate around door handles, leading to wear and tear over time. Use a soft, damp cloth to wipe down the handles regularly. For metal handles, consider using a mild detergent to remove any grime, followed by a quick dry with a clean cloth to prevent rust.

**2. Lubrication is Key:** To ensure smooth operation, apply a few drops of lubricant to the handle’s moving parts, particularly if you notice any squeaking or stiffness. A silicone-based lubricant is ideal as it doesn’t attract dust and dirt like oil-based options.

**3. Check for Loose Screws:** Periodically inspect the screws and bolts that secure the door handle. Vibrations from daily use can loosen these attachments, leading to instability. Tighten any loose screws with a screwdriver to maintain a secure fit.

**4. Avoid Excessive Force:** Educate family members and guests about using door handles gently. Yanking or applying excessive force can lead to breakages, especially in older or more delicate handles. A gentle push or pull is all that’s needed for proper operation.

**5. Replace Worn Parts Promptly:** If you notice any signs of wear, such as cracks or chips in the handle, address them immediately. Replacing worn parts before they fail completely can save you time and money in the long run.

By incorporating these maintenance tips into your routine, you can significantly extend the life of your door handles, ensuring they continue to function smoothly and efficiently for years to come. A little proactive care goes a long way in preventing those frustrating breakages from occurring again!

11. When to Call a Professional

While many door handle repairs can be tackled with a bit of DIY enthusiasm and basic tools, there are certain situations when calling in a professional is the best course of action. If your door handle is part of a complex locking system, for instance, or if it’s integrated into a high-security door, it might be wise to seek expert help. Professionals possess the technical know-how to handle intricate mechanisms that can be easily damaged by inexperienced hands.

Additionally, if you encounter persistent issues such as a door that won’t latch, a handle that feels loose despite your best efforts, or if the entire door frame seems out of alignment, these could be signs of underlying structural problems that require a skilled eye to assess.

Another indicator is if you find yourself without the proper tools or materials to complete the job safely and effectively. Sometimes, the right tools make all the difference in achieving a repair that is not only functional but also aesthetically pleasing.

Lastly, if you simply don’t feel confident tackling the repair or if the thought of disassembling a door handle sends shivers down your spine, there’s no shame in reaching out for professional assistance. Remember, a door handle is a crucial component of your home’s security, and ensuring it’s fixed correctly is paramount for your peace of mind. By knowing when to call a professional, you can avoid further complications and ensure your door handle is repaired safely and efficiently.

12. Conclusion: Enjoy Your Repaired Door Handle!

Congratulations! You’ve successfully navigated the journey of repairing your broken door handle, and now it’s time to revel in the satisfaction of a job well done. As you stand back and admire your handiwork, take a moment to appreciate the small but significant transformation you’ve achieved in your space. A functioning door handle not only enhances the aesthetics of your door but also restores a sense of security and ease of access to your home.

With just a few tools and a little bit of patience, you’ve learned how to diagnose the issue, gather the right materials, and execute a straightforward repair. Whether you opted for a simple tightening, a complete replacement, or a creative workaround, you’ve empowered yourself with the skill to tackle similar issues in the future. This newfound confidence in your DIY abilities extends beyond just door handles; it opens the door (pun intended!) to tackling other small home repairs and projects.

Now, every time you open or close that door, you can take pride in knowing you handled the situation yourself. So go ahead, give your repaired door handle a test run, and enjoy the smooth operation. And remember, the next time something breaks or needs fixing around your home, don’t hesitate to roll up your sleeves and dive in—after all, there’s nothing quite like the feeling of turning a problem into a solution with your own two hands!

In conclusion, fixing a broken door handle doesn’t have to be a daunting task. With just a few simple tools and our easy-to-follow five-step guide, you can restore functionality to your door in no time. Not only will you save money by tackling this DIY project yourself, but you’ll also gain the satisfaction of knowing you’ve enhanced the safety and accessibility of your home. Whether it’s a pesky knob that won’t turn or a handle that’s come loose, we hope this guide empowers you to take control of your home repairs. So gather your tools, roll up your sleeves, and let your newfound skills shine—your doors will thank you! If you found this guide helpful, be sure to share your success stories or any questions you may have in the comments below!

What are the best ways to increase curb appeal?

First impressions matter, especially when it comes to your home.

Whether you’re planning to sell or simply want to enhance the beauty of your space, boosting your home’s curb appeal is a transformative endeavor that pays off in more ways than one. The exterior of your home is the first thing guests and potential buyers see, and it sets the tone for their entire experience. With just a few strategic updates, you can elevate your home’s aesthetic, create a welcoming atmosphere, and increase its overall value. From vibrant landscaping and fresh paint colors to stylish outdoor lighting and inviting entryways, there are countless ways to make your home stand out in the neighborhood. In this blog post, we’ll explore the top strategies to instantly boost your home’s curb appeal, providing you with practical tips and creative ideas to help your property shine and reflect the warmth of the life within. Get ready to transform your home into the envy of the block!

1. Understanding Curb Appeal: What It Is and Why It Matters

What are the best ways to increase curb appeal?
Credit : whatcanu.com

Curb appeal is more than just a buzzword in real estate; it’s the first impression your home makes on visitors, potential buyers, and even passersby. It encompasses everything from the condition of your lawn and the color of your front door to the overall architecture of your property. Curb appeal is the visual allure of your home as seen from the street, and it plays a crucial role in how your property is perceived.

Imagine a potential buyer driving down your street. Their eyes are drawn to homes that stand out for the right reasons. A well-maintained exterior, vibrant landscaping, and thoughtful design elements can spark interest and intrigue, making them more likely to want to explore what’s inside. Conversely, a lackluster façade with peeling paint, overgrown shrubs, or an unkempt driveway can deter even the most enthusiastic home shoppers.

But curb appeal isn’t solely about selling your home; it’s also about enhancing your enjoyment of your personal space. A beautiful exterior creates a welcoming atmosphere for family and friends, providing a sense of pride and ownership. It reflects your style and sets the tone for the warmth and comfort that awaits inside.

Investing time and resources into improving your home’s curb appeal can yield substantial benefits, whether you’re planning to sell or simply want to create a more inviting environment for yourself and your guests. Understanding what curb appeal truly is and why it matters lays the foundation for the transformative strategies to follow. So, let’s delve deeper into the effective ways you can elevate your home’s exterior and create an instant impact!

2. First Impressions: The Importance of a Welcoming Entrance

When it comes to curb appeal, the entrance of your home serves as the first impression for visitors and passersby alike. A welcoming entrance not only enhances the aesthetic appeal of your property but also sets the tone for what lies beyond the front door. Imagine stepping into a home that exudes warmth and charm right from the moment you approach it. This is the magic of an inviting entrance that can transform your home’s exterior and make it stand out in the neighborhood.

Start by evaluating your front door—it’s the centerpiece of your entrance. A fresh coat of paint in a bold yet complementary color can breathe new life into an otherwise dull facade. Consider hues like a rich navy, vibrant red, or even a soft sage that harmonizes with your home’s overall color scheme. Don’t forget to polish or replace the hardware; new handles and locks can work wonders in enhancing the door’s appeal.

Flanking your entrance with well-maintained plants or flowers can also elevate the space. Choose a mix of perennials and seasonal blooms for year-round interest. Potted plants or hanging baskets add a vibrant touch, while classic lanterns or well-placed outdoor lighting can create a cozy, inviting atmosphere, especially during the evening hours.

Additionally, a clean, well-kept walkway leading to your door is essential. Power washing your path, adding decorative stones, or even simple lighting along the way can guide guests to your entrance while making the journey feel delightful. A welcome mat that reflects your personality can be the perfect finishing touch, inviting guests to step inside and enjoy the warmth that awaits.

By investing in these small yet impactful details, you can create an entrance that not only boosts your home’s curb appeal but also makes a lasting impression on everyone who visits. Remember, the entrance is the gateway to your home, and a little effort here can go a long way in showcasing the beauty that lies within.

3. Landscaping Tips for Instant Transformation

What are the best ways to increase curb appeal?
Credit : whatcanu.com

When it comes to boosting your home’s curb appeal, few strategies yield results as quickly and dramatically as enhancing your landscaping. A well-manicured yard can transform an ordinary home into a stunning masterpiece that invites admiration from passersby. Here are some landscaping tips that can help you achieve that instant transformation.

**1. Define Your Edges:** Start by defining the borders of your garden beds and pathways. Crisp edges create a neat appearance and make your landscaping look intentional. You can use brick, stone, or even simple edging materials to delineate areas, giving your yard a polished look.

**2. Add Color with Flowers:** Introduce vibrant blooms that complement your home’s exterior. Seasonal flowers like marigolds, petunias, or geraniums can add pops of color that draw the eye and create a welcoming atmosphere. Planting perennials can also provide long-lasting beauty year after year with minimal maintenance.

**3. Invest in Mulch:** Fresh mulch not only enhances the aesthetics of your garden but also helps retain moisture and suppress weeds. Opt for organic mulch in rich colors that contrast nicely with your plants and the surrounding greenery. A fresh layer of mulch can instantly rejuvenate the look of your garden beds.

**4. Create Symmetry:** Symmetrical landscaping can create a sense of order and balance that is visually pleasing. Consider flanking your front door with identical planters or using matching shrubs on either side of a pathway. These symmetrical elements lead the eye and lend a sophisticated touch to your home’s facade.

**5. Incorporate Hardscape Features:** Adding hardscape elements like walkways, patios, or stone features can elevate your landscaping design. A charming stone path leading to your front door or a welcoming patio area can enhance the overall aesthetic and provide functional outdoor spaces for relaxation and entertainment.

**6. Maintain Your Lawn:** A lush, green lawn is the foundation of appealing landscaping. Regular mowing, fertilizing, and watering will keep your grass healthy and vibrant. If you’re starting from scratch, consider reseeding or sodding for an instant green upgrade.

**7. Add Lighting:** Outdoor lighting can work wonders for your curb appeal, especially in the evening. Illuminate pathways, highlight architectural features, or showcase beautiful trees with strategically placed lights. This not only enhances the beauty of your landscaping but also ensures safety and security.

By focusing on these landscaping tips, you can create a stunning first impression that enhances your home’s curb appeal and invites guests to step inside. Remember, a little effort in your outdoor space can have a tremendous impact, making your home not just a place to live, but a visual delight in your neighborhood.

4. Choosing the Right Color Palette for Your Home’s Exterior

Choosing the right color palette for your home’s exterior can dramatically enhance its curb appeal and create a welcoming atmosphere that reflects your personal style. The exterior color scheme is often the first impression visitors and passersby will have of your home, making it essential to select hues that harmonize with the surrounding environment while also standing out in a tasteful way.

Start by considering the architectural style of your home. Traditional homes may benefit from classic color combinations—think soft whites, muted grays, and earthy tones—that emphasize their timeless appeal. On the other hand, contemporary homes can embrace bolder colors, such as deep blues or vibrant greens, which can give a modern twist to their design.

Another crucial factor to consider is the neighborhood. While you want your home to stand out, it’s also important to maintain a level of cohesion with surrounding houses. Take note of the colors used in your area; this can provide inspiration and help you avoid combinations that may clash with neighboring properties.

Pay attention to the undertones of the colors you choose. Warm hues, like creamy yellows or warm taupes, can create an inviting and cozy feel, while cool tones such as slate blues or soft greens can evoke a sense of calm and tranquility. Additionally, consider how the color will interact with natural light at different times of day, as the appearance of colors can shift dramatically with the sun’s movement.

Don’t forget about the accents! The color of your front door, shutters, and trim can complement your primary color choice and add layers of depth to your façade. A bold door color can serve as a statement piece, drawing the eye and inviting guests to explore further.

Finally, always test your color selections with samples on the actual surface of your home. This allows you to see how the colors work together in different lighting conditions, ensuring that your final choice is one you’ll love for years to come. With the right color palette, you can create an exterior that not only highlights your home’s unique character but also enhances its overall curb appeal, making it a true reflection of your style.

5. Upgrading Your Front Door: Styles and Hardware Choices

What are the best ways to increase curb appeal?
Credit : whatcanu.com

When it comes to elevating your home’s curb appeal, the front door serves as the inviting focal point that sets the tone for your entire property. An upgraded front door not only enhances aesthetics but can also increase your home’s overall value. With a myriad of styles and hardware choices available, selecting the right combination can make a significant difference.

### Styles to Consider

**1. Classic Wood Doors:** Nothing exudes warmth and charm quite like a beautifully crafted wooden door. Available in various finishes, wood doors offer versatility, allowing you to choose between traditional styles with intricate paneling or sleek, modern designs. Consider a rich mahogany or a painted option in a bold color to create a striking contrast against your home’s exterior.

**2. Fiberglass Doors:** Looking for durability without sacrificing style? Fiberglass doors are an excellent choice. They mimic the appearance of wood while providing enhanced resistance to weather elements, scratches, and dents. Many come pre-finished or can be painted, ensuring you have a door that suits your specific taste.

**3. Glass and Iron Doors:** For a touch of elegance, consider a glass and iron door. These doors allow natural light to flow into your entryway while providing a grand, designer look. The intricate ironwork can be customized to match your home’s architectural style, making it a true statement piece.

### Hardware Choices

Once you’ve chosen the perfect door style, it’s time to focus on hardware. The right doorknob, handle, and lock not only enhance the door’s functionality but also complement its overall design.

**1. Bold Knobs and Handles:** Opt for oversized knobs or sleek handles in finishes like matte black, brushed nickel, or antique brass. These elements can elevate even the simplest door, providing a modern or classic touch depending on your selection.

**2. Decorative Hinges:** Don’t overlook the hinges! Decorative hinges can add a charming detail that draws the eye. Choose a style that matches your hardware for a cohesive look.

**3. Smart Locks:** For a blend of style and security, consider upgrading to a smart lock. These modern devices not only provide keyless entry for convenience but also come in various stylish designs that can seamlessly integrate with your door’s aesthetic.

### Final Touches

To complete the look, consider adding a fresh coat of paint, a decorative wreath, or vibrant potted plants flanking your doorway. These thoughtful details can transform your front entrance into a welcoming haven, captivating visitors and enhancing your home’s curb appeal instantly. Remember, your front door is not just an entryway; it’s the first impression you make—make it count!

6. The Power of Lighting: Enhancing Your Home’s Exterior

When it comes to boosting your home’s curb appeal, lighting plays an often-overlooked yet transformative role. The right lighting can not only illuminate your exterior but also create a welcoming atmosphere that draws the eye and enhances the overall aesthetic of your property.

Consider your entryway: a well-lit porch with stylish sconces flanking the door can make a striking first impression. Opt for fixtures that complement your home’s architectural style—whether it’s a sleek modern design or charming vintage flair. Don’t shy away from experimenting with colors; warm tones can envelop your home in a cozy glow, while cooler hues can add a contemporary edge.

Pathway lighting is another fantastic way to enhance safety while showcasing your landscaping. Solar-powered lights or low-voltage fixtures can guide guests from the street to your door, creating a sense of invitation. Strategically placed lights can highlight your garden features, trees, or architectural elements, adding depth and character to your outdoor space.

Remember, it’s not just about adding more light; it’s about creating ambiance. Dimmer switches on exterior fixtures can help you adjust the mood for different occasions, whether it’s a lively gathering or a quiet evening at home.

Lastly, don’t forget about the impact of outdoor string lights or lanterns. They can infuse your space with charm and whimsy, perfect for creating an enchanting outdoor retreat. By leveraging the power of lighting, you can instantly elevate your home’s exterior, making it not just more visually appealing but also a warm and inviting haven for all who pass by.

7. Adding Outdoor Decor: Furniture, Planters, and More

What are the best ways to increase curb appeal?
Credit : whatcanu.com

Enhancing your home’s curb appeal is all about creating an inviting and aesthetically pleasing exterior that draws the eye and welcomes visitors. One of the most effective ways to achieve this is by adding outdoor decor, including stylish furniture, vibrant planters, and charming accents that reflect your personality and taste.

Start by selecting outdoor furniture that complements the style of your home. Whether you opt for a cozy bistro set on your porch or a chic lounge area in your backyard, the right furniture can transform your outdoor space into a relaxing oasis. Choose weather-resistant materials that can withstand the elements while providing comfort and durability. Consider adding colorful cushions or throws to create a warm and inviting atmosphere.

Next, don’t underestimate the power of planters. Incorporating lush greenery and vibrant flowers can breathe life into your outdoor space. Choose planters in various shapes, sizes, and colors to create visual interest. Grouping different plants together can create a lively display, while tall planters can frame your entryway and guide the eye toward your front door. Opt for seasonal flowers for a fresh look throughout the year, and consider using plants that thrive in your local climate for easy maintenance.

Beyond furniture and plants, think about additional decorative elements that can enhance the overall look of your exterior. Wind chimes, garden sculptures, or decorative lanterns can add character and charm, while outdoor rugs can define spaces and provide a pop of color. String lights or solar-powered garden lights can create a magical ambiance in the evenings, making your home feel warm and welcoming after the sun sets.

Remember that the key to effective outdoor decor is to create a cohesive look that ties all elements together. By thoughtfully selecting furniture, planters, and decorative accents, you can instantly boost your home’s curb appeal and create an inviting atmosphere that makes a lasting impression on guests and passersby alike. Transform your exterior into a beautiful extension of your home, and watch as it elevates your property’s overall appeal.

8. Maintaining Your Lawn: Tips for a Lush Look

Maintaining your lawn is essential for creating a welcoming first impression and enhancing your home’s overall curb appeal. A lush, vibrant lawn not only adds to the aesthetics of your property but also signifies care and attention to detail. Here are some tips to help you achieve that pristine green look that will make your home stand out in the neighborhood.

**1. Regular Mowing:** Keeping your grass at the optimal height is crucial. Aim to mow your lawn once a week during the growing season. This not only promotes healthier grass but also prevents the lawn from looking overgrown. Different grass types have varying height preferences, so research the ideal cutting length for your specific type.

**2. Watering Wisely:** Deep, infrequent watering encourages the roots of your grass to grow deeper and stronger. Aim for about an inch of water per week, either from rainfall or irrigation. Early morning is the best time to water, as it minimizes evaporation and reduces the risk of fungal diseases.

**3. Fertilization:** Feeding your lawn with the right nutrients can make a noticeable difference. Use a balanced fertilizer in early spring and again in late summer. Look for slow-release options that will nourish your lawn gradually, promoting even growth and a rich, green color.

**4. Aeration:** Over time, soil can become compacted, which restricts water and nutrients from reaching the roots. Aerating your lawn—by perforating it with holes—allows for better airflow, moisture, and nutrient absorption. This is best done in the fall or spring when the grass is actively growing.

**5. Weed Control:** Weeds can quickly detract from a well-maintained lawn. Regularly inspect your yard for any invasive species and remove them promptly. Consider using mulch in flower beds and along pathways to suppress weed growth and retain moisture.

**6. Edging and Trimming:** Clean edges enhance the overall appearance of your lawn and give it a polished look. Use a lawn edger or trimmer to create neat lines around walkways, gardens, and driveways. This simple task can make a significant difference in the perceived care and upkeep of your property.

By following these tips for maintaining your lawn, you can achieve a lush, healthy landscape that not only boosts your home’s curb appeal but also creates an inviting atmosphere for friends, family, and potential buyers. A vibrant lawn is the foundation of any great exterior transformation, so invest the time and effort to make it shine!

9. Window Treatments that Elevate Curb Appeal

When it comes to enhancing your home’s curb appeal, the power of window treatments cannot be underestimated. They serve not only a functional purpose but also play a pivotal role in defining the exterior aesthetic of your home. Selecting the right window treatments can instantly elevate your home’s appearance, making it more inviting and stylish.

Start by considering the style of your home. Are you working with a charming cottage, a sleek modern design, or a classic Victorian? Each architectural style has window treatment options that can either complement or clash with your home’s character. For instance, wooden shutters can add a rustic charm to a country-style home, while sheer drapes in a contemporary design can provide a sleek and airy look to more modern facades.

Color is another critical factor. Opt for window treatments that harmonize with your home’s color palette. Neutral shades generally work well, as they won’t compete with the overall design but instead enhance it. However, don’t shy away from bolder colors that could serve as a fun pop against a muted exterior, particularly if they reflect other accents around your home, such as your front door or garden accessories.

In addition to aesthetics, consider the practicality of your window treatments. Outdoor roll-up shades or stylish awnings can offer shade and protection from the elements while also adding an extra layer of visual interest. Meanwhile, window boxes filled with vibrant flowers or greenery can frame your windows beautifully, creating an attractive focal point that draws the eye upward.

Lastly, don’t forget about maintenance. Choose materials that are durable and easy to clean, ensuring that your window treatments continue to look fresh and appealing. Whether you decide on elegant curtains, rustic shutters, or modern blinds, the right window treatments can significantly enhance your home’s curb appeal, transforming it into a space that is not only beautiful but also welcoming. Invest in these details, and you’ll find that passersby can’t help but take a second look at your stunning abode!

10. Addressing and Repairing Exterior Damage

When it comes to boosting curb appeal, one of the most crucial yet often overlooked aspects is addressing and repairing exterior damage. Your home’s exterior is its first impression, and any visible wear and tear can significantly impact how it’s perceived, both by passersby and potential buyers.

Start by conducting a meticulous inspection of your home’s exterior. Look for cracks in the foundation, peeling paint, rotting wood, or damaged siding. These issues not only detract from your home’s aesthetic but can also lead to more severe problems if left unattended. For instance, a small crack can quickly escalate into a significant structural issue, resulting in costly repairs down the line.

Once you’ve identified the problem areas, prioritize repairs based on urgency and visibility. For minor cracks in the walls or sidewalk, a simple patching compound can do wonders to restore a smooth finish. For more significant damage, such as broken shingles or severe wood rot, consider enlisting the help of a professional. Fresh paint can also work magic—choosing a modern, appealing color can instantly uplift the entire façade of your home.

Don’t forget about the smaller details, like the mailbox, front door, and window frames. A fresh coat of paint or a thorough cleaning can rejuvenate these elements and tie your home’s appearance together. Addressing these repairs not only enhances your home’s visual appeal but also demonstrates care and maintenance, fostering a sense of pride in your property.

By taking the time to repair exterior damage, you’re not just enhancing curb appeal; you’re also ensuring your home remains a safe and welcoming space for years to come. The more inviting your home looks, the more likely it is to attract admiration and interest from neighbors and visitors alike.

11. The Role of Fencing and Gates in Curb Appeal

When it comes to enhancing your home’s curb appeal, fencing and gates play a pivotal role that often goes overlooked. Imagine approaching a property with a beautifully designed fence framing the front yard, guiding the eye toward an inviting entrance. A well-chosen fence not only defines the boundaries of your space but also adds an element of sophistication and charm that can elevate your home’s exterior from ordinary to extraordinary.

Consider the materials and styles available. A classic white picket fence evokes a sense of nostalgia and warmth, perfect for traditional homes. In contrast, a sleek modern metal fence can impart a contemporary flair, appealing to those who favor minimalist aesthetics. Wooden fences, with their natural textures and tones, bring an organic touch that complements lush landscaping, creating a harmonious balance with nature.

Gates, too, serve as the threshold between the public and private realms of your home, making a statement about what lies beyond. A beautifully designed gate can serve as a focal point that draws attention and invites curiosity. Whether you opt for a simple, unadorned design or a grand, ornate piece, the right gate can enhance the overall aesthetic while also providing security and privacy.

Additionally, the color and condition of your fencing and gates matter significantly. Fresh paint or stain can breathe new life into weathered wood, while a clean, rust-free metal fence speaks volumes about your home’s upkeep. Incorporating decorative elements, such as climbing plants or stylish hardware, can also add character and charm, making your fencing and gates not just functional barriers, but beautiful extensions of your home’s personality.

Incorporating fencing and gates into your curb appeal strategy is not merely about aesthetics; it’s about creating an inviting atmosphere that reflects your style and welcomes guests. So, as you embark on your journey to transform your home, don’t underestimate the impact that well-designed fencing and gates can have on the overall charm and appeal of your property.

12. Creating an Inviting Pathway: Walkways and Driveways

Creating an inviting pathway is one of the most impactful strategies for enhancing your home’s curb appeal. The journey to your front door should be a delightful experience, and a well-designed walkway or driveway can set the tone for what lies beyond.

Start by assessing the current state of your existing path. Is it cracked and uneven, or perhaps overgrown with weeds? A clean, well-maintained pathway not only guides visitors to your door but also speaks volumes about the care you put into your home. Consider using materials that complement your home’s architecture—be it classic cobblestones, sleek concrete, or charming brick.

Incorporate curves and gentle slopes to create a more inviting feel, rather than a straight, utilitarian path. Add some visual interest with borders of flowering plants or decorative stones that lead the eye along the way. Lighting is another essential aspect; strategically placed lanterns or solar-powered stakes can illuminate the pathway, making it both safe and welcoming after dark.

Don’t forget about the driveway! A clean, well-sealed surface not only enhances visual appeal but also prolongs the life of the material. If your driveway is in need of repair, consider resurfacing or adding decorative elements such as patterned pavers or gravel for a more upscale look.

By investing time and thought into your walkways and driveways, you create a warm welcome that entices guests and boosts the overall charm of your home. Remember, first impressions matter, and an inviting pathway is a key element in making yours unforgettable!

13. Seasonal Decor: Keeping Your Home Fresh Year-Round

Seasonal decor is one of the simplest yet most effective strategies to maintain your home’s curb appeal throughout the year. It breathes life into your exterior, making it feel vibrant and welcoming, no matter the season. By thoughtfully adjusting your decor to reflect the changing seasons, you can create a fresh look that captivates attention and showcases your home’s personality.

As winter gives way to spring, consider swapping out heavy wreaths for bright, floral arrangements. Hanging a cheerful, pastel-colored wreath on your front door can immediately brighten the entrance. Potted tulips and daffodils lining your walkway will invite guests with their pops of color, signaling the arrival of warmer days.

When summer rolls around, embrace the outdoors by incorporating cheerful colors and textures. Adorn your porch with colorful cushions, a whimsical hanging chair, or a vibrant outdoor rug. Adding potted plants or a small herb garden can create a lively atmosphere, making your home feel more inviting.

Come autumn, you can evoke the cozy charm of fall with rich hues of oranges, browns, and golds. A rustic pumpkin display on your porch, along with a warm plaid throw draped over your rocking chair, can create a welcoming vibe. Don’t forget to add a festive wreath adorned with autumn leaves and berries, framing your door beautifully.

Finally, winter presents the perfect opportunity to create a serene and magical ambiance. Consider stringing fairy lights along your porch railing or adding festive decorations that reflect the holiday spirit. A simple evergreen garland can bring a touch of nature to your entryway while offering a classic charm.

By thoughtfully curating your seasonal decor, you’re not only enhancing your home’s curb appeal but also expressing your creativity and warmth to all who pass by. This ever-evolving decor approach ensures that your home remains fresh and inviting, making it a joy for both you and your visitors year-round.

14. Sustainable Practices for Curb Appeal Improvement

In today’s eco-conscious world, integrating sustainable practices into your home improvement projects not only enhances curb appeal but also reflects your commitment to the environment. By choosing green solutions, you can create a stunning exterior that stands out while promoting sustainability.

Start with native plants in your landscaping. These plants are naturally adapted to your local climate and soil, requiring less water and maintenance than non-native varieties. A well-planned garden featuring diverse, native flora not only provides a vibrant and inviting look but also supports local wildlife, including birds and pollinators.

Next, consider using recycled materials for pathways, patios, or garden borders. Reclaimed bricks or stones can add character and charm while reducing the need for new resources. Not only does this approach lower your environmental footprint, but it also tells a story about your home’s unique style and commitment to sustainability.

When it comes to exterior paint, opt for low-VOC (volatile organic compounds) or zero-VOC options. These eco-friendly paints are better for the environment and your health, providing a fresh look without the harmful emissions commonly associated with traditional paints. A fresh coat in a trendy, welcoming color can dramatically increase your home’s appeal without compromising your values.

Lastly, consider implementing energy-efficient lighting to illuminate your home’s exterior. Solar-powered garden lights or LED fixtures not only reduce your energy consumption but also create a warm ambiance that invites guests to linger. By combining functionality with aesthetic appeal, these sustainable choices enhance your home’s charm while showcasing your dedication to an eco-friendly lifestyle.

By incorporating these sustainable practices into your curb appeal strategy, you can create a beautiful and inviting home that resonates with both your personal style and a commitment to preserving the planet. Embrace the opportunity to make a statement that’s not just visually stunning but also environmentally responsible.

15. Final Touches: How to Keep Your Curb Appeal Consistent Over Time

Once you’ve invested time and effort into enhancing your home’s curb appeal, the last thing you want is for that initial sparkle to fade. Consistency is key in maintaining the alluring exterior that attracts compliments and potential buyers alike. Here are some final touches to ensure your curb appeal remains vibrant and inviting over time.

First, establish a routine for regular maintenance. Create a seasonal checklist that includes tasks like cleaning gutters, power washing walkways, and trimming hedges. A well-maintained lawn speaks volumes; consider mowing bi-weekly in the growing season and implementing a plan for fertilization and weed control. If you have flower beds, rotate seasonal plants to keep your landscape looking fresh and colorful throughout the year.

Next, invest in quality outdoor lighting. Not only does it enhance the beauty of your home at night, but it also adds a layer of safety. Strategically placed lights along pathways or highlighting architectural features can create a warm, welcoming ambiance. Consider solar-powered fixtures for easy installation and minimal upkeep.

Don’t forget about the small details that make a big impact. Regularly clean and paint your front door, as it’s often the focal point of your home’s exterior. Update house numbers and add a stylish mailbox that coordinates with your home’s aesthetic. Even replacing worn-out outdoor furniture can elevate your porch or patio, making it an inviting space for family and friends.

Lastly, consider the changing seasons. In the fall, arrange pumpkins and autumn leaves; in winter, hang garlands and twinkling lights. By adapting your decor to the seasons, you keep your home feeling current and inviting, maintaining that coveted curb appeal year-round.

By implementing these strategies and keeping up with maintenance, you’ll ensure that your home’s façade remains as stunning as the day you first transformed it, creating a lasting impression that draws in admirers and potential buyers alike.

In conclusion, transforming your home and boosting its curb appeal doesn’t have to be a daunting task or a massive investment. With the strategies outlined in this post, from simple landscaping tweaks to fresh paint and inviting entryways, you can create a welcoming façade that reflects your style and enhances your neighborhood. Remember, first impressions matter, and your home’s exterior is the first thing guests and passersby will notice. So, take these tips to heart, unleash your creativity, and watch as your home transforms into a stunning showcase that not only elevates your property value but also brings you joy every time you pull into your driveway. Happy transforming!