What is carriage bolt ?

Understanding Carriage Bolts

Bolts come in many shapes and sizes. There are round and square, long and short, and even flat and round. They come in a variety of metals such as steel, aluminum, copper, and brass. Currently, let’s review carriage bolts

1. What are carriage bolts?

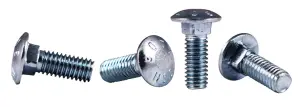
Carriage bolts are type of fastener that are often used in construction and in the automotive industry. They are made up of a head, a squared section and threaded shaft.

They are used to attach two pieces of wood together or metal and wood pieces or two pieces of metal together. Finally, they are designed to be tightened with a nut.

2. What are the types of carriage bolts?

There are many types of carriage bolts. Carriage bolts come in different lengths, and they also have different heads. The most common are the carriage bolts with hexagonal heads and mushroom heads.

They can be made of different material. The most two common types are galvanized steel and stainless steel, which are very resistant to corrosion.

3. How do they function?

A carriage bolt is a fastener that is typically used in heavy construction. It is a type of bolt that has a head on one end and a shank that is threaded on the other.

The shank is the part that actually goes into the wood or the metal pieces to be held together. The part are held by tightening a nut on the shaft using a wrench.

4. How to use carriage bolts?

carriage bolts

A carriage bolt is a type of bolt that has a short and large head on one end and a long ans thin shaft on the other.

First, you need to have holes in the 2 parts you want to held together. Make sure the holes are slightly lager than the shaft diameter.

Then, pass the bolt shaft through the 2 holes. Insert a nut on the shaft and start tightening by hands. Then use a wrench to tight the nut firmly.

5. What are the benefits of using carriage bolts?

Carriage bolts are a popular choice because they are strong, reliable, and easy to use. They are also a good option for those who want to use quick and easy methods for attaching materials.

There are a few reasons why carriage bolts are a good choice for construction. First of all, they are very strong. This means that they can hold a lot of weight and they are also resistant to bending. This means that they can be used to attach large pieces of equipment or materials to other pieces of equipment or the ground.

Another benefit of carriage bolts is that they are easy to use. This is because they have a simple design and they are easy to attach.

6. What are the disadvantages of using carriage bolts?

Although carriage bolts are widely used in construction, there are some disadvantages to using them. For one, the mushroom head type can be difficult to remove because there is no way to hold them with a tool on that side.

Additionally, carriage bolts require space around them because they need to be tighten with a wrench. It cloud be a challenge to use them in limited space, such as the ones on vehicles for instance. Socket extension bars or swivel sockets may be necessary in those cases.

7. What are the precautions to take ?

When using carriage bolts, there are a few precautions that should be taken in order to ensure a safe and successful installation.

First and foremost, the correct size of the bolt should be used. This will depend on the thickness of the material being installed and the strength of the bolt.

Secondly, it is important to make sure the bolt is properly tightened. Make sure to tightened to the specified torque.

Last but not least, it is important to check for any signs of wear or damage. If there are any signs of wear or damage, the bolt should be replaced.

8. What are the possible problems with using carriage bolts?

The most common problem with carriage bolts is that they can become loose. This can happen for a variety of reasons, but the most common is that the bolt becomes loose because it was not tightened enough when it was initially installed.

Another common problem with carriage bolts is that they can become bent. This can happen when the object being fastened is moved around a lot or if the bolt becomes bent while it is being tightened.

Both of these problems can lead to the bolts becoming loose and potentially coming off the object they are attached to. If this happens, it can be a serious safety hazard.

It is important to use a bolt that is the correct size for the job. If the bolt is too big, it will not fit properly into the hole in the object being fastened. If the bolt is too small, it will not be able to hold the object in place.

It is also important to make sure that the bolt is tightened properly. Carriage bolts can be a useful way to attach trim, but it is important to take care when using them.

9. How to make sure that carriage bolts are safe to use?

When it comes to using carriage bolts, there are a few things that you need to know in order to ensure that they are safe to use.

First of all, make sure that the bolts are of the correct size for the application.

Secondly, make sure that the bolts are tightened properly. Too much torque can cause the bolts to break.

And finally, make sure there is a good contact between the 2 parts to be tighten together before starting tightening the nut. If not, the parts could slip suddenly during tightening the nut. It could cause security issues.

By following these tips, you can ensure that your carriage bolts are safe to use and that the tighten parts will stay in place.

10. Conclusion

Understanding carriage bolts is important for anyone using them, mostly on vehicle or construction projects. By understanding the different types of carriage bolts and their purposes, you can ensure that the process goes smoothly and that the parts are properly secured

Carriage bolts are a vital part of any construction project, and it is important to understand how they work in order to use them correctly. By following the steps in this post, you will be able to use carriage bolts successfully and efficiently.

How to propagate snake plant ?

Are you looking for a plant that is both beautiful and easy to care for? If so, you may want to consider propagating snake plant.

snake plant

A snake plant can be propagated by rooting cuttings, so it is a great choice if you are looking to add a new plant to your home or garden. In this post, we will go over the steps necessary to propagate snake plant, and provide tips on how to select the right propagation method for your needs.

We will also share some tips on how to care for the plant once it has been propagated, so you will have a healthy and thriving plant in your home or garden.

1. What is a snake plant?

A snake plant is a type of succulent plant that can grow up to one meter in height. They are often used as houseplants, but can also be grown in outdoor pots. It is a small, leafy plant with long, thin leaves that grow in a circular pattern. The leaves are often variegated, meaning they come in a range of colors, such as green and yellow.

These plants are also known as mother-in-law’s tongue because they are shaped like a tongue and they have a very sharp edge to them. So it is probably better to offer roses to your in-laws. They are most often grown in soil, but they can be grown in water as well. The leaves are very delicate, so it is important to make sure you use the right type of potting soil for them.

2. How to propagate snake plant?

snake plant
Credit : Mokkie

There are a few ways to propagate snake plant. You can take stem cuttings, you can root stem cuttings, or you can propagate from a rooted cutting.

To take stem cuttings, simply cut off a healthy stem at a desired length, being sure to leave at least 1″ of stem attached to the cutting. Make a small hole in the soil and insert the cutting, cover the hole with soil, and water well.

To root stem cuttings, simply place the stem cutting in a pot of water and wait until the cutting roots. Then, transfer the cutting to a pot of soil and continue to water well.

To propagate from a rooted cutting, take a rooted cutting and remove the root ball. Cut the stem, being sure to leave a 1″ piece attached, and insert the stem into soil. water well.

3. How to care for snake plant?

A snake plant is a beautiful houseplant that is widely available and easy to care for. It’s a great plant for beginners because it is easy to take care of and doesn’t need too much attention.

The first step is to make sure you have the right amount of light for your snake plant. You should be able to see one of its leaves from across the room without a problem. Next, water it once every two weeks by soaking the pot in a bowl of water for ten minutes. When watering, make sure you don’t let the pot sit in water for too long because that can cause root rot. If you want your snake plant to grow, make sure you give it some extra love by misting it every other day or feeding it a half-strength fertilizer every month.

As the weather starts to cool down, many people are looking for plants to add to their gardens. We recommend propagating snake plant before the winter months hit.

How to get to the Rold route in Elden Ring ?

To get to the Rold Route in Elden Ring, there are a few key steps to follow.

The Rold Route may be challenging, but it is worth it for the rewards you will receive at the end. First, make sure you have the necessary equipment and supplies for the journey. This includes a sturdy pair of boots, a reliable weapon, and a good amount of healing items.

Rold route in Elden Ring

Next, start your journey by heading to the Rold Village. This is the starting point for the Rold Route, and is located in the northern region of the game’s map. From here, you will need to navigate through a series of winding paths and rugged terrain. Keep an eye out for any obstacles that may impede your progress, and be prepared to battle any enemies you may encounter along the way.

As you make your way deeper into the Rold Route, you will encounter a series of challenging boss battles. These will test your skills and require you to use all of your combat abilities to defeat them. Be sure to take advantage of any environmental hazards or weaknesses that the bosses may have, and use your healing items wisely.

As you progress through the Rold Route, you will also encounter a number of hidden secrets and hidden items. Be sure to explore every nook and cranny of the area, and keep an eye out for any suspicious looking areas that may contain valuable treasures.

Finally, make your way to the Rold Castle. This is the final destination of the Rold Route, and is home to the powerful final boss of the game. Be sure to take your time and prepare for this final battle, as it will be the most challenging one yet. With determination and skill, you will be able to defeat the final boss and claim victory !

Summary

The steps to get to the Rold Route in Elden Ring are:

  • Gather necessary equipment and supplies
  • Head to the Rold Village, located in the northern region of the map
  • Navigate through winding paths and rugged terrain while watching out for obstacles and enemies
  • Defeat challenging boss battles by exploiting their weaknesses and using healing items wisely
  • Explore hidden secrets and hidden items along the way
  • Make your way to the Rold Castle and prepare for the final battle
  • Defeat the final boss and claim victory on the Rold Route.

How to factory reset Oculus Quest 2 ?

The Oculus Quest 2 is a popular virtual reality headset that offers an immersive gaming experience. However, it can sometimes experience issues that require a factory reset

First, it’s important to understand why you might want to factory reset your Oculus Quest 2. This is typically done to troubleshoot problems with the device, or to start fresh with a clean slate.

How to factory reset Oculus Quest 2

To begin, make sure your Oculus Quest 2 is charged and connected to the internet. Then, follow these steps:

  1. Open the Oculus app on your phone and tap the “Settings” option in the bottom menu.
  2. Scroll down to the “Device” section and tap on the “Oculus Quest 2” option.
  3. In the “Device” menu, tap on the “More Settings” option.
  4. Scroll down to the “Reset” section and tap on the “Factory Reset” option.
  5. You’ll be asked to confirm that you want to factory reset your Oculus Quest 2. Tap on the “Reset” button to proceed.
  6. Your Oculus Quest 2 will begin the reset process, which can take a few minutes to complete.
  7. Once the factory reset is complete, you’ll be prompted to set up your Oculus Quest 2 as if it were a new device. Follow the on-screen instructions to do so.

Fresh start with a clean slate

It’s worth noting that factory resetting your Oculus Quest 2 will erase all of your data, including saved games, settings, and other personal information. Make sure you have backed up any important data before proceeding with the factory reset.

While a factory reset can be a helpful solution when your Oculus Quest 2 is experiencing issues, it’s not a cure-all. If you continue to have problems after resetting your headset, you may need to contact Oculus support for further assistance.

In conclusion, factory resetting your Oculus Quest 2 can be a useful troubleshooting tool or a way to start fresh with a clean slate. Just make sure you have backed up any important data before proceeding with the reset. Follow the steps outlined above, and you’ll be ready to go in no time.