What are the best ways to make homemade cheese?

There’s something truly magical about transforming simple ingredients into delicious homemade creations, and few culinary endeavors capture this essence quite like cheese-making.

Whether you’re a seasoned cook or a curious beginner, the journey from milk to masterpiece is both rewarding and surprisingly accessible. Imagine savoring the rich, creamy flavor of fresh mozzarella, the tangy bite of artisanal goat cheese, or the velvety texture of ricotta, all crafted by your own hands. In this blog post, we will explore the best ways to make homemade cheese, guiding you through the essential techniques, ingredients, and tips that will empower you to create your very own dairy delights. Get ready to embrace your inner cheese maker and elevate your culinary repertoire with these delightful recipes that promise to impress your family and friends!

1. Introduction to Homemade Cheese: Why You Should Try It

What are the best ways to make homemade cheese?
Credit : whatcanu.com

Making homemade cheese is more than just a culinary endeavor; it’s a rewarding journey that connects you to the art of food craftsmanship. Imagine transforming something as simple as milk into a luscious, creamy delight that tantalizes your taste buds and elevates your meals. Whether you’re a seasoned cook or a kitchen novice, crafting your own cheese opens up a world of flavors and textures that store-bought varieties simply can’t replicate.

One of the most compelling reasons to try your hand at cheese-making is the satisfaction of creating something uniquely yours. You’ll not only gain a deeper appreciation for the ingredients but also for the process itself. Each batch can be an experiment, a chance to play with flavors, and an opportunity to bring your culinary vision to life. Plus, homemade cheese can be tailored to suit your tastes—whether you prefer a sharp cheddar, a creamy ricotta, or a tangy goat cheese, the possibilities are limited only by your imagination.

Beyond the joy of creation, there’s also a practical aspect to consider. Making cheese at home can be a cost-effective alternative to purchasing artisanal cheeses, especially if you’re a cheese lover. You’ll find that the simple ingredients—milk, salt, and a few others—are often far less expensive than the gourmet varieties found in stores. Plus, you can control the quality of the ingredients, opting for organic or local options that align with your values.

Lastly, creating homemade cheese is a fantastic way to connect with family and friends. Picture a gathering where you proudly present a cheese board made from your own creations, complete with fresh fruits, nuts, and artisanal bread. The delight and intrigue on your guests’ faces as they taste your handiwork will make all the effort worthwhile.

So, if you’re ready to embark on a flavorful adventure, let’s dive into the world of homemade cheese. With a little guidance and a pinch of patience, you’ll soon be on your way to transforming humble milk into mouthwatering masterpieces.

2. Understanding the Basics

Before you embark on your cheese-making journey, it’s essential to grasp the foundational principles that underpin this age-old craft. Understanding the basics of cheese making involves recognizing the key ingredients, processes, and equipment required to transform simple milk into a delectable dairy delight.

At its core, cheese making revolves around just a few fundamental ingredients: milk, cultures, rennet, and salt. The type of milk you choose—be it cow, goat, or sheep—will significantly influence the flavor and texture of your final product. Whole milk is often recommended for beginners, as the higher fat content contributes to a creamier cheese.

Next, the role of cultures cannot be overstated. These are the bacteria that ferment the lactose in the milk, producing lactic acid, which is crucial for flavor development and the coagulation process. There are various types of cultures available, each lending its unique characteristics to the cheese. Whether you opt for mesophilic cultures for softer cheeses or thermophilic cultures for harder varieties, understanding their function will help you select the right ones for your desired outcome.

Rennet, an enzyme that helps coagulate the milk, is another essential component. It can be derived from animal, vegetable, or microbial sources, and using the appropriate type for your cheese will ensure proper curd formation. Finally, salt is not just a flavor enhancer; it also acts as a preservative, inhibiting unwanted bacterial growth and enhancing the cheese’s overall taste.

Equipping yourself with the right tools is equally important. A large pot for heating the milk, a thermometer to monitor temperature, a ladle for stirring, cheese molds for shaping, and fine cheesecloth for draining are the staples of a home cheesemaker’s toolkit. Investing in quality equipment will streamline your process and improve your results.

With a solid understanding of these basics, you’ll be well on your way to experimenting with different cheese varieties. Whether you’re dreaming of creamy ricotta, tangy goat cheese, or robust cheddar, mastering these foundational elements is the first step toward creating your own homemade cheese masterpiece. So gather your ingredients, equip yourself with knowledge, and get ready to turn the humble milk into something extraordinary!

3. Essential Tools and Equipment for Cheese Making

What are the best ways to make homemade cheese?
Credit : whatcanu.com

Embarking on the journey of homemade cheese-making can be both exciting and rewarding, but having the right tools and equipment is crucial for achieving that creamy, delectable end product. While cheese-making can be as simple or as intricate as you desire, here are the essential tools that every aspiring cheese artisan should consider having in their kitchen.

**1. Cheese Thermometer:** Precision is key when making cheese, and a good cheese thermometer will help you monitor milk temperatures accurately. Look for one that reads temperatures in both Fahrenheit and Celsius, with a range suitable for both heating milk and cooking curds.

**2. Large Stainless Steel Pot:** A heavy-bottomed stainless steel pot is ideal for heating milk evenly without scorching it. Choose a pot with a capacity that matches the quantity of cheese you intend to make, typically ranging from 2 to 8 quarts for home cheese-making.

**3. Long-Handled Spoon:** A sturdy, long-handled spoon is essential for stirring the milk as it heats and for gently mixing in ingredients like rennet and cultures. Opt for a spoon made from stainless steel or food-grade plastic to avoid any unwanted reactions with the ingredients.

**4. Cheese Mold and Press:** For hard cheeses, a cheese mold is necessary to shape and drain the curds. Molds come in various sizes and shapes, so consider the type of cheese you want to make. A cheese press is also a valuable tool to apply even pressure during the draining process, ensuring your cheese reaches the desired texture.

**5. Cheese Cloth:** A fine cheesecloth is vital for straining curds from whey and allows for easy drainage. Look for a durable, reusable option that can withstand repeated use and washing.

**6. pH Meter or Test Strips:** Monitoring acidity is important for some cheese varieties. A pH meter or test strips can help you track the curd’s acidity levels, ensuring optimal fermentation and flavor development.

**7. Preserving Jars or Cheese Storage Containers:** Once your cheese is made, proper storage is key to maintaining its quality. Invest in airtight containers or glass jars to keep your cheese fresh and ready for enjoyment.

Equipped with these essential tools, you’ll be well on your way to transforming humble milk into a delicious masterpiece. Each piece of equipment plays a crucial role in the cheese-making process, and understanding their functions will empower you to experiment and refine your techniques. So gather your tools, roll up your sleeves, and get ready to savor the delightful fruits of your labor!

4. Selecting the Right Milk for Your Cheese

Selecting the right milk for your cheese is arguably one of the most critical steps in the cheese-making process. The type of milk you choose not only influences the flavor and texture of the final product but can also dictate the overall success of your cheese-making journey.

When embarking on your homemade cheese adventure, consider the source of your milk. Cow, goat, and sheep milk each bring unique characteristics to the table. Cow milk, with its creamy texture and mild flavor, is an excellent choice for beginners, ideal for making soft cheeses like mozzarella or ricotta. Goat milk, on the other hand, offers a tangy zip and is perfect for creating deliciously distinct cheeses such as chèvre. If you’re feeling a bit more adventurous, sheep milk is rich and buttery, providing a luxurious base for cheeses like feta or pecorino.

Beyond the type of animal, the quality of milk is paramount. Fresh, high-quality, whole milk without additives or preservatives is essential for achieving the best results. If possible, seek out milk from local farms or markets that prioritize humane practices and do not use hormones or antibiotics. The fresher the milk, the more vibrant the flavors in your cheese will be.

Additionally, consider whether you want to use raw or pasteurized milk. While raw milk can yield cheeses with complex flavors, it also requires more advanced techniques and a thorough understanding of food safety. For beginners, pasteurized milk is often the safest and most accessible option, allowing you to focus on honing your cheese-making skills without additional concerns.

In summary, the milk you select is a foundational element that can elevate your cheese from good to extraordinary. Take the time to explore local options, and don’t hesitate to experiment with different types to discover the flavors and textures that resonate with your palate. Happy cheese-making!

5. The Science of Curdling: Acid vs. Rennet

What are the best ways to make homemade cheese?
Credit : whatcanu.com

In the world of cheese-making, understanding the science of curdling is crucial, as it forms the foundation of your cheese’s texture and flavor. At the heart of this process are two primary agents: acid and rennet. Each plays a distinct role in transforming liquid milk into the solid curds that will be the building blocks of your homemade cheese.

**Acid** is typically achieved through the addition of ingredients like lemon juice, vinegar, or cultured buttermilk. When you introduce acid to warm milk, the pH level drops, causing the proteins—primarily casein—to coagulate and form curds. This method is often used in fresh cheeses like ricotta and paneer, where a light, delicate texture is desired. Here, curdling occurs quickly, and the resulting cheese is usually mild and slightly tangy, perfect for salads or cooking.

On the other hand, **rennet** is a complex of enzymes traditionally sourced from the stomachs of ruminant animals, although vegetarian options are now available. When rennet is added to warm milk, it acts on the casein proteins, promoting a more gradual and thorough curdling process. This results in firmer curds with a richer flavor profile, making it ideal for cheeses like cheddar, mozzarella, or gouda. The use of rennet allows for a greater control over the texture and aging potential of the cheese, transforming it into a masterpiece that can develop complex flavors over time.

Understanding when to use acid versus rennet can elevate your cheese-making game. Experimenting with both methods will give you a deeper appreciation for the craft and help you create a variety of cheeses, each with its own unique character and taste. Whether you’re drawn to the quick satisfaction of an acid-set cheese or the intricate artistry of rennet-based varieties, mastering the science of curdling is your gateway to transforming simple milk into delicious homemade cheese.

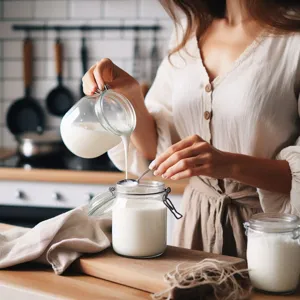
6. Step-by-Step Guide to Making Fresh Cheese (e.g., Ricotta or Paneer)

Making fresh cheese at home is a rewarding and straightforward process that can elevate your culinary creations from ordinary to extraordinary. Whether you choose to make ricotta, paneer, or another variety, the basic steps remain largely the same. Here’s a step-by-step guide to help you craft your own delightful cheese.

### Ingredients You’ll Need:
– **Milk**: Use whole milk for the creamiest results. You can opt for cow’s, goat’s, or sheep’s milk based on your preference.
– **Acid**: Lemon juice or white vinegar works well to curdle the milk.
– **Salt**: For flavor, to taste.

### Step 1: Prepare Your Equipment
Before you begin, gather your utensils. You’ll need a large pot, a thermometer, a slotted spoon, cheesecloth or a clean dish towel, and a colander. Ensuring everything is clean will help prevent any unwanted bacteria from spoiling your cheese.

### Step 2: Heat the Milk
Pour your milk into the large pot and slowly heat it over medium heat. Stir gently to prevent scorching. Use your thermometer to monitor the temperature; you want to heat the milk to around 190°F (88°C). At this temperature, the milk will begin to froth and bubble, indicating that it’s ready for the next step.

### Step 3: Add the Acid
Once the milk reaches the desired temperature, remove it from heat and add your acid (lemon juice or vinegar). Stir gently for a few seconds, then allow the mixture to sit undisturbed for about 5-10 minutes. You’ll see curds forming as the milk separates from the whey.

### Step 4: Strain the Curds
Line your colander with cheesecloth or a clean dish towel and place it over a large bowl to catch the whey. Carefully ladle the curds into the colander, letting the whey drain away. If you prefer a drier cheese, let it drain for a bit longer.

### Step 5: Rinse and Season
Once the curds are well-drained, rinse them under cold water to remove the acidity from the vinegar or lemon juice. This step not only cools the curds but also helps to create a milder flavor. After rinsing, transfer the curds to a mixing bowl, sprinkle in salt to taste, and gently combine.

### Step 6: Shape and Store
At this stage, you can either leave the cheese loose for a rustic texture or shape it into balls or a block. If you’re making paneer, press the curds into a mold or wrap them in cheesecloth and place a weight on top to help them firm up. Once shaped, wrap your cheese tightly in plastic wrap or store it in an airtight container in the refrigerator.

### Enjoying Your Homemade Cheese
Whether you use it in a savory dish, as a topping for salads, or simply enjoy it fresh with a drizzle of olive oil and herbs, your homemade cheese will surely impress. The satisfaction of creating something so delightful from just a few simple ingredients is unparalleled. Plus, once you master the basic techniques, you can experiment with flavors and textures, making every batch uniquely yours. Happy cheesemaking!

7. Techniques for Aging Cheese: How to Create Unique Flavors

What are the best ways to make homemade cheese?
Credit : whatcanu.com

Aging cheese is both an art and a science, transforming humble curds into complex, flavor-packed masterpieces. The process of aging, or affinage, allows the cheese to develop its character, aroma, and taste, creating a unique profile that can range from nutty and buttery to sharp and tangy. Here are some techniques to harness the power of aging and elevate your homemade cheese experience.

1. **Temperature and Humidity Control**: The first step in successful aging is finding the right environment. Cheese thrives in cool, humid conditions. Ideally, aim for a temperature between 50°F and 55°F (10°C to 13°C) and a humidity level of around 85%. A dedicated cheese cave is perfect, but if that’s not available, a wine refrigerator or a simple cooler with a humidity source (like a damp sponge) can work wonders.

2. **Choosing the Right Rind**: The rind of the cheese is more than just a protective barrier; it plays a crucial role in flavor development. Soft cheeses, such as Brie, benefit from a bloomy rind that allows mold to flourish, imparting earthy tones. Hard cheeses, like Parmigiano-Reggiano, develop a firm, dry rind that protects the cheese while allowing for the enzymatic reactions that deepen flavors. Experimenting with different rind types can yield delightful variations in taste.

3. **Turning and Brushing**: Regularly turning your cheese wheels promotes even aging and prevents undesirable mold growth. For cheeses with a natural rind, gentle brushing with a cloth can help maintain surface cleanliness and encourage beneficial bacteria while removing any unwanted mold. Be consistent—turn your cheeses every few days to ensure they age evenly.

4. **Salting Techniques**: Salt is not just a flavor enhancer; it also acts as a natural preservative. The salting technique you choose will significantly impact the final flavor. Dry salting involves rubbing salt directly onto the cheese surface, while brining submerges the cheese in a saltwater solution. Experiment with different salt concentrations and methods to discover the perfect balance for your cheese type.

5. **Experimenting with Flavors**: Aging is the perfect time to infuse your cheeses with unique flavors. Consider adding herbs, spices, or even infused oils during the aging process. For example, a sprinkle of cracked black pepper can add a delightful kick, while fresh herbs like rosemary can impart a fragrant, earthy quality. As you age your cheese, don’t shy away from getting creative—this is where your culinary instincts can shine.

6. **Patience is Key**: While it may be tempting to sample your creations early, remember that great cheese takes time. The aging process can range from a few weeks to several months, depending on the type of cheese. Take notes throughout the journey, and don’t hesitate to make adjustments based on your observations. Each batch is an opportunity to learn and refine your techniques.

By embracing these aging techniques, you’ll unlock a world of flavors and textures, transforming your homemade cheese into a gourmet experience that friends and family will rave about. With a little patience and a dash of creativity, you’ll be well on your way to crafting cheese that not only delights your palate but also tells the unique story of your cheese-making journey.

8. Exploring Different Types of Cheese: A Brief Overview

When it comes to homemade cheese, the world is your oyster—or, in this case, your milk! Cheese-making is a delightful journey that opens up a realm of flavors and textures, each type offering its own unique character and culinary uses. Understanding the different types of cheese can inspire your cheese-making adventures and help you choose which ones to tackle first.

**Fresh Cheese:** This category includes soft cheeses like ricotta, mozzarella, and cream cheese. Fresh cheeses are typically made without aging, resulting in a mild flavor and creamy texture. They are incredibly versatile, perfect for spreading on toast, dolloping on pasta, or incorporating into salads. The process is often straightforward, making fresh cheese an excellent starting point for novice cheesemakers.

**Soft Cheese:** A step up from fresh cheese, soft cheeses like Brie and Camembert undergo a little aging but are still creamy and spreadable. These cheeses develop a lovely white rind, thanks to specific molds introduced during the aging process. Making soft cheese requires patience, as they need time to mature, but the reward is a rich and luscious treat that pairs beautifully with crusty bread and fruit.

**Semi-Hard Cheese:** Cheddar, Gouda, and Swiss fall into this category. These cheeses possess firmer textures and are aged longer than their soft counterparts, resulting in more complex flavors. The cheese-making process is slightly more involved, requiring careful monitoring of temperature and pH levels, but the outcome is well worth the effort. Aged semi-hard cheeses can be used in a variety of dishes, from melty grilled cheese sandwiches to savory cheese boards.

**Hard Cheese:** Parmesan and Pecorino are quintessential examples of hard cheeses. With their robust flavors and granular textures, hard cheeses are perfect for grating over pasta or salads. The aging process for these cheeses can take several months or even years, allowing them to develop deep, rich flavors. While making hard cheese is more intricate, the satisfaction of crafting a cheese that enhances your culinary creations is unparalleled.

**Blue Cheese:** For the adventurous cheesemaker, blue cheese offers a unique challenge. Characterized by its distinct blue veins of mold, varieties like Roquefort and Gorgonzola boast bold flavors that can be both tangy and creamy. The process involves inoculating the cheese with specific molds and allowing it to develop in a controlled environment. While blue cheese may require a bit more expertise, the resulting cheese is a true masterpiece.

Exploring these different types of cheese not only enhances your skill set but also broadens your culinary horizons. Each cheese has its own story and potential, waiting for you to uncover in your kitchen. Whether you’re creating a simple ricotta or embarking on the intricate journey of making a blue cheese, the experience is sure to enrich your appreciation for this amazing dairy delight. So grab your milk and let your cheese-making adventure begin!

9. Flavoring Your Cheese: Herbs, Spices, and Other Additions

Flavoring your cheese is where the magic truly happens, transforming a simple block of white curds into a delectable work of art that tantalizes the taste buds. The possibilities are virtually endless, and experimenting with different herbs, spices, and other additions can elevate your homemade cheese to restaurant-quality indulgence.

Start with the classics. Fresh herbs like basil, chives, or dill can be chopped and folded into your curds, imparting a vibrant freshness that adds a delightful twist to your cheese. Alternatively, dried herbs such as oregano or thyme can provide a more concentrated flavor that develops beautifully as the cheese ages. For an aromatic boost, consider seasoning your cheese with crushed garlic or a sprinkle of onion powder, creating a savory depth that pairs wonderfully with crusty bread or crackers.

Spices also play a crucial role in flavoring your cheese. A pinch of smoked paprika can lend a subtle smokiness, while crushed red pepper flakes add just the right amount of heat for those with a bold palate. For a distinctly Mediterranean flair, try adding za’atar, a fragrant blend of thyme, sesame seeds, and sumac that will transport your taste buds to sun-soaked shores.

Don’t overlook the potential of sweet additions, either! A touch of honey or a swirl of maple syrup can create an intriguing contrast in a creamy cheese, while fruits like figs, cranberries, or even sun-dried tomatoes can introduce a sweet-tart balance. Experimenting with nuts, such as finely chopped walnuts or pistachios, can add a satisfying crunch and nuttiness to your cheese, making it even more enticing.

As you play with flavors, keep in mind that less is often more. Start with small amounts of your chosen ingredients and taste as you go, allowing the natural cheese flavors to come through while enhancing them with your flavorful additions. Whether you prefer a herby spreadable cheese, a zesty pepper-infused cheese, or a sweet and nutty creation, the key is to have fun and let your creativity shine. With each batch, you’ll not only refine your cheese-making skills but also develop a unique flavor profile that reflects your personal tastes, ensuring that your homemade cheese is always a masterpiece.

10. Common Mistakes to Avoid

Making cheese at home can be a rewarding and delicious endeavor, but it’s not without its challenges. Even seasoned home cheesemakers can find themselves tripped up by a few common missteps. Here are some pitfalls to watch out for to ensure your cheese-making experience yields the best results.

**1. Skipping the Sanitization Process:**
One of the most crucial steps in cheese-making is ensuring that all your equipment is impeccably clean. Bacteria and unwanted microorganisms can easily spoil your milk and ruin your cheese. Always sanitize your utensils, molds, and surfaces before you start, and avoid touching anything that isn’t clean during the process.

**2. Using the Wrong Milk:**
Not all milk is created equal when it comes to cheese-making. While whole milk is often ideal, be wary of ultra-pasteurized milk, which can prevent your rennet from coagulating the milk properly. Opt for fresh, raw, or pasteurized milk from a reliable source for best results.

**3. Ignoring Temperature Control:**
Temperature plays a critical role in cheese-making. Too high or too low temperatures can affect the curd formation and texture of your cheese. Invest in a reliable thermometer and keep a close eye on the temperature at every stage, especially during heating and culturing.

**4. Rushing the Curd Cutting Process:**
Cutting the curds too soon or too late can drastically alter your cheese’s texture. Allowing the curds to set for the appropriate time is essential for achieving the right consistency. Follow your recipe closely and be patient; good things come to those who wait!

**5. Over- or Under-salting:**
Salt is not just for flavor; it also helps with preservation and affects the cheese’s texture and moisture. Too much salt can overpower the flavor, while too little can lead to spoilage. Be precise with your measurements and taste as you go.

**6. Neglecting to Age Properly:**
Aging is where the magic happens for many cheeses, contributing to their flavor and texture. Avoid the mistake of rushing this process. Ensure you have a suitable aging environment—cool, dark, and humid—and be patient as your cheese develops its character.

By steering clear of these common mistakes, you’ll be well on your way to crafting delicious homemade cheese that you can be proud of. Embrace the learning curve, and remember that even the occasional mishap can lead to valuable lessons and, perhaps, unexpectedly delightful flavors!

11. Storing and Preserving Your Homemade Cheese

Storing and preserving your homemade cheese is just as crucial as the crafting process itself. Once you’ve put in the time and effort to create your cheesy masterpiece, ensuring it stays fresh and flavorful is essential to enjoying it for weeks or even months to come. The right storage techniques can significantly extend the shelf life of your cheese while maintaining its delightful taste and texture.

First and foremost, consider the type of cheese you’ve made. Soft cheeses, like ricotta and cream cheese, have a higher moisture content and should be stored in an airtight container in the refrigerator. This will help prevent them from drying out and picking up unwanted odors from the fridge. Make sure to consume these cheeses within a week or two for optimal freshness.

On the other hand, harder cheeses, such as cheddar or gouda, can be wrapped in parchment paper or cheese paper, which allows them to breathe while preventing them from drying out. After wrapping, place the cheese in a breathable container or a cheese dome to further protect it from moisture loss. Hard cheeses can often last for several weeks in the fridge, but be sure to check for signs of mold or spoilage regularly.

For longer-term storage, you might consider freezing your cheese. However, not all cheeses freeze well. Hard cheeses generally hold up better when frozen, while soft cheeses may become crumbly after thawing. To freeze cheese, cut it into manageable portions and wrap it tightly in plastic wrap, followed by aluminum foil to prevent freezer burn. You can also vacuum seal your cheese for the best preservation results. Just remember to label your packages with the date and type of cheese to keep track of your stash.

Lastly, don’t overlook the importance of proper aging for certain types of cheese. If you’re crafting a cheese that benefits from aging, like a blue cheese or aged cheddar, be sure to monitor the temperature and humidity levels in your aging environment. A dedicated cheese cave or a controlled space in your refrigerator can create the ideal conditions for your cheese to develop its full flavor potential.

By mastering the art of storing and preserving your homemade cheese, you can ensure that your delicious creations remain enjoyable for as long as possible, ready to be savored on your favorite charcuterie board or melted into your next culinary masterpiece.

12. Pairing Homemade Cheese with Food and Wine

Pairing homemade cheese with food and wine can elevate your culinary experience from delightful to extraordinary. The beauty of crafting your own cheese is that it allows you to explore a world of flavors, textures, and aromas that store-bought varieties simply can’t match. Once you’ve mastered the art of cheese-making, the next step is to discover how to complement your creations with the right accompaniments.

Start with the basics: fresh cheeses like ricotta or mozzarella. These mild varieties shine when paired with fresh fruits and herbs. Imagine a creamy dollop of homemade ricotta atop a warm slice of rustic bread, drizzled with honey and sprinkled with sea salt. Add a handful of fresh figs or berries, and you’ve got a dish that sings with seasonal vibrancy. For mozzarella, a classic caprese salad—layered with ripe tomatoes, fragrant basil, and a splash of balsamic glaze—showcases the cheese’s delicate flavor beautifully.

As you venture into aged cheeses like cheddar or gouda, consider pairing them with hearty accompaniments. A sharp cheddar pairs wonderfully with crisp apples or pears, while aged gouda, with its nutty undertones, complements rich meats like prosciutto or salami. A charcuterie board featuring your homemade cheeses, artisan meats, and a variety of pickles and olives can become a stunning centerpiece at any gathering.

When it comes to wine, the right pairing can truly enhance the tasting experience. Fresh cheeses generally pair well with light, crisp whites such as Sauvignon Blanc or Pinot Grigio, which balance the creaminess without overpowering it. For aged cheeses, consider a bold red like Cabernet Sauvignon or a rich Chardonnay that can stand up to the deeper flavors. Don’t forget to experiment with sparkling wines, as their effervescence can cut through the richness of cheese, providing a refreshing contrast.

Ultimately, the art of pairing is about personal preference. Invite friends and family to join in the exploration, creating a festive atmosphere where everyone can share their thoughts on the delightful combinations. With your homemade cheese as the star of the show, the possibilities for delicious pairings are endless, making every meal a memorable celebration of flavor.

13. Creative Ways to Use Your Cheese in Recipes

Once you’ve mastered the art of cheese-making, the culinary adventure doesn’t end there! Homemade cheese presents a world of possibilities, allowing you to elevate your everyday meals and impress your friends and family. Here are some creative ways to incorporate your artisanal creations into delicious recipes that celebrate your handiwork.

**1. Creamy Cheese Spreads:** Blend your soft cheeses, such as ricotta or cream cheese, with herbs, spices, and perhaps a touch of honey for a delightful spread. Serve it on crusty bread or crackers as a part of an appetizer platter. You can experiment with flavors—think sun-dried tomatoes and basil or garlic and chive—to suit your palate.

**2. Gourmet Mac and Cheese:** Take your homemade cheese to the next level in a classic comfort dish. Mix a medley of your cheeses—sharp cheddar, creamy mozzarella, or a tangy goat cheese—with cooked pasta and a splash of cream. Top it with breadcrumbs and bake until golden for an indulgent treat that will have everyone asking for seconds.

**3. Cheese-Stuffed Vegetables:** Hollow out bell peppers, zucchini, or tomatoes and fill them with a savory mixture of your cheeses, grains, and spices. Bake until the vegetables are tender and the cheese is bubbling for a colorful and nutritious main course or side dish.

**4. Homemade Pizza:** Nothing beats the taste of freshly made pizza topped with your own cheese. Use mozzarella or a blend of cheeses, along with your favorite toppings. Bake in a hot oven for a crispy crust and gooey, melty cheese that will make pizza night a feast to remember.

**5. Salads with Flair:** Crumble your homemade feta or goat cheese over fresh salads to add a creamy texture and flavor contrast. Pair it with seasonal vegetables, nuts, and a light vinaigrette for a refreshing and satisfying dish.

**6. Cheese Desserts:** Yes, cheese can be part of your dessert repertoire too! Use mascarpone or ricotta to create light and airy desserts like cheesecakes, tiramisu, or layered parfaits. The natural sweetness of the cheese pairs beautifully with fruits and honey, perfect for a sweet ending to any meal.

By thinking outside the box and exploring these creative culinary uses for your homemade cheese, you can turn your kitchen into a gourmet paradise. Each dish not only showcases your cheese-making skills but also invites others to savor the delicious flavors and textures that only homemade cheese can provide. Enjoy the delightful journey from milk to masterpiece, one delicious recipe at a time!

14. Troubleshooting Common Cheese-Making Problems

Making cheese at home can be a rewarding and creative endeavor, but it’s not without its challenges. Even the most experienced cheesemakers encounter hiccups along the way. Understanding how to troubleshoot common cheese-making problems can save your batch and enhance your skills.

One frequent issue is curd separation, where the curds and whey don’t fully separate as expected. This can often be traced back to temperature inconsistencies. Ensure you’re maintaining the right temperature throughout the process; investing in a reliable thermometer can make a world of difference. If you find yourself with curds that are too dry, try a gentler heating method or reduce the acidification time in your recipe.

Another common problem is unwanted flavors or odors in the finished cheese, which may arise from improper sanitation or contamination. Always ensure your equipment is meticulously cleaned and sanitized before starting, as even the smallest residue can affect the taste of your cheese. If you notice bitterness, it could be due to overcooking your curds or using poor-quality milk, so be mindful of your ingredients and cooking times.

Texture issues can also arise, with cheese turning out grainy or crumbly instead of smooth and creamy. This could be the result of too much acid or not enough fat in your milk. When experimenting with different types of milk, remember that higher fat content typically leads to creamier cheeses. Lastly, if your cheese isn’t aging properly or developing the desired flavor profile, consider adjusting your aging conditions—humidity and temperature play crucial roles in the maturation process.

By keeping an eye on these potential pitfalls and being ready to adapt, you’ll not only salvage your current batch but also gain invaluable insights for your next cheese-making adventure. Remember, each mistake is a stepping stone toward mastery, turning your initial frustrations into flavorful triumphs!

15. Conclusion: The Joy of Making Cheese at Home

In conclusion, the journey of making cheese at home is not just a culinary venture; it’s a delightful experience that transforms the humble ingredients of milk and culture into a delicious masterpiece. The process may seem daunting at first, but with each step, you’ll discover the joy that comes from creating something uniquely your own. From the pristine moment of curdling milk to the satisfaction of crafting your favorite varieties—be it creamy ricotta, tangy feta, or robust aged cheddar—the rewards are truly unparalleled.

Homemade cheese offers an intimate connection to your food, allowing you to experiment with flavors and textures that store-bought varieties simply can’t match. Each batch you make becomes a testament to your growing skills and creativity in the kitchen. Imagine sharing a platter of your homemade cheese with friends and family, savoring the pride that comes from serving something crafted by your own hands.

As you embark on this cheesy adventure, remember that the journey is just as important as the destination. Whether you’re perfecting the art of mozzarella or venturing into the world of blue cheese, embrace the learning process, celebrate your successes, and don’t shy away from the occasional mishap—each mistake is a stepping stone toward mastering this timeless craft.

So, gather your ingredients, roll up your sleeves, and dive into the world of cheese-making. The joy of creating delectable cheese at home is waiting for you, and with each bite, you’ll savor not just the flavor, but the fulfillment that comes from bringing a little piece of culinary magic into your kitchen. Happy cheese making!

As we wrap up our exploration of transforming humble milk into delicious homemade cheese, we hope you feel inspired to embark on this rewarding culinary journey. Whether you’re aiming to perfect a creamy mozzarella, a tangy ricotta, or a robust aged cheddar, the techniques and tips shared in this post will guide you every step of the way. Homemade cheese not only elevates your meals but also brings a sense of accomplishment and creativity to your kitchen. So gather your ingredients, roll up your sleeves, and let your taste buds lead the way. We can’t wait to hear about your cheesy creations—share your masterpieces with us and let the world savor the fruits of your labor! Happy cheesemaking!

What are the best ways to make homemade yogurt?

There’s something undeniably satisfying about crafting your own homemade yogurt, transforming simple ingredients into a creamy, tangy delight that can elevate any meal or snack.

Whether you’re a health enthusiast seeking to control the ingredients you consume, a culinary adventurer eager to explore the art of fermentation, or simply someone who cherishes the rich, fresh taste of homemade products, this guide is for you. Unlocking the creamy secret of yogurt-making not only allows you to enjoy a deliciously smooth treat but also opens the door to a world of flavors and health benefits that store-bought varieties often lack. Join us as we delve into the best methods for creating your own yogurt at home, from choosing the right starter culture to mastering the fermentation process, ensuring that every spoonful is a testament to your kitchen prowess and dedication to wholesome living. Prepare to indulge in the velvety goodness of homemade yogurt, and discover just how easy it is to make this delightful staple in your very own kitchen!

1. Introduction to Homemade Yogurt

What are the best ways to make homemade yogurt?
Credit : whatcanu.com

Yogurt has long been cherished for its creamy texture and tangy flavor, but nothing compares to the satisfaction of making it at home. The process is not only simple but also incredibly rewarding, allowing you to create a product that is fresher, healthier, and more customizable than anything you can find in the store. Homemade yogurt is a versatile ingredient, perfect for everything from breakfast parfaits to savory dips, and it can be tailored to suit your taste—whether you prefer it plain, sweetened, or infused with your favorite fruits and spices.

At its core, yogurt is a product of fermentation, a magical transformation of milk that occurs when beneficial bacteria are introduced. This process not only thickens the milk but also enhances its nutritional profile, making homemade yogurt a powerhouse of protein, calcium, and probiotics. With a little patience and a few basic ingredients—milk and yogurt starter culture—you can unlock the creamy secret of yogurt-making right in your kitchen.

In this blog post, we’ll guide you through the steps to create your very own batch of homemade yogurt, sharing tips, tricks, and variations to elevate your yogurt-making experience. Whether you’re a novice or a seasoned culinary enthusiast, you’ll discover that with just a few tools and a dash of creativity, you can enjoy the rich, velvety goodness of yogurt made to your liking. So, roll up your sleeves and get ready to embark on a delicious journey into the world of homemade yogurt!

2. Benefits of Making Yogurt at Home

Making yogurt at home is not just a culinary adventure; it comes with a plethora of benefits that make it a worthwhile endeavor. first and foremost, homemade yogurt is a treasure trove of health benefits. It’s packed with probiotics—those beneficial bacteria that support gut health, boost immunity, and improve digestion. By making your yogurt, you can customize the strain of probiotics to fit your health needs, something that store-bought varieties often lack.

Another significant advantage is the control you gain over the ingredients. When you make yogurt at home, you can choose high-quality milk, whether it’s whole, low-fat, or even plant-based alternatives, and you can avoid the preservatives, artificial flavors, and sugars that may be lurking in commercial products. This means you can create a yogurt that is as pure and nutritious as you desire, tailored to your palate and dietary requirements.

Cost-effectiveness is another perk of homemade yogurt. A gallon of milk can yield a substantial amount of yogurt, often at a fraction of the cost of purchasing a similar quantity at the grocery store. This not only saves you money but also encourages you to experiment with flavors and uses, from smoothies to desserts, without the guilt of wasting resources.

Moreover, the process of making yogurt is incredibly rewarding. Watching the transformation from milk to creamy yogurt is like a mini-science experiment in your kitchen. It gives you a sense of accomplishment and connection to your food that is often lost in the hustle of modern life. Plus, the creamy texture and tangy flavor of freshly made yogurt is a treat that can elevate any meal—whether it’s a breakfast parfait, a savory dip, or a cooling sauce for your favorite dishes.

Lastly, homemade yogurt allows for endless creativity. You can infuse different flavors—think vanilla, honey, or fresh fruits—experiment with various add-ins like nuts and seeds, and create your unique blends that cater to your tastes. The possibilities are as vast as your imagination! So, embrace the art of yogurt-making, and unlock a world of creamy goodness right in your kitchen.

3. Essential Ingredients for Creamy Yogurt

What are the best ways to make homemade yogurt?
Credit : whatcanu.com

To embark on your homemade yogurt journey, it’s crucial to start with the right ingredients that will ensure a rich, creamy texture and delightful flavor. At the heart of this culinary adventure are just a few essential components that can elevate your yogurt-making game.

**1. Quality Milk:** The foundation of any great yogurt is, of course, milk. Whole milk is often the best choice for achieving that luscious creaminess, but you can also experiment with 2% or even non-dairy alternatives if you’re looking for a plant-based option. The fat content in whole milk creates a thicker, more indulgent yogurt, so if creaminess is your goal, opt for the richest milk you can find.

**2. Yogurt Starter Culture:** This is the magic ingredient that transforms your milk into yogurt. Look for a high-quality plain yogurt that contains live active cultures; this could be store-bought yogurt or a freeze-dried starter culture specifically designed for yogurt-making. The beneficial bacteria in the starter not only impart flavor but also contribute to the creamy texture by thickening the milk during fermentation.

**3. Optional Additives:** While not strictly essential, certain additives can enhance the creaminess and flavor of your yogurt. For instance, a splash of heavy cream can provide a richer texture, while a tablespoon of powdered milk can help absorb excess moisture, resulting in a thicker consistency. Additionally, sweeteners like honey or maple syrup can be added to taste, offering a touch of sweetness that complements the tang of the yogurt.

When combined, these ingredients lay the groundwork for a delectable homemade yogurt that’s not only creamy but also packed with probiotics. With these essentials in hand, you’re well on your way to unlocking the creamy secret of homemade yogurt! So gather your ingredients, and let the yogurt-making begin!

4. Choosing the Right Milk: Whole vs. Low-Fat

When it comes to making homemade yogurt, one of the most crucial decisions you’ll face is choosing the right type of milk. The texture, creaminess, and overall flavor of your yogurt largely depend on this selection. You may find yourself torn between whole milk and low-fat options, each offering distinct advantages.

Whole milk is often hailed as the gold standard for yogurt-making. Its rich, creamy consistency results in a velvety texture that makes every spoonful delightful. The higher fat content not only contributes to a luxurious mouthfeel but also fosters a creamier, thicker yogurt that is both satisfying and indulgent. If you’re aiming for a luscious Greek-style yogurt, whole milk is your best bet, providing that satisfying richness that keeps yogurt lovers coming back for more.

On the other hand, low-fat or skim milk can be appealing for health-conscious individuals looking to reduce their calorie intake. While it may not produce yogurt with the same creamy texture as whole milk, low-fat options can still yield tasty results, especially when you’re after a lighter snack. You might discover that some people prefer the tangy bite of low-fat yogurt, which can serve as a refreshing base for smoothies or a delightful addition to salads.

Ultimately, choosing between whole and low-fat milk will depend on your personal preferences and health goals. If you decide to experiment, consider blending the two—using a combination of whole and low-fat milk can strike a balance between creaminess and a lighter feel. Whatever you decide, the key is to use high-quality milk, as fresh and wholesome ingredients will always lead to superior homemade yogurt. So, roll up your sleeves, grab your chosen milk, and let the yogurt-making adventure begin!

5. Starter Cultures: What You Need to Know

What are the best ways to make homemade yogurt?
Credit : whatcanu.com

When it comes to making homemade yogurt, understanding starter cultures is crucial to achieving that velvety texture and tangy flavor we all love. A starter culture is essentially a collection of live bacteria that kickstarts the fermentation process, transforming milk into creamy yogurt.

You have several options when it comes to selecting a starter culture. You can opt for store-bought yogurt that contains live active cultures—just be sure to check the label for strains like *Lactobacillus bulgaricus* and *Streptococcus thermophilus*, as these are the essential bacteria needed for yogurt-making. Alternatively, for a more artisanal approach, you can purchase freeze-dried starter cultures specifically designed for yogurt production. These cultures come in a variety of strains, each offering unique flavors and health benefits, allowing you to experiment and find your perfect match.

If you decide to use store-bought yogurt as a starter, remember that it should be plain, unflavored, and free from additives. The fresher the yogurt, the better your results will be, as the potency of the bacteria decreases over time. On the other hand, freeze-dried cultures can be a bit pricier, but they often yield a more consistent product and allow you to create yogurt with specific characteristics, such as thickness or probiotic content.

Once you’ve chosen your starter culture, it’s essential to maintain proper temperatures during the fermentation process. Most yogurt cultures thrive between 110°F and 115°F (43°C to 46°C). Investing in a yogurt maker or using a simple method like wrapping your container in towels and placing it in a warm spot can help regulate the temperature and ensure a successful fermentation.

In summary, selecting the right starter culture is a pivotal step in your homemade yogurt journey. Whether you choose a beloved store-bought option or opt for a specialized freeze-dried culture, the microorganisms you introduce will shape the flavor, texture, and health benefits of your yogurt. With a little knowledge and experimentation, you’ll unlock the creamy secret to creating delicious, homemade yogurt that will have everyone coming back for more!

6. Step-by-Step Guide to Making Yogurt

Making your own yogurt at home is not only a rewarding culinary adventure, but it also allows you to create a creamy, delicious product tailored to your taste preferences. Below is a straightforward, step-by-step guide to help you achieve yogurt-making success.

**Step 1: Gather Your Ingredients and Tools**
To start, you’ll need just a few simple ingredients: milk (whole or low-fat, depending on your preference), and a tablespoon of plain yogurt with live active cultures. If you want to infuse your yogurt with flavors or sweetness, consider adding honey, vanilla extract, or fruits later in the process. Ensure you have a heavy-bottomed pot, a whisk, a thermometer, and a container to incubate the yogurt, such as a glass jar or a yogurt maker.

**Step 2: Heat the Milk**
Pour your desired amount of milk into the pot and slowly heat it over medium heat. Stir occasionally to prevent the milk from scorching. Monitor the temperature with your thermometer; you want to bring it to around 180°F (82°C). This step is crucial as it helps to denature the proteins, ensuring a smoother texture.

**Step 3: Cool the Milk**
Once the milk reaches the right temperature, remove it from the heat and allow it to cool to about 110°F (43°C). You can expedite this process by placing the pot in an ice bath.

**Step 4: Add the Starter Culture**
Once the milk has cooled, whisk in the tablespoon of plain yogurt until thoroughly combined. Make sure the yogurt contains live active cultures, as these are the beneficial bacteria that will ferment your milk into yogurt.

**Step 5: Incubate the Mixture**
Transfer the milk mixture into your container and cover it with a lid or a clean kitchen towel. To maintain a consistent warm temperature, place the container in a warm spot in your kitchen—this can be an oven with the light on, or a warm insulated cooler. The incubation period typically lasts between 6 to 12 hours, depending on how tangy and thick you want your yogurt. The longer you let it sit, the tangier it will become.

**Step 6: Check for Doneness**
After the incubation period, carefully check the yogurt. It should be thickened and have a slight tangy aroma. If it’s to your liking, proceed to the next step; if not, let it ferment a few more hours.

**Step 7: Refrigerate and Enjoy**
Once your yogurt has reached your desired flavor and texture, transfer it to the refrigerator to cool and set. Homemade yogurt can be stored in an airtight container for up to a week. Before serving, you can whisk it for a creamier consistency and add your favorite toppings—think fresh fruits, granola, or a drizzle of honey.

By following these simple steps, you will unlock the creamy secret to homemade yogurt, allowing you to savor the freshest and most delicious yogurt in the comfort of your own kitchen! Enjoy the satisfaction of knowing exactly what’s in your yogurt, and experiment with flavors and textures to make it uniquely yours.

7. Tips for Achieving the Perfect Consistency

What are the best ways to make homemade yogurt?
Credit : whatcanu.com

Achieving the perfect consistency in homemade yogurt can elevate your culinary experience from good to extraordinary. The texture of your yogurt is influenced by several factors, and mastering these will ensure you get that creamy, luscious mouthfeel every time.

**1. Choose the Right Milk:** Start with high-quality milk—whole milk is ideal for achieving a rich and creamy texture, while low-fat options can lead to a thinner consistency. If you’re adventurous, try using a mix of whole and half-and-half for an ultra-creamy result.

**2. Heat to the Right Temperature:** When heating your milk, aim for about 180°F (82°C). This step not only helps to kill any unwanted bacteria but also denatures the proteins, allowing them to form a smooth and cohesive structure once cooled and cultured.

**3. Cool Gradually:** After heating, let the milk cool to between 110°F and 115°F (43°C to 46°C) before adding your yogurt starter. This is the ideal temperature for the bacteria to thrive and will contribute to a thicker consistency. If you rush this step, you may end up with a runny yogurt.

**4. Use a Quality Starter:** The quality of your yogurt starter can make a world of difference. Look for live cultures with a variety of probiotics, as these will not only enhance flavor but also collaborate to create a thicker texture. You can use plain yogurt from the store or a powdered starter culture; just ensure it contains active cultures.

**5. Incubate the Right Way:** The incubation period is crucial for thickness. Allow your yogurt to ferment undisturbed for 6 to 12 hours, depending on personal preference for tartness. The longer it incubates, the thicker it will become. Use a yogurt maker, a warm oven, or even a thermos to maintain a stable temperature.

**6. Avoid Stirring:** Once your yogurt has set, resist the urge to stir it. This can break down the structure you’ve so carefully developed. If you want to add flavors or sweeteners, do so gently after the yogurt has reached your desired thickness.

**7. Chill Before Serving:** Finally, chilling your yogurt in the refrigerator for a few hours after it has set will help improve its thickness. The cold temperature helps the proteins solidify, resulting in a firmer texture.

By following these tips, you’ll be well on your way to crafting homemade yogurt that boasts the perfect consistency—smooth, creamy, and utterly delightful. Whether enjoyed on its own, drizzled with honey, or blended into smoothies, your homemade yogurt will be a testament to your kitchen prowess!

8. Common Mistakes to Avoid

Making homemade yogurt can be a delightful and rewarding experience, but it’s easy to stumble into a few common pitfalls that can derail your creamy creation. Here are some mistakes to watch out for to ensure your yogurt turns out smooth, tangy, and absolutely delicious.

**1. Skipping the Temperature Check:** One of the most crucial steps in yogurt-making is ensuring your milk is heated to the right temperature. If you heat it too much, you risk scalding the milk, which can alter the flavor and texture. Conversely, if it’s not hot enough, the bacteria won’t thrive, leading to thin and runny yogurt. Aim for a sweet spot of around 180°F (82°C) for optimal results.

**2. Not Cooling Down Properly:** After heating your milk, it’s essential to let it cool to around 110°F (43°C) before adding your starter culture. If you add the culture when the milk is too hot, you’ll kill the beneficial bacteria that help ferment the yogurt. Use a food thermometer to monitor the temperature closely for the best outcome.

**3. Choosing the Wrong Starter Culture:** Using a starter with live active cultures is key to successful fermentation. Avoid store-bought yogurts that may contain stabilizers or are past their expiration date. Instead, opt for plain yogurt from a reputable brand, or even better, use a yogurt starter culture specifically designed for homemade yogurt.

**4. Forgetting to Maintain a Steady Temperature:** Yogurt needs a warm environment to ferment properly. If your kitchen is too cool, the cultures won’t thrive, resulting in yogurt that is less tangy and thick. Invest in a yogurt maker or find a warm spot in your home—like an oven with the light on or a warming drawer—to keep the temperature stable during fermentation.

**5. Overlooking Fermentation Time:** Each batch of yogurt is unique, and fermentation times can vary based on factors like the type of milk used, the starter culture, and the ambient temperature. While most yogurt requires anywhere from 4 to 12 hours to ferment, it’s essential to taste-check periodically. If you leave it too long, you might end up with overly tart yogurt.

**6. Neglecting Hygiene Practices:** Cleanliness is paramount in yogurt-making. Any stray bacteria can spoil your batch or lead to inconsistent results. Always sanitize your equipment and work surfaces before you begin to ensure a healthy fermentation process.

By steering clear of these common mistakes, you’ll be well on your way to crafting creamy, homemade yogurt that’s not only delicious but also nourishing. Embrace the process, learn from any missteps, and soon you’ll be enjoying the rich flavors of your own yogurt creations!

9. Flavoring Your Yogurt: Natural Add-ins and Toppings

Flavoring your yogurt is where the magic truly happens, transforming a simple, creamy base into a delightful culinary experience. While plain yogurt offers a wholesome foundation packed with probiotics, adding natural ingredients can elevate its taste and nutritional profile, making it a treat you’ll look forward to indulging in every day.

Consider starting with fresh fruits, which not only enhance the flavor but also provide a burst of color and nutrients. Sliced strawberries, ripe bananas, or a handful of blueberries can add sweetness and natural sugars without the need for artificial additives. If you’re feeling adventurous, experiment with tropical fruits like mango or pineapple for a refreshing twist that transports your taste buds to a sun-soaked paradise.

For those who enjoy a bit of crunch, nuts and seeds are excellent choices. A sprinkle of toasted almonds, walnuts, or chia seeds can provide a satisfying texture while adding healthy fats and protein. You might also consider incorporating granola, offering a delightful combination of flavors and crunch that will make breakfast or a snack feel indulgent.

Herbs and spices can also work wonders in flavoring your yogurt. A dash of cinnamon or a hint of vanilla can infuse warmth and depth, while fresh mint leaves can add a refreshing note that brightens up the dish. For a unique twist, try mixing in a spoonful of honey or maple syrup—a drizzle that not only sweetens but also adds an enticing layer of complexity to your yogurt.

Don’t forget about the power of savory toppings! A sprinkle of sea salt or a drizzle of olive oil can create a bold contrast, perfect for serving yogurt as a dip with pita or vegetable sticks. Combining yogurt with garlic and herbs can transform it into a creamy sauce that elevates any meal.

Ultimately, the beauty of homemade yogurt lies in its versatility. As you explore natural add-ins and toppings, you’ll discover endless possibilities to personalize your yogurt experience, ensuring that each spoonful is a delightful journey of flavors and textures. So get creative, experiment with your favorite ingredients, and unlock the creamy secret to making yogurt that’s truly your own!

10. Creative Uses for Homemade Yogurt

Homemade yogurt is not just a delicious snack on its own; it’s a versatile ingredient that can elevate a multitude of dishes. Once you’ve mastered the art of making your own creamy yogurt, you’ll discover a world of creative uses that will have you reaching for that jar in your fridge time and time again.

**1. Smoothies and Shakes:** Start your day on a refreshing note by blending homemade yogurt into your morning smoothies. Its creamy texture adds body and richness while boosting the protein content. Combine it with fruits like bananas, berries, or mangoes for a nutrient-packed breakfast or a post-workout snack.

**2. Salad Dressings:** Elevate your salads with homemade yogurt-based dressings. Mix it with olive oil, lemon juice, herbs, and spices to create a tangy, creamy dressing that’s far healthier than store-bought alternatives. It adds a delightful zip to your greens, enhancing both flavor and nutrition.

**3. Baking Substitute:** When baking, replace sour cream or buttermilk with homemade yogurt for a moist and tender texture in cakes, muffins, and pancakes. The subtle tanginess will add depth to the flavors and keep your baked goods from drying out.

**4. Dips and Spreads:** Whip up a quick and healthy dip by mixing yogurt with garlic, herbs, and your favorite spices. Serve it alongside fresh vegetables, pita bread, or chips for a delightful appetizer. You can also incorporate yogurt into spreads to slather on sandwiches or toast, adding creaminess without the added calories of mayonnaise.

**5. Marinades:** Harness the natural probiotic qualities of yogurt to create tenderizing marinades for meats and vegetables. The acidity in yogurt helps to break down proteins, resulting in juicy and flavorful dishes. Combine it with spices and herbs to complement whatever you’re grilling or roasting.

**6. Frozen Treats:** Beat the heat with homemade yogurt popsicles! Simply blend yogurt with fruits, honey, or your favorite flavorings, pour into molds, and freeze. These treats are not only delicious but also a healthier alternative to store-bought ice creams.

**7. Soups and Sauces:** Stir a dollop of yogurt into soups just before serving for added creaminess and flavor. It works wonders in both chilled soups, like gazpacho, and warm soups, adding a rich texture and a cooling effect. You can also use it as a base for creamy sauces, perfect for drizzling over pasta or grilled vegetables.

With these creative uses for homemade yogurt, you can transform your culinary repertoire while enjoying the health benefits of this probiotic powerhouse. So, don’t be shy—experiment and discover new ways to incorporate your delicious homemade yogurt into everyday meals!

11. Storing and Preserving Your Yogurt

Once you’ve mastered the art of making your own creamy homemade yogurt, the next step is to ensure that it stays fresh and delicious for as long as possible. Proper storage and preservation are crucial, not just for maintaining flavor and texture, but also for maximizing the health benefits that yogurt offers. Here are some essential tips to help you store your yogurt like a pro.

**Choose the Right Container:**
The type of container you use can significantly affect the shelf life of your yogurt. Opt for airtight glass jars or food-safe plastic containers, as these will help maintain the yogurt’s texture and prevent any unwanted odors from seeping in. Avoid using metal containers, which can react with the acidity of yogurt and alter its flavor.

**Refrigeration is Key:**
Fresh homemade yogurt should always be stored in the refrigerator. The cold temperature slows down bacterial growth, keeping your yogurt safe to eat for longer. Ideally, yogurt can last up to two weeks when stored properly in the fridge. However, check for any signs of spoilage, such as an off smell or mold, before consuming.

**Portion it Out:**
If you’ve made a large batch of yogurt, consider portioning it out into smaller containers. This way, you only open one jar at a time, which limits exposure to air and helps maintain the overall freshness of the remaining yogurt. This is especially handy if you enjoy different flavors or toppings; you can customize each portion without affecting the entire batch.

**Freeze for Longer Storage:**
If you find that you have more yogurt than you can consume within two weeks, don’t worry! Yogurt can be frozen for future enjoyment. Scoop it into ice cube trays or freezer-safe containers, and freeze it for up to two months. When you’re ready to indulge, simply thaw it in the refrigerator overnight. Keep in mind that the texture may change slightly after freezing, making it best suited for smoothies or baking.

**Label and Date:**
To keep track of freshness, always label your containers with the date you made the yogurt. This simple step ensures you know how long it has been stored and helps you enjoy your yogurt at its peak quality.

By following these storage and preservation tips, you can savor the creamy goodness of your homemade yogurt for as long as possible. Whether enjoyed plain, topped with fruits, or blended into smoothies, your yogurt will be a delightful staple in your kitchen, ready whenever you need it!

12. Troubleshooting: What to Do If It Doesn’t Set

Making homemade yogurt can be a delightful and rewarding process, but sometimes things don’t go as planned. If you find yourself facing the frustrating situation where your yogurt hasn’t set properly, don’t worry! There are several common issues that can lead to this, and with a little troubleshooting, you can get back on track.

First, check the temperature of your incubation environment. Yogurt cultures thrive in warm conditions, typically around 110°F (43°C). If your mixture is too cool, the cultures may not grow adequately. You can create a cozy setting by wrapping your yogurt container in a thick towel or placing it in a warm oven (turned off) with the light on. Conversely, if it’s too hot, the cultures can die, so make sure the temperature stays consistent.

Next, consider the quality and type of starter culture you used. If your yogurt didn’t set, it might be that the live cultures in your starter were not strong enough or that they were past their expiration date. Always opt for a high-quality yogurt with active live cultures, or use a specially formulated yogurt starter for the best results.

Another potential issue could be the milk itself. Make sure you’re using fresh milk, as spoiled or overly processed milk can interfere with the fermentation process. Whole milk often yields creamier yogurt due to its higher fat content, but if you prefer a lower-fat option, ensure it’s pasteurized and not ultra-pasteurized, which can hinder proper setting.

Finally, if you’ve checked all these factors and your yogurt still hasn’t set after the typical incubation period (usually around 6-12 hours), consider giving it a little more time. Sometimes, yogurt just needs a bit longer to reach that perfect creamy consistency. If all else fails, don’t discard your efforts! You can salvage runny yogurt by straining it through cheesecloth or a fine mesh sieve to create a delicious Greek-style yogurt.

Remember, every batch of homemade yogurt is a learning experience. With a little patience and adjustment, you’ll soon be enjoying the rich, tangy goodness of your very own yogurt—just the way you like it!

13. Health Benefits of Yogurt

Yogurt isn’t just a delicious addition to your diet; it’s also a powerhouse of health benefits that can enhance your overall well-being. Packed with nutrients, homemade yogurt is a superb source of protein, calcium, and essential vitamins, making it an ideal choice for anyone looking to boost their nutritional intake.

One of the most notable benefits of yogurt is its probiotic content. These beneficial bacteria promote a healthy gut microbiome, aiding digestion and potentially reducing issues like bloating and constipation. A balanced gut can also bolster your immune system, helping your body fend off illness more effectively.

Additionally, yogurt is rich in calcium, which is vital for maintaining strong bones and teeth. For individuals looking to reduce their dairy consumption, yogurt can serve as an excellent alternative, providing the same bone-healthy benefits without the heavy load of other dairy products.

Moreover, many studies have suggested that regular consumption of yogurt may help in weight management. The protein content aids in satiety, keeping you fuller for longer and reducing the likelihood of unhealthy snacking. This can be particularly beneficial for those looking to maintain a healthy weight or shed a few pounds.

Another significant benefit of yogurt is its versatility. It can be incorporated into a variety of meals, from breakfast parfaits and smoothies to savory marinades and dressings. By making your yogurt at home, you can control the ingredients, avoiding added sugars and preservatives often found in store-bought varieties.

Incorporating homemade yogurt into your daily routine not only satisfies your taste buds but also nurtures your body, making it a smart and delicious choice for health-conscious individuals. So, as you embark on your yogurt-making journey, remember that you’re not just creating a tasty treat; you’re also unlocking a treasure trove of health benefits that can contribute to a healthier lifestyle!

14. Yogurt Varieties: Greek, Regular, and More

When it comes to yogurt, the world is bursting with delicious varieties, each bringing its own unique flavor and texture to the table. Understanding these differences not only enhances your yogurt-making experience but also allows you to tailor your creations to suit your taste preferences and nutritional needs.

**Greek Yogurt** is perhaps the most popular variety, beloved for its thick, creamy texture and rich flavor. The secret to its dense consistency lies in the straining process that removes most of the whey, resulting in a yogurt that’s higher in protein and lower in sugar compared to its regular counterpart. Greek yogurt is perfect for those looking to add a satisfying punch of protein to their breakfast or snacks, and it serves as an excellent base for smoothies, dressings, and dips.

**Regular Yogurt**, on the other hand, offers a smoother, more liquid consistency. This type of yogurt is versatile and can be enjoyed on its own, used in recipes, or incorporated into baked goods. Regular yogurt retains more of the whey, which contributes to a tangier flavor and a creamier mouthfeel. It’s a fantastic choice for anyone who enjoys a lighter, less concentrated yogurt experience.

Beyond these two, there are a plethora of yogurt varieties to explore. **Skyr**, an Icelandic specialty, is similar to Greek yogurt but is typically even thicker and has a slightly milder flavor, making it a fantastic option for those who prefer a less tangy taste. Then there’s **Kefir**, a fermented drinkable yogurt that’s packed with probiotics, offering a refreshing twist with a slightly fizzy texture that’s perfect for those hot summer days.

You can also experiment with **flavored yogurts**, which come in an array of fruit and spice combinations, or try your hand at **non-dairy options** made from almond, coconut, or soy milk, perfect for lactose-intolerant individuals or those following a vegan diet. Each variety presents a unique opportunity to explore different culinary landscapes, allowing you to customize your yogurt creations to suit your cravings and dietary needs.

So, whether you’re stirring in fresh fruits, drizzling honey, or creating savory sauces, understanding the nuances of yogurt varieties will elevate your homemade yogurt experience. Embrace the creaminess, and unlock a world of flavor possibilities right in your kitchen!

15. Conclusion: Enjoying Your Homemade Creation!

As we reach the end of our yogurt-making journey, it’s time to celebrate and savor the fruits of your labor. There’s something undeniably satisfying about creating your own yogurt from scratch—transforming simple ingredients into a delicious, creamy indulgence that’s tailored to your taste. Whether you’ve opted for a tangy Greek yogurt or a smooth, luscious regular variety, the satisfaction of enjoying a homemade creation is truly unparalleled.

Once your yogurt has set and chilled, the fun really begins! Picture opening your refrigerator to find a jar brimming with velvety yogurt, ready to elevate your breakfasts, snacks, and desserts. The versatility of homemade yogurt is one of its greatest charms. Enjoy it plain, drizzled with honey, or topped with your favorite fresh fruits and nuts for a wholesome breakfast. Blend it into smoothies for a protein boost, or use it as a base for dips and dressings that can transform your meals into culinary delights.

Don’t forget about the health benefits! Homemade yogurt is probiotic-rich, promoting gut health and immunity. Plus, you have complete control over the ingredients, ensuring there are no additives or preservatives—just pure, wholesome goodness.

As you embark on this delicious journey, remember that practice makes perfect. Each batch may inspire you to experiment with flavors, textures, and toppings, turning yogurt-making into a delightful ritual. So, roll up your sleeves, unleash your creativity, and enjoy each spoonful of your homemade yogurt. Taste the difference, and let your culinary creations become a staple in your kitchen. Cheers to your delicious homemade yogurt adventure!

In conclusion, making homemade yogurt is not only a rewarding culinary adventure but also a delicious way to enjoy a creamy, nutritious treat tailored to your taste. By following the tips and methods outlined in our blog, you can unlock the secrets to creating the perfect batch of yogurt that is rich in flavor and probiotics. Whether you prefer it plain, sweetened, or flavored with fruits and spices, the possibilities are endless. So gather your ingredients, embrace your inner chef, and start experimenting with different cultures and techniques. Before you know it, you’ll be savoring the delightful taste and health benefits of your very own homemade yogurt. Happy yogurt-making!

What are the best ways to make homemade ice cream?

As the sun blazes and temperatures rise, nothing quite compares to the joy of indulging in a bowl of creamy, homemade ice cream.

There’s a certain magic in the process—transforming simple ingredients like fresh cream, sugar, and your favorite flavors into a delightful frozen treat that cools you down and brings a smile to your face. Whether you’re craving classic vanilla, adventurous salted caramel, or fruity sorbet, making ice cream at home allows you to customize every scoop to your liking. In this ultimate guide, we’ll take you through the essentials of homemade ice cream-making, from choosing the right tools and ingredients to mastering churn techniques and creative flavor combinations. Get ready to chill out and learn how you can turn your kitchen into an ice cream parlor, perfect for hot summer days or any occasion that calls for a sweet, creamy escape!

1. Introduction to Homemade Ice Cream

What are the best ways to make homemade ice cream?
Credit : whatcanu.com

There’s something undeniably magical about ice cream. The creamy texture, the delightful flavors, and the sheer joy of indulging in a scoop (or two) on a hot summer day can bring a smile to anyone’s face. But have you ever considered taking that joy to the next level by making your own homemade ice cream? This guide will take you on a delicious journey into the world of crafting your very own frozen treats, right from the comfort of your kitchen.

Homemade ice cream isn’t just a nostalgic nod to childhood summers; it’s an opportunity to unleash your creativity and tailor flavors to suit your taste buds. Imagine swirling together your favorite ingredients—be it rich chocolate, fresh fruits, or even unexpected spices. The best part? You have complete control over the quality and freshness of every component that goes into your ice cream. No preservatives, no artificial flavors, just pure, decadent goodness.

In this ultimate guide, we’ll explore the basics of ice cream making, from selecting the right equipment to understanding the science behind the freezing process. Whether you’re a seasoned home chef or a curious beginner, you’ll find tips and techniques to create ice cream that rivals even the most beloved parlors. So grab an ice cream maker (or a trusty blender), gather your ingredients, and get ready to chill out with the ultimate homemade ice cream experience!

2. The Benefits of Making Ice Cream at Home

Making ice cream at home is not just a delightful culinary endeavor; it also comes with a plethora of benefits that can elevate your experience beyond what you’d find in a store-bought pint.

First and foremost, there’s the sheer joy of customization. When you make your own ice cream, you have complete control over the ingredients. This means you can craft flavors that cater to your specific tastes, whether that’s a classic vanilla bean, a rich chocolate fudge, or an adventurous lavender honey. You can experiment with mix-ins like fresh fruits, nuts, or even swirls of caramel and fudge, allowing you to create truly unique concoctions that tantalize your taste buds.

Health-conscious individuals will appreciate the ability to choose wholesome ingredients. Homemade ice cream can be made with organic dairy, natural sweeteners, and fresh, seasonal produce, allowing you to indulge guilt-free. You can even explore dairy-free alternatives using coconut milk, almond milk, or cashew cream, making it an inclusive treat for those with dietary restrictions.

Additionally, making ice cream at home fosters creativity and brings a sense of accomplishment. The process can be a fun activity for the whole family, turning a warm afternoon into a memorable experience. Whether you’re hosting a gathering or simply enjoying a quiet evening, the satisfaction of scooping out a bowl of your own creation adds a personal touch that store-bought options simply cannot match.

Finally, there’s an undeniable charm in sharing your homemade ice cream with friends and family. It can become a centerpiece for gatherings, a thoughtful gift, or a delightful treat on a hot summer day. So, not only do you get to enjoy a delicious dessert, but you also create lasting memories that are just as sweet as the ice cream itself. Embrace the joy of making ice cream at home, and discover how it can be so much more than just a treat—it’s an experience!

3. Essential Tools and Equipment for Ice Cream Making

What are the best ways to make homemade ice cream?
Credit : whatcanu.com

Creating your own homemade ice cream can be a delightful adventure, but having the right tools and equipment is essential to achieving that perfect creamy texture and flavor. Here’s a rundown of the must-have items that will elevate your ice cream-making experience:

1. **Ice Cream Maker**: At the heart of your homemade ice cream journey is the ice cream maker. While there are several types available—manual, electric, and compressor models—electric ice cream makers are often the most user-friendly for beginners. They come with built-in freezing mechanisms that take the guesswork out of the process, allowing you to churn your mixture to perfection without the hassle of ice and salt.

2. **Mixing Bowls**: A set of mixing bowls is essential for combining your ingredients. Opt for a variety of sizes, preferably stainless steel or glass, as they are durable and easy to clean. A larger bowl is perfect for mixing your cream and sugar, while smaller bowls can be used for incorporating flavorings or toppings.

3. **Whisk and Spatula**: A sturdy whisk will help you blend your base smoothly, ensuring that the sugar dissolves completely and the ingredients are well incorporated. A silicone spatula is perfect for scraping down the sides of your bowls and transferring your mixture into the ice cream maker with minimal mess.

4. **Measuring Cups and Spoons**: Accurate measurements are crucial in ice cream making. Invest in a set of measuring cups and spoons to ensure you get the ratios of cream, milk, sugar, and flavorings just right. Precision can make a significant difference in the final taste and texture of your ice cream.

5. **Thermometer**: If you’re making a custard base, a food thermometer is invaluable for ensuring that your mixture reaches the correct temperature without overheating. This step is crucial for achieving the perfect custard consistency and preventing scrambled eggs in your ice cream!

6. **Storage Containers**: Once your ice cream is churned to creamy perfection, you’ll need suitable containers to store it. Airtight plastic or glass containers work well, as they help retain freshness and prevent freezer burn. Consider using containers with wide openings for easy scooping!

7. **Ice Cream Scoop**: Finally, don’t forget a high-quality ice cream scoop. A sturdy scoop allows you to serve your homemade creation with ease, ensuring that every bowl is a generous, perfectly rounded portion.

With these essential tools and equipment in your arsenal, you’ll be well on your way to crafting delicious homemade ice cream that rivals your favorite shop. Get ready to experiment with flavors, create scrumptious toppings, and enjoy the sweet rewards of your labor!

4. Choosing the Right Ingredients: Dairy, Sweeteners, and Flavorings

When it comes to crafting the perfect homemade ice cream, the choice of ingredients plays a pivotal role in achieving that creamy, dreamy texture and flavor explosion that keeps everyone coming back for more. Let’s dive into the essential components: dairy, sweeteners, and flavorings.

**Dairy**: The foundation of any great ice cream starts with high-quality dairy. Whole milk and heavy cream are the stars of the show, providing the rich, velvety mouthfeel that we associate with premium ice cream. If you’re looking for a lighter option, you can also experiment with half-and-half or even non-dairy alternatives like coconut cream or almond milk. Just be mindful that non-dairy bases may yield a different texture and flavor profile. For a delicious twist, consider adding a splash of buttermilk or sour cream to enhance the creaminess and introduce a subtle tang.

**Sweeteners**: The sweetener you choose can significantly impact not just the flavor but also the texture of your ice cream. Traditional granulated sugar is the most common choice, providing a classic sweetness that balances the richness of the dairy. However, you might want to explore alternatives like honey, maple syrup, or agave nectar for a unique twist. Remember that liquid sweeteners may require adjustments to your cream base to maintain the right consistency, so don’t hesitate to experiment! For a sugar-free option, consider using erythritol or stevia, but keep in mind that some sugar substitutes can create a different mouthfeel and may not freeze as smoothly as traditional sugar.

**Flavorings**: This is where your creativity can really shine! Whether you’re opting for classic vanilla, decadent chocolate, or fruity strawberry, the key is to select high-quality flavorings. Pure extracts, like vanilla or almond, will elevate your ice cream to a whole new level, while fresh fruits can add a vibrant burst of flavor. If you’re feeling adventurous, try infusing your cream with herbs like basil or mint, or add spices like cinnamon or nutmeg for a unique flavor profile. Don’t forget about mix-ins—think chocolate chips, nuts, or cookie pieces—that can add both texture and surprise to every delightful scoop.

In summary, the right combination of dairy, sweeteners, and flavorings can transform your homemade ice cream from simple to sensational. So gather your ingredients, unleash your inner ice cream artisan, and get ready to savor the deliciousness of your creations!

5. Base Types: Custard vs. Philadelphia Style

What are the best ways to make homemade ice cream?
Credit : whatcanu.com

When it comes to making homemade ice cream, one of the most crucial decisions you’ll encounter is choosing the right base. The two primary styles of ice cream bases are custard and Philadelphia style, each offering distinct flavors and textures that can elevate your frozen treat to new heights.

**Custard Style Ice Cream** is rich, creamy, and indulgent. Made with egg yolks, this base requires a careful cooking process to create a smooth custard before chilling. The addition of egg yolks not only gives the ice cream a luxurious texture but also enhances the overall flavor profile, creating a velvety experience with every spoonful. The custard base is often cooked gently over a double boiler, allowing the eggs to thicken without scrambling. Once cooled, it’s combined with cream, milk, and sugar, resulting in a decadent ice cream that is perfect for those who appreciate a more complex flavor.

On the other hand, **Philadelphia Style Ice Cream** is the simpler, no-cook alternative, making it a favorite among home ice cream makers seeking a quick and straightforward approach. This style relies primarily on heavy cream and milk, with no eggs involved, which allows for a lighter, fresher taste. The absence of eggs means you skip the time-consuming step of cooking the custard, making it an excellent option for those who want to whip up a batch of ice cream on a whim. Philadelphia style ice cream is particularly well-suited for bold flavors, as the creaminess showcases the ingredients beautifully without the rich undertones of eggs.

Ultimately, the choice between custard and Philadelphia style comes down to personal preference. If you’re in the mood for something luxurious and rich, go for the custard base. But if you’re craving a light, refreshing treat that highlights the flavors of your favorite mix-ins, Philadelphia style is the way to go. Whichever you choose, both styles promise to deliver delicious homemade ice cream that’s sure to impress family and friends alike!

6. Step-by-Step Guide to Making Ice Cream from Scratch

Making ice cream from scratch is a delightful and rewarding experience that allows you to indulge in creamy, dreamy flavors tailored to your preferences. Here’s a simple, step-by-step guide to creating your own ice cream masterpiece:

**Step 1: Gather Your Ingredients**
To kick off your ice cream adventure, collect the essential ingredients: heavy cream, whole milk, granulated sugar, and vanilla extract. For a basic vanilla ice cream, you’ll want about 2 cups of heavy cream, 1 cup of whole milk, and 3/4 cup of sugar. Don’t forget to grab your favorite mix-ins like chocolate chips, fruit, or nuts for that personal touch!

**Step 2: Prepare the Base**
In a medium mixing bowl, whisk together the sugar and whole milk until the sugar is completely dissolved. This will ensure a smooth texture without any gritty surprises. Once mixed, gently fold in the heavy cream and vanilla extract. The mixture should be rich and velvety, setting the stage for your creamy creation.

**Step 3: Chill the Mixture**
To enhance the flavor and improve the final texture, refrigerate the ice cream base for at least 1-2 hours. This step helps the ingredients meld together while cooling the mixture, making it easier to churn later.

**Step 4: Churn Your Ice Cream**
Once your base is chilled, it’s time to churn! If you have an ice cream maker, pour the mixture into the machine and churn according to the manufacturer’s instructions, usually around 20-30 minutes. If you don’t have a machine, you can pour the mixture into a shallow dish and place it in the freezer, stirring vigorously every 30 minutes for about 3-4 hours until it reaches a soft-serve consistency.

**Step 5: Add Mix-Ins**
During the last few minutes of churning (or just before your ice cream sets in the freezer), fold in any mix-ins you desire. Think chocolate chunks, cookie crumbles, or fresh berries. This is where you can get creative, adding your favorite flavors and textures.

**Step 6: Freeze Until Firm**
Once you’ve achieved the desired consistency and added your mix-ins, transfer your ice cream to an airtight container and freeze for at least 4 hours, or until it’s hard enough to scoop. This final freeze will give your ice cream that perfect, scoopable texture.

**Step 7: Serve and Enjoy**
After patiently waiting, your homemade ice cream is ready to be served! Scoop it into bowls or cones, and consider topping it with sprinkles, syrups, or whipped cream. Enjoy the fruits of your labor with friends and family, or keep it all to yourself—after all, you deserve it!

By following these simple steps, you’ll be well on your way to mastering the art of homemade ice cream, treating yourself and your loved ones to a sweet, personalized delight that’s sure to impress!

7. Flavor Ideas: Classic, Unique, and Seasonal Variations

What are the best ways to make homemade ice cream?
Credit : whatcanu.com

When it comes to homemade ice cream, the flavor possibilities are as vast as your imagination. Whether you’re a fan of timeless classics or adventurous enough to explore seasonal and unique concoctions, there’s a flavor waiting to tantalize your taste buds.

**Classic Flavors**
Start with the tried-and-true favorites that have stood the test of time. Vanilla, chocolate, and strawberry are the holy trinity of ice cream flavors. Vanilla serves as a blank canvas, allowing you to add a variety of mix-ins like chocolate chips, cookie dough, or fresh fruit. Chocolate lovers can indulge in rich, creamy chocolate ice cream, perhaps swirled with fudge for added decadence. Meanwhile, strawberry ice cream, made with ripe, juicy berries, provides a refreshing and fruity experience that’s perfect for summer.

**Unique Flavors**
If you’re feeling adventurous, why not venture into the realm of unique and unexpected flavors? Consider experimenting with flavors like lavender honey, where the floral notes of lavender beautifully complement the sweetness of honey. Or try a spicy chocolate ice cream infused with a hint of chili for a surprising kick. For a taste of the tropics, coconut lime could transport you straight to a beachside paradise, while matcha green tea offers a delightful earthy flavor that’s both refreshing and invigorating.

**Seasonal Variations**
Embrace the changing seasons by incorporating seasonal ingredients into your ice cream creations. In the spring, consider a fresh mint chocolate chip, with vibrant green mint leaves blended into a creamy base. Summer calls for refreshing fruit flavors like peach or raspberry, using peak-season produce for an unbeatable taste. As autumn approaches, why not whip up a pumpkin spice ice cream, rich with the warm spices of cinnamon and nutmeg? Finally, during the winter months, indulge in a cozy eggnog ice cream, perfect for holiday gatherings and chilly nights.

No matter which direction you choose, the beauty of making homemade ice cream lies in the ability to customize and experiment. So grab your ingredients, unleash your creativity, and get ready to delight in the endless world of flavors that await you!

8. Tips for Achieving the Perfect Texture

Achieving the perfect texture in homemade ice cream is an art that combines science, technique, and a little bit of love. The texture of your ice cream can make or break the experience, transforming a simple scoop into a creamy delight that melts beautifully in your mouth. Here are some essential tips to help you create that coveted silky-smooth texture.

First and foremost, start with a base that has the right balance of fat and sugar. Higher fat content, usually from heavy cream, not only enhances the flavor but also contributes to a richer texture. Aim for a base that contains at least 10-20% fat, as this will help create that luscious creaminess we all adore. Sugar also plays a crucial role; it lowers the freezing point of the mixture, allowing the ice cream to remain softer and easier to scoop after freezing.

Next, don’t underestimate the power of proper chilling. Before churning your mixture, ensure that it is thoroughly chilled in the refrigerator for several hours. This step not only accelerates the churning process but also helps incorporate air into the mixture, creating a light and fluffy texture. For best results, chill your base to at least 40°F (4°C) before pouring it into the ice cream maker.

When it’s time to churn, keep your ice cream maker bowl as cold as possible. If you’re using a bowl that requires pre-freezing, make sure to freeze it for at least 24 hours. The colder the bowl, the quicker the mixture will freeze, which helps minimize ice crystal formation. This results in a smoother texture, so don’t rush this crucial step!

Another tip is to avoid over-churning. While it may be tempting to let your ice cream maker run indefinitely, doing so can lead to a grainy texture as too much air is incorporated. Keep an eye on the consistency and stop churning once you see a soft-serve texture. After churning, transfer your ice cream to an airtight container and freeze it for a few hours to achieve the ideal scoopable consistency.

Finally, consider adding stabilizers to your mixture. Ingredients like cornstarch or gelatin can help improve the texture by preventing ice crystals from forming during the freezing process. These are especially helpful if you plan to store your ice cream for an extended period.

With these tips in your toolkit, you’ll be well on your way to creating homemade ice cream that’s not just delicious, but also boasts the perfect texture that will have your friends and family coming back for more. So grab your ice cream maker and start experimenting—you’re in for a real treat!

9. Add-ins and Mix-ins: Get Creative with Your Ice Cream

When it comes to homemade ice cream, the possibilities for add-ins and mix-ins are virtually endless, and this is where your creativity can truly shine. Imagine scooping into a velvety base of vanilla bean ice cream, only to discover delightful surprises hidden within. From classic favorites to adventurous twists, the right mix-ins can elevate your homemade concoction from ordinary to extraordinary.

Start with the classics: chunks of rich chocolate, ribbons of caramel, or a generous handful of crunchy nuts can all add texture and flavor. But why stop there? Consider mixing in crushed cookies for a delightful cookie dough flavor, or swirl in some fruit preserves for a refreshing tartness that complements the creaminess of the ice cream. Fresh fruit such as strawberries, blueberries, or bananas can infuse natural sweetness and vibrant color, while also providing a burst of freshness in every bite.

For those who love a bit of crunch, think about incorporating granola or toasted coconut flakes, which not only add a satisfying texture but also a unique flavor profile. If you’re feeling particularly adventurous, try adding spicy elements like crushed chili peppers or ginger, or even savory touches like a sprinkle of sea salt to enhance the sweetness.

Don’t forget about the fun toppings! After churning your ice cream, why not serve it with an array of toppings that guests can customize themselves? A DIY sundae bar with whipped cream, sprinkles, and various syrups can turn your ice cream experience into a party, delighting both kids and adults alike.

No matter how you choose to get creative, remember that the heart of homemade ice cream is all about personal expression. So, grab your favorite add-ins and mix-ins, and let your imagination run wild—after all, the best ice cream is the one that reflects your unique taste!

10. Storing Homemade Ice Cream: Best Practices

Storing homemade ice cream properly is key to preserving its creamy texture and delightful flavor. After all the effort you’ve put into creating that perfect batch, you want to ensure it remains as delicious as the day it was made. Here are some best practices to keep your ice cream in top shape.

First and foremost, choose the right container. Opt for an airtight, freezer-safe container that’s made of plastic or metal, as glass can crack under extreme cold. A shallow container is ideal, as it allows for faster freezing and easier scooping. If you have a larger batch, consider dividing it into smaller portions. This way, every time you open the freezer, you’re not exposing the entire batch to warmer air, which can lead to ice crystals forming—a texture enemy for your homemade creation.

When packing your ice cream into the container, leave just a little bit of space at the top to allow for expansion as it freezes. Then, press a piece of parchment paper directly onto the surface of the ice cream before sealing the container. This additional layer acts as a barrier against air, helping to lock in that velvety smoothness you worked so hard to achieve.

Next, store your ice cream in the coldest part of the freezer, ideally the back, rather than the door. The door tends to fluctuate in temperature every time it opens, which can affect the consistency of your ice cream. Aim to keep your freezer at a steady 0°F (-18°C) or lower to maintain the best texture.

Finally, remember to consume your homemade ice cream within a month for optimal flavor and quality. While it may last longer, the longer it sits in the freezer, the more likely it is to succumb to freezer burn or lose that fresh taste. So, gather your friends and family and invite them over for an ice cream party—after all, nothing is quite as delightful as sharing your homemade treat! With these best practices, your homemade ice cream will remain a delightful indulgence, ready to enjoy whenever the craving strikes.

11. Common Mistakes to Avoid When Making Ice Cream

Making homemade ice cream can be a delightful and rewarding experience, but it’s easy to stumble over a few common pitfalls that could turn your creamy dreams into icy disappointments. Here’s a rundown of mistakes to avoid, ensuring that each batch is a success.

**1. Skipping the Pre-Chill Step:** One of the most crucial steps in making ice cream is pre-chilling your ice cream maker’s bowl. If the bowl isn’t cold enough, your mixture won’t freeze properly, leading to a soupy texture rather than the smooth, creamy consistency you desire. Always ensure you’ve placed the bowl in the freezer for at least 24 hours before use.

**2. Not Tempering Eggs:** If your recipe calls for eggs, make sure to temper them before adding them to your mixture. Quickly whisking the eggs with a small amount of hot cream prevents them from scrambling and ensures a silky texture. This step is vital for custard-based ice creams, so don’t skip it!

**3. Using Too Much Sugar:** While sweetness is essential, overdoing it can lead to an overly soft ice cream that doesn’t freeze well. Sugar lowers the freezing point of your mixture, so balance is key. Follow your recipe closely, and consider tasting along the way to hit that sweet spot without going overboard.

**4. Forgetting to Strain:** If your recipe includes a custard base, always strain it after cooking. This removes any potential egg bits and ensures a perfectly smooth texture. You want your ice cream to be a luxurious treat, free of any unwanted crunch.

**5. Ignoring Flavor Balance:** When adding flavors like vanilla, chocolate, or fruit purees, be mindful of your ratios. Too much flavoring can overpower the overall taste, while too little may leave your ice cream bland. Start with smaller amounts, tasting as you go, to create a well-rounded profile.

**6. Overchurning:** While it may be tempting to keep the mixture churning until it’s super thick, overchurning can lead to icy crystals forming. Once your ice cream reaches a soft-serve consistency, it’s time to stop and transfer it to a container for freezing.

**7. Skipping the Freeze Time:** After churning, it’s essential to let your ice cream set in the freezer for at least a few hours before serving. This additional freezing time allows flavors to meld and the texture to firm up, resulting in a more enjoyable scoop.

By avoiding these common mistakes, you’ll be well on your way to crafting delicious, homemade ice cream that rivals the best scoop shops. Whether you’re experimenting with traditional flavors or getting creative with unique combinations, following these tips will help ensure your frozen treats are nothing short of perfection.

12. Dairy-Free and Vegan Ice Cream Options

As the demand for inclusive dessert options continues to rise, crafting delicious dairy-free and vegan ice cream has never been more rewarding. Whether you’re lactose intolerant, following a vegan lifestyle, or simply looking to explore new flavors and textures, there are countless ways to create creamy and satisfying frozen treats without traditional dairy.

Start with a base that’s rich and flavorful. Coconut milk is a popular choice thanks to its luscious consistency and subtle sweetness, making it an ideal canvas for a variety of flavors. Almond milk and cashew milk are also excellent alternatives, imparting their unique nutty notes to your ice cream. For a thicker, creamier texture, consider using silken tofu, which blends smoothly and provides a protein boost, or opt for a blend of nut butters for added richness.

When it comes to sweeteners, the options are plentiful. Agave nectar, maple syrup, and coconut sugar can infuse your ice cream with natural sweetness, while dates or bananas can provide a whole-food option that also contributes to creaminess. Experiment with different sweeteners to find the perfect balance for your palate.

Flavors are where the fun truly begins! From classic vanilla to decadent chocolate, and adventurous combinations like matcha green tea or lavender, the possibilities are endless. Don’t shy away from adding mix-ins like chopped nuts, dairy-free chocolate chips, or chunks of fresh fruit to elevate the texture and taste of your creations.

To make your process even easier, consider using an ice cream maker, which can help achieve that desired smoothness and prevent ice crystals from forming. If you don’t have one, fear not! Simply pour your mixture into a shallow dish and stir every 30 minutes as it freezes to achieve a still creamy texture.

With these dairy-free and vegan options, you can indulge in homemade ice cream that caters to everyone’s dietary needs while tantalizing their taste buds. So gather your ingredients, unleash your creativity, and get ready to enjoy guilt-free frozen delights that are sure to impress family and friends alike!

13. Fun Serving Ideas and Presentation Tips

When it comes to homemade ice cream, the experience isn’t just about the taste—it’s also about how you serve it! Elevating the presentation of your frozen creations can add a dash of excitement to any gathering and make your homemade treats even more memorable. Here are some fun serving ideas and presentation tips that will impress your family and friends.

**1. Colorful Bowls and Unique Cones:** Start by selecting vibrant bowls or quirky ice cream cones to serve your creations. Opt for rainbow-hued cups, vintage glassware, or even edible waffle bowls for a delightful twist. The right container can turn even the simplest scoop into a visual masterpiece.

**2. Layered Sundaes:** Layering your ice cream can create a stunning presentation. Start with a scoop of one flavor, drizzle some sauce (think chocolate, caramel, or fruit compote), and then add another scoop of a different flavor. Top it off with whipped cream, sprinkles, and a cherry for that classic sundae look.

**3. Garnish with Fresh Ingredients:** Fresh fruits can provide a burst of color and flavor. Consider garnishing your ice cream with slices of strawberries, blueberries, or kiwi. Fresh mint leaves can also add a pop of green that brightens up your dish.

**4. Creative Toppings Bar:** Set up a toppings bar at your next gathering, where guests can customize their own sundaes or cones. Include a variety of toppings such as crushed cookies, nuts, mini marshmallows, and a selection of syrups. This interactive approach not only makes serving fun but also lets everyone tailor their dessert to their liking.

**5. Ice Cream Sandwiches:** For a playful twist, create ice cream sandwiches using cookies, brownies, or even donuts. Roll the edges in sprinkles or nuts for an added surprise. These handheld treats are not only delicious but also make for great photo opportunities!

**6. Themed Presentation:** If you’re hosting a themed party, align your ice cream presentation accordingly. For a beach party, serve ice cream in coconut shells topped with crushed graham crackers to mimic sand. For a movie night, use popcorn boxes filled with scoops of ice cream, complete with a drizzle of chocolate sauce for a fun and unexpected treat.

**7. Freeze and Serve:** For a dramatic effect, freeze your serving plates or bowls before serving. The condensation that forms will give your dessert a frosty, inviting look, while also keeping your ice cream from melting too quickly.

Remember, the key to a delightful ice cream presentation is to let your creativity shine. Each scoop of your homemade ice cream is a blank canvas waiting for your artistic touch. With these fun serving ideas and presentation tips, you’ll be ready to create an unforgettable dessert experience that will leave everyone craving more!

14. Hosting an Ice Cream Party: Themes and Recipes

Hosting an ice cream party is a delightful way to gather friends and family while indulging in everyone’s favorite frozen treat. The beauty of an ice cream party lies in its versatility; it can be as simple or as extravagant as you’d like, and the themes can be tailored to suit any occasion. Here are some fun ideas to get you started, along with delicious recipe suggestions that will make your ice cream party unforgettable.

**Themed Parties:**
1. **Classic Sundae Bar:** Set up a stunning sundae bar with a variety of ice cream flavors like vanilla, chocolate, and strawberry. Offer an array of toppings, from hot fudge and caramel sauce to sprinkles, crushed cookies, and fresh fruits. Provide fun bowls and spoons, and let guests create their own masterpiece while mingling.

2. **Tropical Luau:** Transport your guests to a tropical paradise with flavors inspired by the islands. Think coconut, pineapple, and mango ice creams. Pair these with toppings like toasted coconut flakes, macadamia nuts, and rum-infused fruit compote. Decorate with Hawaiian leis and play some upbeat island music to enhance the vibe.

3. **Decadent Chocolate Affair:** For the chocolate lovers, host a chocolate-themed party with rich chocolate ice cream as the star. Experiment with different recipes—dark chocolate, white chocolate raspberry, or even chocolate brownie ice cream. Add toppings like chocolate shavings, brownie bites, and chocolate syrup for an indulgent experience.

4. **Seasonal Flavors:** Celebrate the seasons by featuring flavors that reflect the time of year. In summer, go for refreshing mint chocolate chip and strawberry basil. In fall, pumpkin spice and apple pie ice cream can capture the essence of autumn. Create seasonal decor to complement the flavors and make the event feel special.

**Recipe Inspiration:**
– **No-Churn Vanilla Ice Cream:** Simple to prepare, this recipe requires just heavy cream, sweetened condensed milk, and vanilla extract. Mix and freeze for a creamy, dreamy treat that can serve as a base for countless toppings.

– **Strawberry Sorbet:** Perfect for a refreshing dessert, this sorbet combines fresh strawberries, sugar, and a touch of lemon juice. Blend until smooth, freeze, and serve for a light, fruity option that everyone will love.

– **Chocolate Chip Cookie Dough Ice Cream:** Who doesn’t love cookie dough? Make a classic vanilla ice cream base and mix in chunks of cookie dough for a nostalgic twist that brings back childhood memories.

– **Dairy-Free Coconut Ice Cream:** For guests with dietary restrictions, whip up a coconut milk-based ice cream. Infuse it with vanilla and throw in some shredded coconut for added texture.

As you plan your ice cream party, don’t forget the essential elements—fun activities like ice cream-making contests or tasting games can keep the energy high. Provide comfortable seating and perhaps even a photo booth with fun props to capture the sweet memories. With delicious flavors, creative themes, and a festive atmosphere, your ice cream party is sure to be a hit, leaving your guests with smiles and satisfied taste buds!

15. Conclusion: Enjoying Your Homemade Creations

As you reach the end of this delightful journey into the world of homemade ice cream, it’s time to savor the fruits of your labor. There’s something incredibly satisfying about crafting your own frozen treats—it’s not just about the creamy, dreamy flavors but also the joy of sharing these creations with family and friends.

Imagine opening your freezer to find a colorful array of ice cream tubs, each representing a different flavor you’ve expertly concocted. From classic vanilla bean to adventurous lavender honey or rich chocolate fudge, the choices are as limitless as your imagination. The moment you scoop that first serving, the silky texture and vibrant taste remind you of the care and creativity that went into each batch.

But the enjoyment doesn’t stop there. Picture a sunny afternoon, the laughter of loved ones filling the air as they gather around a bowl of your homemade ice cream. Whether it’s a simple scoop served in a cone or an extravagant sundae topped with whipped cream, sprinkles, and cherries, each bite is a celebration of your culinary skills. You’ll find that your creations spark conversation, evoke memories, and create new experiences, making every scoop a cherished moment.

So, as you conclude your ice cream-making adventure, remember that the real reward lies not just in the creamy delights you’ve made but in the smiles and laughter they bring. Embrace the messiness of experimentation, keep refining your flavors, and most importantly, enjoy every delicious moment of your homemade creations. After all, the joy of ice cream is best when shared!

As we wrap up our ultimate guide to making homemade ice cream, we hope you’re feeling inspired to unleash your inner ice cream artisan and create delightful frozen treats that will impress family and friends alike. With the simple techniques and creative flavor ideas we’ve shared, you now have the tools to craft everything from classic vanilla to adventurous combinations that tickle the taste buds. So, gather your ingredients, fire up that ice cream maker, and embark on a delicious journey that not only cools you down but also warms your heart with the joy of homemade goodness. Don’t forget to share your delicious creations with us—tag us on social media and let the world see your frozen masterpieces! Enjoy every scoop!

How to make your voice deeper ?

If you’re a man looking to deepen your voice, there are a few simple steps you can take to achieve a more commanding and authoritative tone.

While some men are naturally blessed with deep voices, others may need to work on their vocal technique. Here are some tips for making your voice deeper.

Deep voice
Credit : ChrisGoldNY
  1. Relax your throat muscles. When you’re speaking, try to relax your throat muscles as much as possible. Tensing up your throat can make your voice sound higher and less authoritative. To relax your throat, take deep breaths and try to speak slowly and evenly.
  2. Use a lower pitch. To make your voice sound deeper, you need to speak at a lower pitch. This means lowering the pitch as you speak, rather than simply speaking in a monotone. To practice speaking at a lower pitch, try saying the same sentence in a few different pitches and see which one sounds the deepest.
  3. Speak from your diaphragm. Another key to achieving a deeper voice is to speak from your diaphragm, rather than just using your throat muscles. Your diaphragm is a large muscle located just below your rib cage, and it’s responsible for helping you breathe and control the volume of your voice. To speak from your diaphragm, try taking deep breaths and engaging your abdominal muscles as you speak.
  4. Use a microphone. If you’re a singer or a public speaker, using a microphone can help you achieve a deeper voice. When you speak into a microphone, the microphone amplifies your voice and makes it sound louder and more powerful. This can help you achieve a deeper, more commanding tone.
  5. Practice vocal exercises. There are many vocal exercises you can do to improve your vocal technique and make your voice sound deeper. For example, you can try humming or singing a low note and then gradually increasing the pitch. You can also try speaking in different pitches and experimenting with different vocal techniques to see what works best for you.

In conclusion, making your voice deeper is all about relaxation, pitch, and technique. By relaxing your throat muscles, speaking at a lower pitch, and using your diaphragm, you can achieve a deeper, more commanding tone. Then, with practice and dedication, you can develop your vocal skills and make your voice sound deeper and more authoritative.