
How to shoot a bow and arrow: The technical breakdown
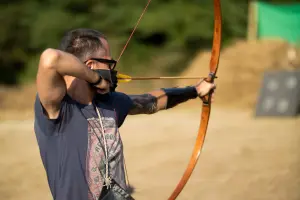
Archery is not about brute strength. It is about repeatable mechanics. Think of your body like a mechanical crane: if the frame is unstable, the load will never hit the mark. To become a consistent archer, you must master the physical sequence that leads to an accurate release every single time.
The safety protocols of a lethal sport
Before pulling a string, you must treat your bow with the same respect as a firearm. An arrow is a projectile capable of serious damage. Always ensure your backstop is rated for your bow weight. If you are shooting a 40-pound recurve, a thin hay bale will not stop your arrows safely.
- Inspect your limbs for hairline fractures before every session.
- Never dry-fire your bow. This is the equivalent of running a car engine without oil; it will cause the bow to shatter instantly.
- Keep your fingers clear of the string path until you are ready to shoot.
- Always use an arm guard to prevent string slap, which can leave deep bruises.
Establishing a rock-solid foundation
Your stance is your anchor to the ground. Stand perpendicular to the target with your feet at shoulder-width. Imagine your body is a pillar. If you lean forward or backward, you shift your center of gravity, which creates wild variations in your arrow flight.
Keep your lead arm firm but not locked. If you lock your elbow, you risk hitting it with the bowstring, causing a painful “slap.” Keep a micro-bend in the elbow to clear the path. Use the heel of your palm to push the bow away, creating steady tension against the string.
Mastering the anchor point
The anchor point is the rear sight of your bow. It is the specific spot on your face where your index finger or release aid touches every single time. A shift of just 5 millimeters at your face can translate to a 10-centimeter miss at a 20-meter target.
- Pick a consistent contact point, such as your jawbone or the corner of your mouth.
- Bring the string to your face, not your nose to the string. Maintain a tall, upright posture.
- Use a ‘kisser button’ on the string if you need a physical tactile reference point.
The engine of the shot: Back tension
Most beginners make the error of pulling with their biceps. This leads to fatigue and inconsistent aiming. Archery requires your back muscles, specifically the rhomboids located between your shoulder blades.
Think of the drawing motion as if you are trying to squeeze a walnut between your shoulder blades. When you engage these large muscles, your bow hand becomes rock steady. This process naturally leads to a cleaner, more fluid release of the arrow.
Technical performance metrics
To improve, you need to track your progress with data. Start your practice at 5 meters. Your goal is not to hit the bullseye, but to create a tight ‘group.’ A group of 5 centimeters at 5 meters is a sign of good form. Only move to 10 or 15 meters once your grouping remains consistent over 30 arrows.
If your shots are spreading horizontally, your release is likely inconsistent. If they spread vertically, your anchor point or breathing rhythm is fluctuating. Use these patterns to diagnose your form rather than guessing what went wrong.
Avoiding common execution errors
Target panic is a mental barrier where your brain forces a release before you are fully ready. It feels like a reflex you cannot control. To fix this, close your eyes while at full draw and focus solely on your back tension. Remove the pressure of hitting the center until your muscle memory takes over.
Another trap is ‘plucking’ the string. This happens when you pull your hand away from your face at the moment of release. This forces the arrow to wobble as it leaves the bow. Ensure your hand moves straight back along your jawline during the follow-through. Your hand should end up near your ear after the shot.
Practical tips for long-term success
- Keep a shooting log. Record your distance, the number of arrows fired, and your ‘group’ size.
- Do not exceed 50 arrows per session in your first month. Quality practice beats quantity every time.
- Film your side profile in slow motion. You will often see technical flaws in your elbow or follow-through that you cannot feel while shooting.
Content updated on 2026-09-03